I love my car, but over the brief 8+ months of ownership I have really taken a dislike to the JVC. I decided to do something about it after swapping out the speakers last week. After searching all threads for a solution, I came up empty. Apologies if something like this has been posted before, but here’s how I went from my JVC to a Nakamichi with ISO connections.
After extensive online research and discussing the several car stereo shops, there is no male (reverse) JVC connector that I could hook up to my iso pigtails. In addition, that would add yet another connector onto the line which I really didn’t want. I also didn’t want to chop the old room and splice into it, as I want to be able to revert the car back to stock at some point.
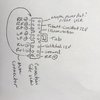
I pulled my old JVC and go looking behind the dash. Low and behold, I found a 14 pin connector that is mounted on the left side of the radio about 8 inches back and 3 inches off to the side. It is mounted on a sliding mount. I was able to push down on a tab and release the entire harness and remove it. Out came about 18 inches of wire. I was able to match that connector to a 14 pin unit designed for a Subaru, and ordered it from Amazon. I was able to find a diagram of the JVC connector and trace wires to the existing 14 pin female from the factory. I then transcribed wire position onto the new connector and fabricated a new loom using approximately 8 inches of connecting wire between the pigtails. I now have an inside the dash to ISO harness leading to a Nakamichi HU, and the result sounds great.
A couple of notes.
As seen in the pic, the lower left space in the replacement 14 pin connector is vacant, but it has a wire in the right lower posision. This is opposite the stock connector, so the wire needs to be relocated from the right to left lower position. This is done by releasing tabs to loosen the retaining plate on the back of the connector, then releasing a locking tab inside the port by pushing it with a jewellers screwdriver.
Replacement 14 pin connector wires are not color-coded properly for our car so you basically have to go by my diagram
and not by the color of wires coming from the Subaru connector.
I hope this is of help to someone.


.
After extensive online research and discussing the several car stereo shops, there is no male (reverse) JVC connector that I could hook up to my iso pigtails. In addition, that would add yet another connector onto the line which I really didn’t want. I also didn’t want to chop the old room and splice into it, as I want to be able to revert the car back to stock at some point.
I pulled my old JVC and go looking behind the dash. Low and behold, I found a 14 pin connector that is mounted on the left side of the radio about 8 inches back and 3 inches off to the side. It is mounted on a sliding mount. I was able to push down on a tab and release the entire harness and remove it. Out came about 18 inches of wire. I was able to match that connector to a 14 pin unit designed for a Subaru, and ordered it from Amazon. I was able to find a diagram of the JVC connector and trace wires to the existing 14 pin female from the factory. I then transcribed wire position onto the new connector and fabricated a new loom using approximately 8 inches of connecting wire between the pigtails. I now have an inside the dash to ISO harness leading to a Nakamichi HU, and the result sounds great.
A couple of notes.
As seen in the pic, the lower left space in the replacement 14 pin connector is vacant, but it has a wire in the right lower posision. This is opposite the stock connector, so the wire needs to be relocated from the right to left lower position. This is done by releasing tabs to loosen the retaining plate on the back of the connector, then releasing a locking tab inside the port by pushing it with a jewellers screwdriver.
Replacement 14 pin connector wires are not color-coded properly for our car so you basically have to go by my diagram
and not by the color of wires coming from the Subaru connector.
I hope this is of help to someone.


.


