Welcome to Tesla Motors Club
Discuss Tesla's Model S, Model 3, Model X, Model Y, Cybertruck, Roadster and More.
Register

3D printed lowering links

This site may earn commission on affiliate links.
I have no reference for model X standard link lengths... you'd have to measure yours when it arrives.

Measure one side on the front, and one on the rear.

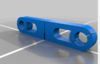
You can do this leaving them in-place on the car using calipers:
1) measure total overall length, from outside ball end to the other outside ball end, jot it down
2) measure just the ball cup outside diameter at one end of the link.. jot it down
3) subtract (2) from (1) and you'll have the on-center standard distance between those two mount points.

I don't recommend NinjaFlex for yours :p
PLA too brittle for this design and too low melting point
ABS, that's what I did mine in
Nylon or PETG might be better material choices, dying to try either of these
 
Thanks @scottm -- I fly to Tampa, Florida on Saturday, and drive home 1,200 miles over the 2 days that follow. Back in Ohio by dinner time Monday night. I'll be sure to measure the lengths as you pointed out here, once I can. I see you're in Canada, so you can likely appreciate the current weather, so it may be a week or two until I'm actually willing to crawl under the snow-covered X, haha!

I was kidding about the NinjaFlex -- though the length changing height could be fun :cool:
Had figured actually that I'd do Nylon, or PET ... I have both of those.

Are your files on Thingiverse or similar? Drop me a PM with the file links of ones you'd want printed and in what materials (Nylon, PET) and I can definitely print some to send you if you want to inspect. My Lulzbot Mini is sitting idle, might give me something to do with it anyhow!
 
I've not yet had a chance to measure my MX links @scottm but it isn in the works. Meanwhile, I have a friend with a Model S w/air that wanted to try these links. Did a test print in PLA, and now printing some clear PETG that I had laying around. Next, I'll print a set in the Nylon that I have, too. So really the PLA was just to see them in the flesh and have a set to examine--- the PETG/Nylon will be the "installation" sets for him to try to his satisfaction.

I'll report back soon. Also hope to have Model X dimensions with my digital calipers-- but its been cold and my garage isn't heated, so I haven't really felt like getting on the cold damp floor just yet. :p
 
IMG_1031.jpg IMG_1032.jpg IMG_1033.jpg IMG_1034.jpg

Here are the 3D printed pieces I've made so far. They are the 58mm/78mm set for the Model S that I printed off for a friend. I made them first in PLA just to see how they look-- those we won't use obviously as they have been noted in this thread as not being ideal for outside temps, etc.

From left to right, they are PETG (clear), Nylon (Bridge) and then the black PLA. The only PET that I had was the clear, and the only Nylon I have is the bridge. There was some slight warping with the outer edge of the Nylon materials as is typical for my non-enclosed LulzBot Mini. But overall I think they are good.

I'll hand them off to my friend and prob suggest he start with the Nylon if that works/fits to his satisfaction. The PETG would be plan-B, most likely. And when I have time I still do plan to measure the Model X stuff-- though suspect it may bet he same who knows... :)
 
  • Like
Reactions: scottm
now that more people are trying these out, it's important to remember... KEEP THE ORIGINAL LINKS

If you are getting Tesla service done that will involve a ride height recalibration (for whatever reasons... any work done with drive line, suspension, wheels)... BE SURE to put your factory links back in to the car BEFORE the service. Otherwise, your car will come back set to stock height on your "lowering" links. So you'd need to get even longer lowering links to drop the car (again), and there is a physical limit to that madness..

So just ask when you are arranging service ... "are you going to recalibrate air suspension ride height?" If it's optional, explain you have lowering links in the car and know it is intentionally lower than stock and want to keep it that way, and ask that they not recalibrate. If it is mandatory for the service they're doing, or they just insist on setting it "per spec" then put the old stock links back in before the work is done.

This goes for any kind or brand of lowering links you happen to have. If yours are adjustable, then spin 'em back to stock. If you're are fixed length (printed from this thread) then pop 'em off.
 
Putting on rear links.

It's possible to install a rear link with the sensor arm pivoted the wrong way.
If you do that the ride height will be terribly off.

Pay attention to which way the sensor arm is in relation to the link when you're talking the stock link off.
Install the new lowering link with that same angular relationship with the sensor arm.

Here pix of two ways of installing a rear link.
(A) is correct.
(B) is the wrong way.
When you're doing the job, you'll see the right way... follow that way.

Alink.jpg
Blink.jpg
 
Last edited:
  • Informative
Reactions: Superendo
You can buy artisan crafted adjustable lowering links for $500, run-of-the-mill from ebay sources for $250 or less... or make your own 3D printed in plastic (here) for pennies in material costs for all four corners. They're so cheap to print think of them as disposable.. make different lengths for different heights... print spares for stock height.. break one installing it? Print another. No big deal.

They all perform the same function of lowering the car to a more preferred height.

The main question is, what's the benefit of fixed length versus adjustable links?

And there's a sub-question, what's the difference between the adjustable types?

Adjustables are good if you want "car show" lowering for frequent special events, and then lowered (but not so dramatic) for daily driver, and want to restore factory ride height for service visits - which is needed if doing air suspension re-calibration as part of the service.

With some of the better adjustable ones you don't have to remove them to change ride height again... The 3D printed adjustable ones in this thread are like this. You can spin 'em in place (leaving both ball sockets connected to the car). This is made possible by having something like a turnbuckle in the design -- one end typically has reverse threading. (Or as in the case of the 3D printed adjustable ones in this thread, one end is free-wheeling.) These all allow what I'd call "infinitely adjustable" -- fine grain adjustments possible. So if you're OCD on stuff like this... get these.

Possibly cheaper or more poorly designed adjustable links you must pop off one end of the link's ball joint from the car to change ride height. ...then rotate that free end of the link a whole revolution... and pop it back on. The result is you can only change ride height in whole increments of one full rotation of the ball socket end. Considering what 1mm of link length does for ride height drop... this thread pitch / rotation matters. You won't get all four corners "exactly the same" height using these for any desired height.

Fixed links of various set lengths you get a certain drop for a link, and that's that. If your car has even height all the way around on stock links, then fixed links will produce an even amount of drop too. The downside of fixed links is you have to pop them off and replace them with a different link for any particular height change. Put the stock ones back on for service. Popping links on/off a lot would be cause for concern for wear / breakage... so you'd want to keep spares on hand if you had frequent change needs. But if you're a set-and-forget kind of person ... with relatively infrequent service visits ... fixed length is fine for you.

One thing I've found useful for adjustable links. My car had one corner out-of-spec for ride height. The car needed calibration from Tesla to address this. But I'm 2000 kilometers away from that. So by using adjustable links, I was able to fine tune the ride height of one corner of the car back into the same level playing field as the other corners.


Hope that helps.
 
Last edited:
  • Like
Reactions: pilotSteve
New front fixed-length lowering links have been designed and are up on thingiverse now.

The previous version had too much rigidity because of the thick plastic build-up around the ball ends.
Snapping them on and off the ball took some pretty brutal force and I found with PETG it was too easy to crack the ball end.

So now the fronts look a lot more like the rears, and these snap on and off quite nicely and have enough spring action to do this many many times without wear or fatigue cracking.

Nevermind the strange visual artifact in the middle of the link... they don't print out with that.

All previous lengths are now available in this design at this link for download.
Again, you have to multiply the size by a factor of 10x before printing.

newfront.PNG
 

Attachments

  • upload_2017-4-26_21-13-41.png
    upload_2017-4-26_21-13-41.png
    230.7 KB · Views: 484
Last edited:
I had Scott print a set of the 58/78 for me, and put them on my 2017 75D. These pics (sorry for all the shadows) are all on the low setting. I have had the links on nearly a week now. I actually drive on the low setting, and have no issues. I do go up to normal when the family is in the car though.

I tried to add a lot of angles to show the drop, camber, and clearance.
 

Attachments

  • 20180124_120142.jpg
    20180124_120142.jpg
    702.4 KB · Views: 479
  • 20180124_120208.jpg
    20180124_120208.jpg
    760.9 KB · Views: 480
  • 20180124_120222.jpg
    20180124_120222.jpg
    600.7 KB · Views: 466
  • 20180124_120251.jpg
    20180124_120251.jpg
    419.9 KB · Views: 466
  • 20180124_120304.jpg
    20180124_120304.jpg
    460 KB · Views: 455
  • 20180124_120606.jpg
    20180124_120606.jpg
    286.2 KB · Views: 478
Thanks for showing us the +8's on 21" facelifted car .. this is as low as you can go with the sets posted up on Thingiverse

Punchbuggy - Yellow ! no returns

do your kids play that game each time your neighbor pulls up? Or is that VW cancelled out forever? :)

Wow, quite the eye! They don't play punch bug, but do play "that's my car!" Though lately they just say, "Daddy's car is my car." So have isn't as fun as it used to be, haha!
 
Putting on rear links.

It's possible to install a rear link with the sensor arm pivoted the wrong way.
If you do that the ride height will be terribly off.

Pay attention to which way the sensor arm is in relation to the link when you're talking the stock link off.
Install the new lowering link with that same angular relationship with the sensor arm.

Here pix of two ways of installing a rear link.
(A) is correct.
(B) is the wrong way.
When you're doing the job, you'll see the right way... follow that way.

View attachment 223264 View attachment 223265

Thank you so much for this! Installed the evolution adjustable links last night and kept getting air suspension error and no air in rear. Just had them flipped so reinstalled them in correct position A and good to go!! Thanks again!
 
That's a good point... these links will change the height of the car, but perhaps another calibration Tesla needs to do when you change wheel sizes (in addition to setting ride height) is to set the speedometer / odometer calibration because there will be perimeter difference of the two wheel sizes.

I have both 19s and 21s and the wheel/tire diameter is nearly the same on both:

21s
Height of side wall = 245 * .35 = 85.75mm / 25.4mm = 3.376" * 2 = 6.75" of sidewall + 21" wheel = 27.75" diameter

19s
Height of sidewall = 245 *.45 = 110.25mm / 25.4mm = 4.34" * 2 = 8.68" of sidewall + 19" wheel = 27.68" diameter

Putting them side by side and measuring, there was no difference at all even though on paper there's a 0.07" or 0.25% difference which vanishes because the all season tires have just a bit more tread depth than the summer only tires.