Welcome to Tesla Motors Club
Discuss Tesla's Model S, Model 3, Model X, Model Y, Cybertruck, Roadster and More.
Register

3D Printed Rigid Hatch Stops (to reduce uneven road noise)

This site may earn commission on affiliate links.
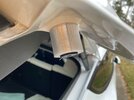
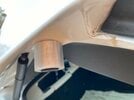
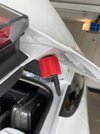
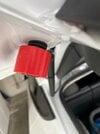
Printed these with Inland PETG+. As I suspected, my usual naughty textured pavement was still boomy. NOT as I suspected, a section of road farther from home I also use to test was eerily silent for the first time ever. So today I learned not only is not all my boom coming from the hatch, different road surfaces will actually trigger different parts of the car to resonate...
 

Attachments

  • IMG_4052.jpeg
    IMG_4052.jpeg
    255.9 KB · Views: 451
  • IMG_4051.jpeg
    IMG_4051.jpeg
    224.6 KB · Views: 334
How do you know what height to print them at? Is it the amount that rubber bumper sticks out above the plastic piece surrounding it?

Also, how much room should I leave for the rubber bumper to stick out from the rigid hatch stop? 1mm, 2mm?\

And, if anyone has a 3d printer, I'd be happy to venmo you if you could print some for me :).
 
  • Like
Reactions: Bp25
I didn't know the answers to those questions, so I printed all of them (in one job, took about 19 hours). When they were finished printing, I arranged them from tallest to shortest and checked each one on my left hatch stop until I found one where I could feel and just barely see the rubber protruding from the end, then did the same with the right stop (you can see my pictures in my previous post). I have no idea if this is the right amount of rubber sticking out, and I'm fortunate enough not to care, because I believe my hatch is already quiet enough. But if I were obsessed with squeezing out every last decibel, I would want to test each height by putting the rigidizer of that height on, then driving the vehicle over naughty pavement. Maybe then I would try to measure the frequency spectrum, too, like many here have done. I've never done that because I'm not a believer in bringing in data of questionable quality (it's from a phone, not a research grade microphone) alongside something that is inherently a subjective experience. Your mileage may vary.
 
@i
Awesome! I'd love to see an adjustable non-fragile 3d printed part that fits in the hole of the original bumper. FDM preferred! I think PETG would be pretty tough enough.
First off, thanks so much for both this and the tubing suggestion. I have a brand new model Y and incredibly frustrated, but good to know there are a few options available. I had adjusted the 4 stoppers using chalk, 3-d printed the upper two and no change in DB at the low frequencies but I probably did it wrong because of the gap in the base.

I printed at 6mm (IMG_3975) and 9mm (IMG_3974) and have a gap at the base. What am I doing wrong? Is it because both my OEM stoppers were too screwed out to begin with?
 

Attachments

  • IMG_3972.jpeg
    IMG_3972.jpeg
    56.9 KB · Views: 278
  • IMG_3973.jpeg
    IMG_3973.jpeg
    57 KB · Views: 274
  • IMG_3974.jpeg
    IMG_3974.jpeg
    52 KB · Views: 277
  • IMG_3975.jpeg
    IMG_3975.jpeg
    47.1 KB · Views: 300
Last edited:
I will caveat that I am not an expert in this. :)

Take the 3D printed hatch stop off and hold the rubber stopper in one hand while you twist the plastic OEM support all the way up against the hatch. The slide the 3D printed hatch stop over that. I believe the rubber should stick out a little bit below the 3D hatch stop. Perhaps 1-2 mm.
 
  • Like
Reactions: ajohnson23
@i

First off, thanks so much for both this and the tubing suggestion. I have a brand new model Y and incredibly frustrated, but good to know there are a few options available. I had adjusted the 4 stoppers using chalk, 3-d printed the upper two and no change in DB at the low frequencies but I probably did it wrong because of the gap in the base.

I printed at 6mm (IMG_3975) and 9mm (IMG_3974) and have a gap at the base. What am I doing wrong? Is it because both my OEM stoppers were too screwed out to begin with?
Looks like you adjusted them improperly.

The rubber stopper screws into the plastic nut and that is how you adjust the depth as you should screw this in back all the way so the plastic nut is flush against the hatch.

There should be no gap between the plastic nut and the metal of the hatch.
 
@i

First off, thanks so much for both this and the tubing suggestion. I have a brand new model Y and incredibly frustrated, but good to know there are a few options available. I had adjusted the 4 stoppers using chalk, 3-d printed the upper two and no change in DB at the low frequencies but I probably did it wrong because of the gap in the base.

I printed at 6mm (IMG_3975) and 9mm (IMG_3974) and have a gap at the base. What am I doing wrong? Is it because both my OEM stoppers were too screwed out to begin with?

Did it work after ilovecoffee's latest advice? do you mind posting a picture of your bump stop after further adjustment?

I also just got my MYP and is so frustrated!
 
Did it work after ilovecoffee's latest advice? do you mind posting a picture of your bump stop after further adjustment?

I also just got my MYP and is so frustrated!
I did but maybe because I had already lowered tire pressure and adjusted original stoppers it didn't produce a meaningful difference. The below is the same road I test out with each change. This shows the drop in decibels, a -1 is equivalent to 10% drop.
 

Attachments

  • Screen Shot 2022-04-07 at 11.04.44 AM.png
    Screen Shot 2022-04-07 at 11.04.44 AM.png
    26.7 KB · Views: 295
I'm about to give this a try... I printed one out of PLA just to see how it came out and roughly fit (as I find PETG a bit more finicky and often ends with me cleaning the nozzle after). I'll probably print both in PLA as it's cold out now, just to test them out before I finalize them in PETG.

Thanks very much for designing these and making them available!

Any others having success with this? Have a July/2022 MYP and I don't find the buffeting to be too bad personally from an ear pain/headache perspective (only sometimes on slower speed bumpy roads after a bit do I maybe detect it). What I do notice is the sound moreso going over bumps though, so hoping this helps.

I adjusted the stoppers a month ago or so which definitely helped, but not quite enough. I do notice even with them well adjusted the hatch is not that tough to cause movement on it with your hand alone - i think because i've had to adjust the stoppers out far enough, there's just so much length on the non-rigid part that it's impossible for them not to be able to compress that much. I'm really hoping this helps reduce that significantly!
 
  • Like
Reactions: PecuniaNonOlet
I'm about to give this a try... I printed one out of PLA just to see how it came out and roughly fit (as I find PETG a bit more finicky and often ends with me cleaning the nozzle after). I'll probably print both in PLA as it's cold out now, just to test them out before I finalize them in PETG.

Thanks very much for designing these and making them available!

Any others having success with this? Have a July/2022 MYP and I don't find the buffeting to be too bad personally from an ear pain/headache perspective (only sometimes on slower speed bumpy roads after a bit do I maybe detect it). What I do notice is the sound moreso going over bumps though, so hoping this helps.

I adjusted the stoppers a month ago or so which definitely helped, but not quite enough. I do notice even with them well adjusted the hatch is not that tough to cause movement on it with your hand alone - i think because i've had to adjust the stoppers out far enough, there's just so much length on the non-rigid part that it's impossible for them not to be able to compress that much. I'm really hoping this helps reduce that significantly!
Although I'm not "the others" who have printed and used it, but rather the one who made it I will say it's an easy thing to try if you've got a 3D printer ready to go.

The best most noticeable change for me was stiffening the gasket with vinyl tubing. If you think you might do that in the future you'd have to re-print these because that will require re-adjusting the hatch stops.

:cool:
 
  • Like
Reactions: PecuniaNonOlet
Hi, thanks for the suggestions. I got a dec 2022 build model Y. I inserted the 5/16 vinyl tube (one piece) but my hatch won’t close. So I think the tube is a no go for me. My hatch booming sound is not bad but I can still hear it with uneven road in low speed. High speed seems fine. I am now trying the ridge stop approach. I have asked the local shop to 3D print them for me. My top 2 stops are currently at lowest setting. They are grabbing the envelope really tie and I cannot reduce them anymore. My rubber is like 6mm. @ilovecoffee , is it possible for you to upload or send me the 5mm and 5.5mm file in case I need those. I have ask the shop to print the 6 and 6.5mm for me to try but I might need them to go lower. Thanks.
 
Hi, thanks for the suggestions. I got a dec 2022 build model Y. I inserted the 5/16 vinyl tube (one piece) but my hatch won’t close. So I think the tube is a no go for me. My hatch booming sound is not bad but I can still hear it with uneven road in low speed. High speed seems fine. I am now trying the ridge stop approach. I have asked the local shop to 3D print them for me. My top 2 stops are currently at lowest setting. They are grabbing the envelope really tie and I cannot reduce them anymore. My rubber is like 6mm. @ilovecoffee , is it possible for you to upload or send me the 5mm and 5.5mm file in case I need those. I have ask the shop to print the 6 and 6.5mm for me to try but I might need them to go lower. Thanks.

What?! Your rubber stoppers are ALL at the lowest possible setting and it's grabbing paper tightly?

That seems...not normal. Are the metal panels of the hatch door touching the metal panels of the car body when closed?

But yes I can easily make a smaller size...but something seems not right.

You can also just sand down the surface of what you have printed so far.
I see what I did wrong. I didn’t screw it in all the way. Now my rubber piece is around 7 or 8mm. Any idea why my hatch won’t close when I inserted the 5/16 tube?
 
I see what I did wrong. I didn’t screw it in all the way. Now my rubber piece is around 7 or 8mm. Any idea why my hatch won’t close when I inserted the 5/16 tube?

Well... I'm not sure. Anyone else who has said that the tubing didn't allow the hatch to close commented too soon, and after several opens and closes (or driving around with it for some time closed) allowed it to settle into place. I can't think of anyone who had to take it out because it didn't fit. 3/8" outer diameter was tricky for some, but never 5/16" outer diameter. We are talking about outer diameter, right?
 
Unfortunately, I already pull out of the tube. Even with the tube in there, the picture won’t show anything. It is inside. I can force close the hatch by hand but it just won’t close automatically. Maybe if I leave it in there longer then it will compress.
This is the tube brand. Outer 5/16. 55psi.
 

Attachments

  • 32D7C66B-1114-496B-9F1F-BA004D01326F.jpeg
    32D7C66B-1114-496B-9F1F-BA004D01326F.jpeg
    632.5 KB · Views: 178
Unfortunately, I already pull out of the tube. Even with the tube in there, the picture won’t show anything. It is inside. I can force close the hatch by hand but it just won’t close automatically. Maybe if I leave it in there longer then it will compress.
I was meaning pictures of your hatch stops and how they were adjusted. I'm curious how far in or out they are.
 
  • Like
Reactions: WyoDude