Hi all. I’m picking up my Performance Model 3 tomorrow afternoon (woohoo!) and am hoping to complete a DIY install of a NEMA 14-50 outlet today. Lots of useful info on this forum, but I have a few questions nonetheless.
A little background:
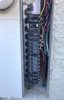
1. Location of breaker in panel? There’s one remaining double-breaker spot in my panel, right at the top. But I’ll be running the wire through a knockout in the bottom of the panel (already knocked out, with a grommet in place, by the prior homeowner). Should I go ahead and use the spot at the top for my new breaker? Or would it make more sense to move the breaker from the bottom of the panel (for the AC), which has wire running to the top of the panel anyway, and use that bottom spot for my new breaker?
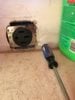
2. Orientation of outlet? I know Tesla says to install the outlet with the ground to the top. But I believe that’s so the cord will hang properly. Here, the existing outlet box is installed just above a shelf, so if I install the outlet per the Tesla recommendation, I don’t think I’ll be able to plug the adapter in. Also, I think the prior homeowner installed the outlet box sideways, based on the screw holes of the outlet box. But that seems perfect for me, as the whole adapter can sit on the shelf sideways, so there’ll be no strain on the connection between the plug and the outlet. Any problem with installing the outlet sideways in this situation?
3. Romex in conduit? As mentioned above, I have a length of 6/3 NM-B Romex. which I procured before discovering today that there’s actually metal conduit inside the wall running the one foot from the panel to the outlet box. I’ve read a lot of conflicting, confusing, and maybe confused information and opinions on this. The smartest opinions (on their face, to me), are that if it’s a situation where Romex would be okay, then it’s okay to put it in conduit. The argument against it seems to be heat build-up but as some have pointed out, it’s already sheathed in rubber and putting it inside metal conduit isn’t going to add that much more heat insulation than it already has. And in any case, I’m looking at a run of about one foot, so it really shouldn’t matter. I could also “unsheath” the Romex, but is that really necessary? (And then it would probably not be code-compliant as the individual wires aren’t labeled THHN). True, I could just go get some different wire, but I’m not sure I can procure it before I can get my car, so if there’s an acceptable installation with what I’ve got I’d like to proceed with it.
Thanks so much!
A little background:
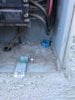
- For whatever reason, there’s a very nice empty metal outlet box already installed in my garage, just one foot below where the panel is mounted on the wall outside. So I literally just need to run one foot of wire from the panel to the outlet.
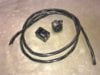
- For materials, I’ve got an Eaton 50A breaker, about 10 feet of 6/3 NM-B Romex, and one of the Tesla recommended outlets (Hubbell HBL9450A).
1. Location of breaker in panel? There’s one remaining double-breaker spot in my panel, right at the top. But I’ll be running the wire through a knockout in the bottom of the panel (already knocked out, with a grommet in place, by the prior homeowner). Should I go ahead and use the spot at the top for my new breaker? Or would it make more sense to move the breaker from the bottom of the panel (for the AC), which has wire running to the top of the panel anyway, and use that bottom spot for my new breaker?
2. Orientation of outlet? I know Tesla says to install the outlet with the ground to the top. But I believe that’s so the cord will hang properly. Here, the existing outlet box is installed just above a shelf, so if I install the outlet per the Tesla recommendation, I don’t think I’ll be able to plug the adapter in. Also, I think the prior homeowner installed the outlet box sideways, based on the screw holes of the outlet box. But that seems perfect for me, as the whole adapter can sit on the shelf sideways, so there’ll be no strain on the connection between the plug and the outlet. Any problem with installing the outlet sideways in this situation?
3. Romex in conduit? As mentioned above, I have a length of 6/3 NM-B Romex. which I procured before discovering today that there’s actually metal conduit inside the wall running the one foot from the panel to the outlet box. I’ve read a lot of conflicting, confusing, and maybe confused information and opinions on this. The smartest opinions (on their face, to me), are that if it’s a situation where Romex would be okay, then it’s okay to put it in conduit. The argument against it seems to be heat build-up but as some have pointed out, it’s already sheathed in rubber and putting it inside metal conduit isn’t going to add that much more heat insulation than it already has. And in any case, I’m looking at a run of about one foot, so it really shouldn’t matter. I could also “unsheath” the Romex, but is that really necessary? (And then it would probably not be code-compliant as the individual wires aren’t labeled THHN). True, I could just go get some different wire, but I’m not sure I can procure it before I can get my car, so if there’s an acceptable installation with what I’ve got I’d like to proceed with it.
Thanks so much!