Duke-U
Member
Haha @rickyjb same here, the HDMI mod is fun, this one I will definitely do too! Thanks @VelociRabbitt for sharing this great idea!


You can install our site as a web app on your iOS device by utilizing the Add to Home Screen feature in Safari. Please see this thread for more details on this.
Note: This feature may not be available in some browsers.
Haha @rickyjb same here, the HDMI mod is fun, this one I will definitely do too! Thanks @VelociRabbitt for sharing this great idea!
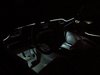
") NOTE: Ignore the red in the last pic. I have ultra bright red door led lights and Red lighted door sills that are reflecting off the wall and door in the garage.
NOTE: Ignore the red in the last pic. I have ultra bright red door led lights and Red lighted door sills that are reflecting off the wall and door in the garage.The pigtails are actually how I spliced in. I basically treated the pigtails as If they were the direct line in the car (Because that's exactly what they are, just extensions). and when you unplug the harness that's in the door, the pigtails just get plugged in female to male, and male to female between the original wiring and the lighting harness and you're in. If you ever want to remove them, just unplug the pigtails, and reconnect the original setup
This is 100% non destructive. You can remove it without any evidence of it ever being installed, and you don't risk damaging ANY wiring in the process!! the pigtails were made to be sacrificed lol they weren't to extend anything, only to splice in non-destructively.
First off: very cool project.
On the parts list: isn't it two pairs of pigtails? With one pair you can't do the back doors without splicing or am I over thinking this?
Started mine tonight. I can't believe how tight the fit is on the door! I had to use a shopping club card plastic key chain to wedge in there just to make enough room and that was a two handed effort.
Got mine about 1/2 done. Loving the look. Pics don't do it justice at all. Also my lights are white, not sure why the color came out so blue.
Here is what I learned (for those about to do this)
1. I tried caulk insulation from Home Depot (near window trim area @HD). It works great for sound at low brightness, but when they go full, it does not seem to work. Need to follow the @VelociRabbitt 's lead on this one. YMMV. It did make it easy to stick the box where I wanted it though.
2. I was able to wire through the door wiring boot (on passenger side). I used a zip tie and some tape to pull it through. It required removing the boot on both sides to make it work.
3. I've spent probably 4 hours on this and need to do the back doors still. My fingers are sore from pressing all the wire in. The dash was easy, the doors nearly impossible. Again, I'm not done, but this looks REALLY amazing.
Thank you @VelociRabbitt for all the information and details on doing this!
@gazepdapi looks great. I tried it with my X but gave up on the doors as well. Looks like the lights in the doors on the X don’t have the s are light connector as the others / model S. This would mean I guess to do it we would be splicing into her wires.... Is this what you found too?
I had not thought of doing just the dash and the seat outlines.... good idea. You may have inspired me to try again!
has anyone done this and can tell me where to tap the lights? I bought the splitters.
Thanks
I've done this (4 doors and dash). You take off the door panel and you can see the wire for the ambient light in the door. Splitter goes there - but you have to remove the door panel, then its mostly clear (only a couple options up near the handle/where the light is located.
The dash is the harder one - to get it on ambient you have to run from the dash through the door grommet into the passenger door - its very possible, but takes some time working in a really tight space.