Welcome to Tesla Motors Club
Discuss Tesla's Model S, Model 3, Model X, Model Y, Cybertruck, Roadster and More.
Register

AC/Heater Blower removal

This site may earn commission on affiliate links.
Dear all,

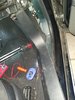
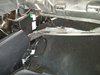
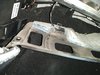
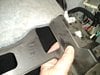
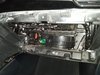
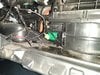
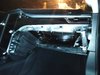
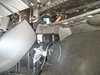
in my TMS'14 85 AC/Heat Blower started to make really irritating noises at low speeds. Bearings seem to wear off. I want to replace it myself, however, I don't know how complicated it can be. I know that blower is located behind the glove box in HVAC unit. First you need to remove the glove box to have access to it but after this step procedure is a mystery to me. Maybe some1 from this forum tried to change it on his own? fixmyev.com stopped working so I can't find any service procedures for this :/ You can see it on this video
. I would love to get any insights on it. Thanks in advance.
 
  • Like
Reactions: Dunnman99
Ha! I am facing the same right this minute. I haven't touched the blower motor or resistor yet but a moment ago after diagnosing, I came to the conclusion that one or both possibly need replacement. Where are you purchasing yours? I looked on eBay. Have not tried Tesla parts yet.
 
I'm looking into eBay. Tesla in Denmark claimed around 5000 DKK (750$) + TAX so I decided I will try my luck on eBay. I'm having a real struggle if I should do it on my own or I should go to a mechanic. The blower is visible but it is a bit under other elements I'm not certain if I will have to dismount half of the dashboard to get to it or not :/ On eBay there is a LOT of these blowers, I'm looking for lowest milage possible
 
I'm looking into eBay. Tesla in Denmark claimed around 5000 DKK (750$) + TAX so I decided I will try my luck on eBay. I'm having a real struggle if I should do it on my own or I should go to a mechanic. The blower is visible but it is a bit under other elements I'm not certain if I will have to dismount half of the dashboard to get to it or not :/ On eBay there is a LOT of these blowers, I'm looking for lowest milage possible
I'm sure you can do it yourself, especially if you have changed out other blower motors. Yes eBay has some good deals for used... Good luck, we are traveling the same road...
 
OK, I tore mine down tonight. I did take some pictures but not sure there is enough interest. I did take the glove box out but I believe it can be done without doing that. The one thing that possibly makes it easier with the glove box out is unplugging a vent duct piece out of the way and unplugging some wiring from that. Other than standing on your head and having no instructions, it wasn't very hard of a job. I will take time to post pictures if there is enough interest.
 
Last edited:
It would only let me upload 10 pictures
 

Attachments

  • IMG_20200718_002259771.jpg
    IMG_20200718_002259771.jpg
    521.9 KB · Views: 2,222
  • IMG_20200718_002342497.jpg
    IMG_20200718_002342497.jpg
    539.3 KB · Views: 909
  • IMG_20200718_002454559.jpg
    IMG_20200718_002454559.jpg
    413.8 KB · Views: 913
  • IMG_20200718_002512354.jpg
    IMG_20200718_002512354.jpg
    449.5 KB · Views: 971
  • IMG_20200718_002543519.jpg
    IMG_20200718_002543519.jpg
    570.2 KB · Views: 930
  • IMG_20200718_002703516.jpg
    IMG_20200718_002703516.jpg
    365.2 KB · Views: 908
  • IMG_20200718_004106804.jpg
    IMG_20200718_004106804.jpg
    250.5 KB · Views: 909
  • IMG_20200718_004154359.jpg
    IMG_20200718_004154359.jpg
    291.5 KB · Views: 919
  • IMG_20200718_010049968.jpg
    IMG_20200718_010049968.jpg
    220 KB · Views: 900
  • IMG_20200718_010939373.jpg
    IMG_20200718_010939373.jpg
    428.5 KB · Views: 905
  • Like
Reactions: Dunnman99
Here is the rest. All of the pictures uploaded randomly.
 

Attachments

  • IMG_20200718_000129512.jpg
    IMG_20200718_000129512.jpg
    486.9 KB · Views: 876
  • IMG_20200718_000141554.jpg
    IMG_20200718_000141554.jpg
    548.3 KB · Views: 857
  • IMG_20200718_000153395.jpg
    IMG_20200718_000153395.jpg
    438.1 KB · Views: 835
  • IMG_20200718_002254198.jpg
    IMG_20200718_002254198.jpg
    572.2 KB · Views: 869
  • IMG_20200718_011832655.jpg
    IMG_20200718_011832655.jpg
    369.4 KB · Views: 894
  • IMG_20200718_012047508.jpg
    IMG_20200718_012047508.jpg
    545.6 KB · Views: 773
  • IMG_20200718_020237921.jpg
    IMG_20200718_020237921.jpg
    431.2 KB · Views: 747
  • IMG_20200718_020509187.jpg
    IMG_20200718_020509187.jpg
    608.5 KB · Views: 908
  • Like
Reactions: hpjtv and Dunnman99
If you choose to remove the glove box the video is in an above post. After doing that, you have to pop (pry, snap off) both right and left footwell panels off in the passenger footwell. The console side as well as the doorsill side.

You need to remove 2 screws in the assembly cover that is the top upper cover in the footwell. One screw is on the right near the front and the left as well. As you lower it you have to detach a light wire and you have to detach the cable pull bracket used for the frunk on the right side. You then need to detach the cable out of the bracket to get the assembly panel out of the way.

Unplug the motor from the green resistor mounted on the firewall. There is some duct work in the way and one of the screws is located in the duct hole on the right. another is located at the blower and if I remember right, there are no more screws holding it on but you have to go far to the left at the connection up by the MCU and twist the duct section to disconnect it from the rest of the duct. You also have to remove a sensor wire at this connection also.

Now you can thread this section of duct out of the way by lowering it to the floor. You are now able to remove the 3 screws holding the blower motor and remove it out of the vehicle. I found on my vehicle that the pinch connector at the blower motor wiring harness was difficult and did not want to unplug from the motor easily. Good luck to all! Now, I need to find a blower motor. I tested my old one and it would only power up with a little human intervention (slightly spinning the squirrel cage).
 
Last edited:
  • Like
  • Helpful
Reactions: hpjtv and SUM-EV
Thank you for that. I know have a much clearer picture of how does it looks like :D I will find a blower on ebay and I will dismantle mine. I will post some pictures how does it look like in my car (probably the same as yours). The more material the better I presume :). Once again thank you :)))
 
  • Like
Reactions: Evoforce
The bearing in the blower motor of my '13 S was on its way out. I could hear high pitched chirping from the bearing that immediately went away went turning off the HVAC. I did not replace the regulator. Sourced a replacement blower from eBay. The Tesla service manual for this job is woefully inadequate, so I thought I'd share a couple observations from my work. You have to remove the passenger side upper foot well trim to access the blower. The manual specifies that there are two T15 screws, which is accurate, except that the left side screw is hiding behind the left foot well trim. That can be removed by pulling, it's just secured with a bunch of clips. Dropping the upper foot well trim reveals the blower motor. I did not remove the glove box for this work as having access to that part of the system is unnecessary for replacement. The Philips screws for the blower (three for the motor itself, one connecting the duct to the motor) are fairly accessible, however the manual unhelpfully says that you should be able to maneuver the blower around the foot well duct to remove. I have no clue how someone could do this. I removed an additional duct screw on the right side to give a bit more flexibility to the duct (seen in the first picture). I still could not get the blower past the duct because there isn't enough room between the duct and the foot well for the blower to fit through. To give myself more real estate to work, I removed the right side foot well trim (held in with pegs and a single clip, just pull but be prepared to break some of the pegs). Then I folded the carpet back. Lastly, I removed the 4 screws attaching the metal foot plate and removed the plate altogether. This gave loads of room to work. The blower practically fell out after this as it has a clear path downwards. If I were doing this job again and I removed the trim, carpet, and plate to begin with, I could do the whole job in about an hour. As it was, it took about two while trying to figure out how to remove the blower. Reinstall the blower first, then reattach everything in reverse order.
IMG_5584.jpg

IMG_5581.jpg
 
  • Like
  • Helpful
Reactions: hpjtv and SUM-EV
does anyone know if the blower motor is located in the same place on a model 3? i have a model 3 and the blower is making a ticking sound. i'm hoping to access the blower to remove whatever is touching the fan blades. i looked at some parts drawings and it looks to me like the blower is not in the same place, but hoping someone knows for sure
 
Hello

Someone can tell me how much resistance it’s correct between two pols (conector) in the blower?
I mean if put the two poles from the multimeter in to the two pols in the blower how many ohms?

I’m not fine information in internet about that.

👍👍👍Thanks to this forum, I take out the blower.👍👍👍

Mine motor it’s not working. At the connector comes 12,6v continually and when i change the speed, voltage it’s going down progressively to 10,4v.

I thing that’s it’s correct because the resistance it’s working… but I want to be 100% sure that the problem it’s the blower before I buying it.

Thanks!