Welcome to Tesla Motors Club
Discuss Tesla's Model S, Model 3, Model X, Model Y, Cybertruck, Roadster and More.
Register

Anyone ever changed paddle gear on “Gen3” door handle assy?

This site may earn commission on affiliate links.
I’ve seen plenty of videos and how to for the early versions. But never a Gen 3 with the hall effect sensor.
I got as far as sliding the shaft out to put the new gear on and realized it won’t slide out because the hall sensor is attached at the end, and there appears to be no way to remove it.
am I stuck replacing the entire assy?

thanks for any help
 
Now I’m annoyed and need more help please. Everything has been working great since I replaced the paddle gear on Saturday. Today all of a sudden I kept hearing noises near me. I thought the window was open, but it wasn’t. Then I get out of the car and the stupid door handle thing is making noise. It is now stuck in the out position and I can’t open the door!! Please don’t tell me the micro switches decided to fail now? What am I missing?? Please help. Thanks.
 
Upvote 0
Now I’m annoyed and need more help please. Everything has been working great since I replaced the paddle gear on Saturday. Today all of a sudden I kept hearing noises near me. I thought the window was open, but it wasn’t. Then I get out of the car and the stupid door handle thing is making noise. It is now stuck in the out position and I can’t open the door!! Please don’t tell me the micro switches decided to fail now? What am I missing?? Please help. Thanks.
Gen3 has no microswiches or do you have a gen2 doorhandle?

You can measure microswiche harness with multimeter, would try that first.

It is recommended to change paddle gear and microswiches at the same time or at least inspect wiring harness
 
Upvote 0
What is the date of your 2017 S? I Believe the later model (after September) 2017 gpt the Gen 3 handles and prior was stil using the Gen 2 . And of course Gen 2 still has the older micro switches . Because of the window issue and now the handle issue……are you certain the module itself was installed back onto the studs correctly and mounted properly? Is there any chance the unit wasn’t seated down and was touching the window?
 
Upvote 0
That day was just bad from the beginning. I got in the car, and noticed the rear trim along the hatch just "fell" off and was laying on top of the trunk cover. Then, I pulled into the bank, put the car in park, and the passenger door magically opened. Then, I heard all the noise from the drivers door and the handle was stuck. Then, in a parking garage, the passenger door unlatched again. and the drivers door was still making noise. I decided to "power" the car down completely, and magically, everything started working normal. Who knows? One last thing, the next morning I was pulling back into the garage and the MCU rebooted. First time since I had it replaced from MCU 1 to MCU2 (18 months or so). Hoping it was just a bad week. We shall see. BTW, December 2017 Model S. About 63k miles. Thanks.
 
Upvote 0
I’ve seen plenty of videos and how to for the early versions. But never a Gen 3 with the hall effect sensor.
I got as far as sliding the shaft out to put the new gear on and realized it won’t slide out because the hall sensor is attached at the end, and there appears to be no way to remove it.
am I stuck replacing the entire assy?

thanks for any help
I just removed the hall effect sensor today. I first removed the controller that the sensor backed up against, then slipped small pieces of stiff paper (pieces of a cut up business card) under each of the little teeth holding the sensor in place. I was then able to just slide the sensor off. After drilling a hole in the plastic housing, I was able to pull the shaft over allowing the installation of the new paddle gear. Finicky- but not hard….. I see your post was a few months ago- how did you make out?
 
Upvote 0
Made out great. I kept messing with it(I was afraid of breaking the plastic teeth) until I got it off. Did same as you and drilled a hole in the side and replaced. I was worried the sensor was not “keyed” somehow on the shaft so I would never be able to rig/calibrate the whole thing, but apparently it only goes back on one way.
long story short it’s fixed and I could do It again much faster now if it happens again. I have several new paddle gears on my work bench.
 
Upvote 0
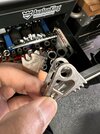
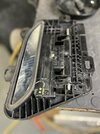
I just got the paddle gear in my gen 3 door handle (passenger side) replaced by someone who has experience working with teslas. it was a pain to remove the shaft to slip in the new paddle. I believe he drilled the side of the handle to slowly move out the shaft and install the paddle gear. He had to remove the Hall effect sensor to install it. I was gone for the remaining of the install, but when he finished, it is completely back to normal. He didn't need to do any more calibration or adjust anything else.
 

Attachments

  • IMG_4602.jpg
    IMG_4602.jpg
    422.8 KB · Views: 108
  • IMG_4603.jpg
    IMG_4603.jpg
    352.5 KB · Views: 76
  • Like
Reactions: quickstrike12
Upvote 0
Made out great. I kept messing with it(I was afraid of breaking the plastic teeth) until I got it off. Did same as you and drilled a hole in the side and replaced. I was worried the sensor was not “keyed” somehow on the shaft so I would never be able to rig/calibrate the whole thing, but apparently it only goes back on one way.
long story short it’s fixed and I could do It again much faster now if it happens again. I have several new paddle gears on my work bench.
Good to hear! Mine still needed to be recalibrated- but Tesla didn’t charge me🥳.
 
Upvote 0
That must be it. I had been confused and uncertain of being able to rebuild the original assy when I couldnt get the sensor off, so I chickened out and purchased the entire assy to replace. After putting in the new one I started playing around with the original one and figured it out. I went ahead and rebuilt it with a new gear. I have it laying around for another day or for parts I guess if needed.
but maybe your right had I just put my original back in I wouldn’t have needed the calibration.
oh well glad to be done with it.
I appreciate everyones help on this project. I could definitely do this myself next time with what I learned.
I am just seeing these posts now after getting to the point where I already removed the front drivers side door handle assemly and realized its a gen3. Since you have figured out how to replace the paddle gear, could you please help walk me through it? I would be very appreciative. I am happy to provide my phone number if we could have a quick call. Please let me know. Thanks.
 
Upvote 0
I just completed replacing the paddle gear on my gen 3 door handle. The set screw size that holds the shaft is a T8 Torx. You can find a set from Harborfreight. SKU is 97517. I removed the shaft without having to drill a hole as I took it out the opposite way in which it was originally assembled. In order to do this you will need to remove the motor. To do this you will need a T10 hex allen wrench and use the short end. This is needed as there is only 1 1/4" clearance on one of the screws. I found a set at Home Depot. Take pictures of the springs when disassembling in order to properly reassemble and be careful as the springs can eject themselves unexpectedly...wear safety glasses!

FYI The piece that is attached to the shaft is actually the magnet that the hall effect sensor uses to sense a magnetic field change.
 
Upvote 0
I’ve done it both ways. Drilling the hole the end for the shaft and also just removing the motor. Either way was about the same in time and effort honestly For me.
i think I favor the drilling only because I could slide the shaft back just far enough to get the gear in and slide it back without disturbing the spring at the other end. And heaven forbid it breaks again at least the hole will already be drilled.

i personally struggled with unlocking the sensor From the shaft. I kept thinking I was going to break the plastic spline mechanism.
 
  • Like
Reactions: cyphear
Upvote 0
I’ve done it both ways. Drilling the hole the end for the shaft and also just removing the motor. Either way was about the same in time and effort honestly For me.
i think I favor the drilling only because I could slide the shaft back just far enough to get the gear in and slide it back without disturbing the spring at the other end. And heaven forbid it breaks again at least the hole will already be drilled.

i personally struggled with unlocking the sensor From the shaft. I kept thinking I was going to break the plastic spline mechanism.
Thanks for sharing your picture as it shows the clearance issue for the motor screws.

I understand drilling the hole allows movement of the shaft just enough to slip the new gear on but from the YouTube video that I saw where they drilled the hole they had to use a hammer and considerable force to move the shaft as it was binding against the spring as it is moved. The thought of using a hammer on a mostly plastic assembly had me a bit nervous and selected the reverse of the original assembly route. Another suggestion is to remove the magnet at room temperature as the splines are rather delicate and might be brittle in a cold garage or environment as the case was for me in December.

I have one more paddle gear as it came in a package of two from Tesla so I think the next time this happens and I fully expect it will that I can get it repaired in about an hours time.
 
  • Like
Reactions: quickstrike12
Upvote 0
Made out great. I kept messing with it(I was afraid of breaking the plastic teeth) until I got it off. Did same as you and drilled a hole in the side and replaced. I was worried the sensor was not “keyed” somehow on the shaft so I would never be able to rig/calibrate the whole thing, but apparently it only goes back on one way.
long story short it’s fixed and I could do It again much faster now if it happens again. I have several new paddle gears on my work bench.
Are you drilling a hole in the plastic on the side where the hall effect sensor was?
 
Upvote 0
@y2khd
thats great. I have since learned the sensor is relatively simple to get off. Thanks to another forum member I was told to look closely at the sensor it has a tiny arrow printed on the side. If you turn the sensor opposite of the arrow(to remove) the sensor will release and you can slide it off. Pretty easy and it appears to really only go back on one way so I didn’t need to mark it or worry from that stand point.

the real problem for me was after I got it all back to together and installed in the door. My handle was not moving in sync with the other 3 handles. It was trying to go out when the others were going in and vice versa. I ended up taking it down to the SC where it took the the guys 5 minutes to use the laptop and “calibrate” the handle.
Is there no real way around the “calibration “ of the handle with the toolbox laptop software?
kind of a bummer after all the work to replace it to have to go to SC anyway. Even tho they only needed $20 bucks and a few minutes.
Are you turning the whole sensor or the movable ring around the outside of the sensor?
 
Upvote 0
Managed to replace my paddle gear on gen3 door handle. Couldn't work out how to get the sensor off with the moulded plastic piece it backs up against. Ended up drilling hole on the opposite side of the rod for removal. Once the springs are un-tensioned and the small ring in the center of the rod is removed, it is fairly straight forward to get the new paddle gear into place. Reinstalling the motor screws was frustrating, but got it done.

Start to finish I could do the job again in 90min, but it is fairly involved. No loss of integrity with drilling the hole, that will probably be my go-to method if this happens again in the future.
 
  • Like
Reactions: quickstrike12
Upvote 0