


Yinn
Active Member
How tricky was it to get to the drivers side & passenger side trunk wires?
Piece of cake. 30 minutes per the instructions is being generous. If you are a regular DIYer, you can do it in less than 10 minutes.
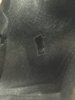
I first found the areas and poked at it with my fingers to bend the cutouts a little.
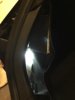
Then, I pulled the lining back. Unlike other cars, the Tesla doesn't have extra clips holding the rear lining down. It's simply tucked away, and mine was actually pulled loose just from regular use of the side cubbies.
A quick tug (medium pressure - requires some force, but no strain) to get it loose.
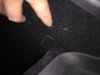
The drivers side wire was a little further up (around the orange plastic of the charge port) secured by a white pull away tape. The passenger side was directly behind the cutout. Picture here hopefully gives you an idea of how far up.
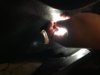
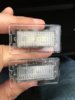
After I located them, I quickly tested to make sure I had the right wires. Plugged in, closed & opened the hatch to make sure they turned on and off. The wires are secured by white pull away tape.
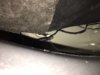
Then I used a box cutter (a good, sharp one) to finish the cutouts from behind.
The instructions seem much more complicated an intimidating than the reality.
Attachments
Last edited:
