


I'm a new owner and first post. I own a 2017 Model S and from day one there have been rattles on both sides of the car when you hit rough roads. Its like dueling rattles when the car vibrates. At first, I thought it was in the rear passenger doors and was ready to take those apart. I had my wife ride in the back and she identified that the rattles were emanating from the B Pillars.
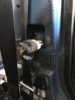
After taking apart the one of the B Pillars there is a connector in the pillar that is loose (looks like wires to the camera in B Pillar) that on rough roads moves around and rattles against the metal walls of the B Pillar. It appears Tesla tried to address the issue with a thin felt tape around the connector. However, the issue is to restrict the movement of the connector so it doesn't move and contact metal pillar of the car. I was able to secure the connector with two cable ties that restricts the movement of the connector and voila no more rattle.
This is the procedure I used to fix the B Pillar rattle. Hope this helps someone with this rattle. There are a number of Pics but my comments below:
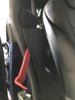
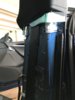
1. Need to remove the door sill using a plastic pry tool there is one blue snap and a 25mm torx screw in front and back seat.
2. Once you open up the door sill and you can pry off the B pillar lower cover. Its best if you can insert your tool as close to the fastner as possible since they are in pretty tight.
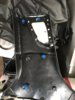
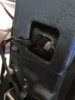
3. Pic 4 is a shot of the plastic panel. There are two fastner holes that are not used.
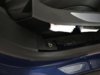
4. Pic 5 is the loose wire connector that you have to retrieve from inside of the pillar. I used two cable ties to restrict the movement of connector.
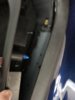
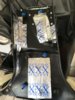
5. The top portion of the pillar there are hard plastic fins that touch directly to the metal pillar. Inserted dynamat material as a buffer between the metal pillar and plastic fins. Did the same for the plastic piece that I removed.
6. Also added additional dynamat to the plastic lower B pillar panel. I just did it since I had everything open. Don't know if it was necessary.
7. I also used hot glue to fasten the blue connectors so they wouldn't fall out when I reinstalled the plastic panel.
8. Ensure you don't forget to reinstall Torx screws before you attach and snap in B pillar panel.
9. Took me about an hour for each side.
After taking apart the one of the B Pillars there is a connector in the pillar that is loose (looks like wires to the camera in B Pillar) that on rough roads moves around and rattles against the metal walls of the B Pillar. It appears Tesla tried to address the issue with a thin felt tape around the connector. However, the issue is to restrict the movement of the connector so it doesn't move and contact metal pillar of the car. I was able to secure the connector with two cable ties that restricts the movement of the connector and voila no more rattle.
This is the procedure I used to fix the B Pillar rattle. Hope this helps someone with this rattle. There are a number of Pics but my comments below:
1. Need to remove the door sill using a plastic pry tool there is one blue snap and a 25mm torx screw in front and back seat.
2. Once you open up the door sill and you can pry off the B pillar lower cover. Its best if you can insert your tool as close to the fastner as possible since they are in pretty tight.
3. Pic 4 is a shot of the plastic panel. There are two fastner holes that are not used.
4. Pic 5 is the loose wire connector that you have to retrieve from inside of the pillar. I used two cable ties to restrict the movement of connector.
5. The top portion of the pillar there are hard plastic fins that touch directly to the metal pillar. Inserted dynamat material as a buffer between the metal pillar and plastic fins. Did the same for the plastic piece that I removed.
6. Also added additional dynamat to the plastic lower B pillar panel. I just did it since I had everything open. Don't know if it was necessary.
7. I also used hot glue to fasten the blue connectors so they wouldn't fall out when I reinstalled the plastic panel.
8. Ensure you don't forget to reinstall Torx screws before you attach and snap in B pillar panel.
9. Took me about an hour for each side.
Attachments
-
 IMG_2121.JPG273.1 KB · Views: 1,189
 -
 IMG_2123.JPG430.7 KB · Views: 1,006
 -
 IMG_2148.JPG332.1 KB · Views: 1,087
 -
 IMG_2149.JPG371.3 KB · Views: 1,003
 -
 IMG_2151.JPG386.9 KB · Views: 999
 -
 IMG_2152.JPG290.7 KB · Views: 983
 -
 IMG_2153.JPG371.3 KB · Views: 976
 -
 IMG_2155.JPG502.8 KB · Views: 984
 -
 IMG_2159.JPG568.3 KB · Views: 991
