Welcome to Tesla Motors Club
Discuss Tesla's Model S, Model 3, Model X, Model Y, Cybertruck, Roadster and More.
Register

Backup Camera Install :: Any help/pointers?

This site may earn commission on affiliate links.
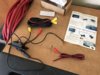
Okay so I purchased a backup camera that should work nicely for my 2010 Tesla Roadster 2.0– it will replace the light above the license plate. I’m waiting for some crimp connectors since I am out... figure I’ll tackle install in the coming days here once that arrives. And perfect time then for me to ask for help...

My varied questions thus far....

1 - Where did folks grab 12V power for their backup cameras? With the length of wire provided to me it really wouldn’t be that difficult to just run it up to the head unit and get power near there. But is there a better 12V power source nearer to the back of the car?

2 - What route did you use for getting the wires from the rear of the car to the radio? This is key/vital for the RCA video signal obviously, even if 12V can be sourced elsewhere, I still need to run video from back to front. Photos/links to help here would be paramount!

3 - For purpose of signal wiring, I’m assuming there is no easy way to grab REVERSE? Or did people find a “reverse signal wire” somewhere? I’m guessing that most folks were using the reverse lights and just tapping into those? I swear I had seen some thread or two about a resistor issue there too but never actually saved the post so now of course I can’t find it... haha...

Thanks in advance for any help that can be provided. There are plenty of local stereo shops that could do this for me, but i’ve Done bigger projects before— the only hard part here is that the interior trim and wire routing isnt as obvious as other cars i’ve worked on before. Ciao!
 
PS :: here is the hardware that i’m working with... there is a 12V pigtail off the camera, for powering the LED light (license plate) but those aren’t always on, so that can’t really be my 12V power source for the camera. So I’ll need to use the red connector to then grab 12V Camera power elsewhere, and the yellow RCA is for the video signal (with red pig tails that allow for the camera on/off signal wire).
 

Attachments

  • FEA306A5-5CC9-49A9-8FB9-AA75479366E4.jpeg
    FEA306A5-5CC9-49A9-8FB9-AA75479366E4.jpeg
    458.9 KB · Views: 356
All the ones I have seen just run the power leads along with the video cable and the reverse light wire. There is a hole and grommet right above the subwoofer outlet right behind the drivers seatbelt. Run it thru the center console and behind the seat. Once you go thru the hole above the subwoofer, you secure it alone the frame to the rear.
 
  • Informative
Reactions: arijaycomet
All the ones I have seen just run the power leads along with the video cable and the reverse light wire. There is a hole and grommet right above the subwoofer outlet right behind the drivers seatbelt. Run it thru the center console and behind the seat. Once you go thru the hole above the subwoofer, you secure it alone the frame to the rear.

Okay, so looking from the trunk area I was able to see the grommet that i think you’re talking about ... but getting to it from the interior seems like it’ll be more difficult than just a blink of an eye. Pointers? Seems like running along the driver tunnel and getting access to removing the plastic trim near the belt would be easiest. Or do you have any other pointer? My car has the CF interior, so I’m a bit freaked out removing any of it—- I can hear the Velcro, but havent really tried that hard to remove the door sill piece... yet!
 
Yes, it takes a while to get at it on the inside. You need to remove the drivers seat and the door sill. Just steady and slow lifting from the rear to remove the sill. The CF sills are a lot easier than the base ones. Sometimes you have to reattach the velcro. Pop off the thin trim that lays across the rear window, and then the side panel with the speaker. There is not a lot of room to run the wires by the sill, you would have to go down under the carpet to find room. If you saw a grommet form the rear you probably don't have a subwoofer, which makes things easier. The subwoofer uses a 2x3 hole (plugged without it), but the hole I am referring to is right above that, but parallel to the floor. It is only about an inch in size. I can't remember if you have to remove the seatbelt to access it, but if you do, don't turn the key on with the orange wire disconnected or you will set an airbag code. I think you can just leave the seatbelt wire connected and just move the whole unit out of the way. Here is a pic of the rear bulkhead where the subwoofer goes, from the inside.
SAM_4213.JPG
 
Thanks @MLAUTO that photo helps confirm what I saw; indeed with a flashlight from the trunk I was able to see that 1-inch grommet and it appears some wires (maybe 2x, orange in color) are already passing through it. From the inside cabin there is the plastic cover over the upper seat belt anchor that’ll need removed in order to gain access to it, as you’re suggesting. Interestingly this is different than another thread were I believe the forum member ran his wire through the subfloor channeling or similar.

Either way, it seems that when I’m ready to tackle this project i’ll need to remove a fair share of interior trim to gain access to whatever location or method desired. I’ve committed myself to that and will just have to block off a few hours on a weekend or evening to get it done. But again thank you as your photo does help confirm what I saw!
 
I purchased an AUTO-VOX M1 W Wireless Backup Camera Kit from Amazon and used coupon code Z29XZ2NF at checkout and only paid $63.97! Installation was easy as camera and sending unit get their juice from the passenger side backup light. I mounted the wireless transmitter on the rear side of the PEM. I mounted the monitor on the center console and it plugs in to the cigarette lighter and has a usb port as well so I can charge my iPhone. Works great! Highly recommend it. It took under an hour to install.
 

Attachments

  • Camera.jpg
    Camera.jpg
    421 KB · Views: 132
  • Monitor.jpg
    Monitor.jpg
    282.9 KB · Views: 135
  • Transmitter.JPG
    Transmitter.JPG
    406.5 KB · Views: 146
  • Informative
Reactions: X.l.r.8
Interesting. I've been wanting a good wireless backup camera, as feeding a wire through to the rear is more trouble than it's worth.

Can you detail the connections in the rear, to the tail lights and such? I'm not seeing how that's done. Claims are that the wired camera that I have can be fed through the license plate lamp somehow. Seems not possible.

Also, I hope the service guys don't complain about the transmitter being attached to the PEM. I'd put it elsewhere, just in case.
 
The wire from the camera to the backup light has a mini connector, so I drilled a 1/4" (I think) hole behind the license plate and used a thin electrician's snake to run some messenger twine to the passenger side taillight location. Removing the taillight assembly was the hardest part of the job. Just look at the components for the camera, electrical p/u and the transmitter and take note of where the wires can be disconnected. I probably should have taken pix as I did it. I just got done trouble shooting the electric cooling fans on my 76 Jaguar XJ6C (owned since new). All I can say is Tesla without a shop manual is much easier than Lucas with a shop manual. BTW, Lucas owns the patent on short circuits.
 
Last edited:
Thanks @MLAUTO that photo helps confirm what I saw; indeed with a flashlight from the trunk I was able to see that 1-inch grommet and it appears some wires (maybe 2x, orange in color) are already passing through it. From the inside cabin there is the plastic cover over the upper seat belt anchor that’ll need removed in order to gain access to it, as you’re suggesting. Interestingly this is different than another thread were I believe the forum member ran his wire through the subfloor channeling or similar.

Either way, it seems that when I’m ready to tackle this project i’ll need to remove a fair share of interior trim to gain access to whatever location or method desired. I’ve committed myself to that and will just have to block off a few hours on a weekend or evening to get it done. But again thank you as your photo does help confirm what I saw!
Did you ever get that camera on the Roadster?
 
HI I had alluded to my experience on another post, but never provided details, and there was a suggestion to add to a camera thread so here goes.
Not being as brave electrically as some on this site I went for the wireless solution. I found a completely wireless, solar powered back up camera that I could easily install. Basically, the camera has solar power cells and the camera installed on a license plate holder. The viewing monitor simply plugs into the cigarette lighter port.

THe only modificaiton I did was because the camera was on the upper part of the license plate and that would bump into the exterior of the tesla in the back, I flipped the camera to the bottom of the license plate frame. I added a "T" bar of some stainless steal that runs from the bottoms screws in the license plate holder and then provides a shelf under the camera, it probably wasn't needed but I worried as I had unstuck the camera from the holder it might become unstuck inadvertently.

Have driven through rain etc since last June and even though the car is covered when not driving and so I don't think it gets that much solar exposure the camera hasn't needed recharging. There is a USB port should such be required.
To use, you just plug the view screen in when you get in the car and are preparing to back up and then unplug when you are driving away in forward. (I don't leave things plugged in cigarette holder intentionally due to 12v concern).

Will attach pictures in next post. I bought direct from the US company, I see on Amazon there are now several (knock offs/improved) models now available, all in the 100-140 $range....you can PM me if you want to know the brand I bought. Yes you can buy cheaper cameras to wire but heck my time is more than that and its plug and play.
 

Attachments

  • 20190622_191808.jpg
    20190622_191808.jpg
    159.9 KB · Views: 106
  • Informative
Reactions: drewski
attached file is the Tesla Double DIN install instructions which includes the back-up camera installation starting on Page 9.

there is the spec for the Zener diode (4.7V 1W) needed to fix the signal from the reverse lights and which wire to tap (brown) in the taillight for the reverse signal.

they use the same routing that JdeMO recommends for their harness. a channel under the passenger door sill that goes up to the A-Pillar
 

Attachments

  • SB-12-17-005_Radio_DDIN_Installation_Rear_Camera_R2.pdf
    968.7 KB · Views: 108
  • Like
Reactions: Gabner