I texted with the SC about doing the alignment on the low suspension setting since my car still feels like it is hunting for direction on the highway. They said they are not able to do the alignment on low due to lack of space for the equipment. This seems like a problem since the car drops automatically to low on the highway.


Welcome to Tesla Motors Club
Discuss Tesla's Model S, Model 3, Model X, Model Y, Cybertruck, Roadster and More.
Register
Install the app
How to install the app on iOS
You can install our site as a web app on your iOS device by utilizing the Add to Home Screen feature in Safari. Please see this thread for more details on this.
Note: This feature may not be available in some browsers.
-
Want to remove ads? Register an account and login to see fewer ads, and become a Supporting Member to remove almost all ads.
You are using an out of date browser. It may not display this or other websites correctly.
You should upgrade or use an alternative browser.
You should upgrade or use an alternative browser.
Best alignment settings - educate me please
- Thread starter Bull
- Start date
Even a very small change in camber will affect the toe, so the small tweaks they did on the alignment rack would still have necessitated a toe adjustment. That being said, I have certainly seem OEM alignment specs calling for quite a bit of toe-in for the rear, but that was on high-end MB vehicles and those customers are more interested in dead-straight tracking on the road rather than tire life.Thanks - do you think it pushed it out that far even though his camber was still within oem spec after install though?

Aggmeister2010
Active Member
I texted with the SC about doing the alignment on the low suspension setting since my car still feels like it is hunting for direction on the highway. They said they are not able to do the alignment on low due to lack of space for the equipment. This seems like a problem since the car drops automatically to low on the highway.
That's typical of Tesla. IIRC, they have sensors that clamp to the wheels, not wrap around the tires....so it shouldn't be a big deal to do it on low. But who knows. I really don't understand why they don't align at the ride height that you drive on. if you only drive on low, or drop to low on the freeway, aligning 1/2" higher is doing you a disservice.
Even a very small change in camber will affect the toe, so the small tweaks they did on the alignment rack would still have necessitated a toe adjustment. That being said, I have certainly seem OEM alignment specs calling for quite a bit of toe-in for the rear, but that was on high-end MB vehicles and those customers are more interested in dead-straight tracking on the road rather than tire life.
100% correct. I fine-tuned my own toe settings after my last alignment to get it exactly right (perfectly centered wheel, set up for the pitch on the roads i drive on)....and even a 1/2 turn on the adjustment thread can cause a significant change in how the car drives.
It is complicated since I not only pushed out the camber but I also lowered it which should negate some of the effect of initially lengthening the atm to reduce camber.Even a very small change in camber will affect the toe, so the small tweaks they did on the alignment rack would still have necessitated a toe adjustment. That being said, I have certainly seem OEM alignment specs calling for quite a bit of toe-in for the rear, but that was on high-end MB vehicles and those customers are more interested in dead-straight tracking on the road rather than tire life.
It is complicated since I not only pushed out the camber but I also lowered it which should negate some of the effect of initially lengthening the atm to reduce camber.
I stopped by my SC today and they told me that they only do alignment in medium setting and that the specs are for the car in medium setting.I texted with the SC about doing the alignment on the low suspension setting since my car still feels like it is hunting for direction on the highway. They said they are not able to do the alignment on low due to lack of space for the equipment. This seems like a problem since the car drops automatically to low on the highway.
It seems that the front camber arms cannot be shimmed to adjust camber. My SC did say that they could move the subframe a little which might solve the problem but that seems like a huge risk. I passed on that option.Found it: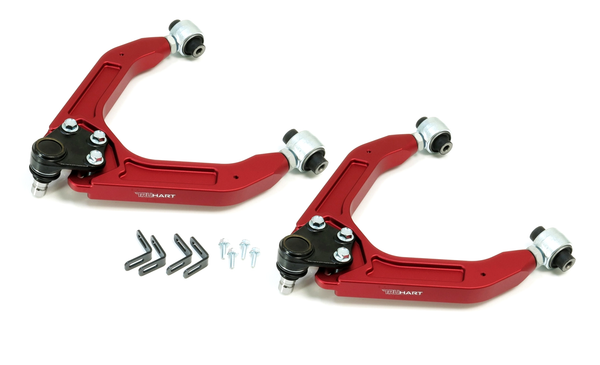
12+ Tesla Model S Truhart Front Adjustable Camber Arms
TruHart adjustable front camber arms replace your factory front upper control arms allowing for necessary adjustment after lowering your vehicle. Our camber kits utilize hardened rubber bushings which allow less deflection and provide a more direct feel road feel than OE bushings. Low profile...coiloverdepot.com
If you want extra adjustability up front, this'll do it. TBH, very few vendors have aftermarket gear for the 1st gen Model S, which is what I have. These TruHart ones are the only adjustable front suspension components that I've ever seen. Plaid will likely have a lot more aftermarket support.
I heard back from Coilover Depot and they said this part will fit the Plaid. I was a little surprised because that part is listed as fitting all Model S from 2012 on. Is it really the same part?
Also, it seems that @MountainPass and @UnpluggedP do carry that part with some differences and with significantly higher prices (2-4x). I'll be calling them soon to get a better understanding as to why the higher prices.
Last edited:
It seems that the front camber arms cannot be shimmed to adjust camber. My SC did say that they could move the subframe a little which might solve the problem but that seems like a huge risk. I passed on that option.
I heard back from Coilover Depot and they said this part will fit the Plaid. I was a little surprised because that part is listed as fitting all Model S from 2012 on. Is it really the same part?
Also, it seems that @MountainPass and @UnpluggedP do carry that part with some differences and with significantly higher prices (2-4x). I'll be calling them soon to get a better understanding as to why the higher prices.
Cheap chinese production & QC vs north american production & QC... if the parts are identical.
I would have to agree that has to be a big part of it. Both Mountainpass and Unplugged have established themselves as very high quality.Cheap chinese production & QC vs north american production & QC... if the parts are identical.
I would have to agree that has to be a big part of it. Both Mountainpass and Unplugged have established themselves as very high quality.
Just checked the EPC. the pre 2/21 and 2/21+ model S uses a completely different part number. Those coilover depot parts will not work.
Pre 2/21 front left upper control arm part# 1043965-00-B
Post 2/21 front left upper control arm part# 1420321-00-C
That is what I would have expected. Thank you!Just checked the EPC. the pre 2/21 and 2/21+ model S uses a completely different part number. Those coilover depot parts will not work.
Pre 2/21 front left upper control arm part# 1043965-00-B
Post 2/21 front left upper control arm part# 1420321-00-C
UPDATE!
I shifted the front subframe today. Both Tesla and @MountainPass suggested this to me. When Tesla suggested it I thought I would be opening a can of worms but then Mountainpass gave me the same advice I decided to do it.
It moved about 3mm without having to elongate the bolt holes. Hopefully that will be good for at least a half degree of camber change.
Alignment tomorrow hopefully and then I'll post detailed info including the before on the new alignment so we know what 3mm actually does. I'll also post pics, torque specs, etc.
Aggmeister2010
Active Member
UPDATE!
I shifted the front subframe today. Both Tesla and @MountainPass suggested this to me. When Tesla suggested it I thought I would be opening a can of worms but then Mountainpass gave me the same advice I decided to do it.
It moved about 3mm without having to elongate the bolt holes. Hopefully that will be good for at least a half degree of camber change.
Alignment tomorrow hopefully and then I'll post detailed info including the before on the new alignment so we know what 3mm actually does. I'll also post pics, torque specs, etc.
Can you explain the process you followed to shift it?
Yes. I’m going to post detailed instructions with pics in this thread as soon as I get alignment done (hopefully) tomorrow.Can you explain the process you followed to shift it?
Here is a procedure for shifting the front subframe to get better alignment values. I hope it is helpful.
Thank you to @MountainPass for the suggestion to shift the front subframe.
Wheels must be unloaded for this so jack or lift from the lift points only. I used 2 floor jacks and some jack stands, wood, and tire chocks for extra safety. If you use 2 floor jacks as high as I did please alternate sides when lifting and lowering.

Remove the plastic aero plate in front of the battery skid plate.
Using a sharp pencil mark the frame casting where the subframe is currently positioned. This will help you gauge how much movement you got. In my case pushing it to the right moved about 3mm.


There are 5 bolts to loosen on each side. They are #2, #3, #4, and two #6 on each side. Socket size and torque for each is on attached image.
You will need to temporarily remove bolt #4 and measure it. There are two different lengths out there and there is a different torque value for each one.

Do not loosen the middle smaller bolts (#8 in the diagram) holding the rail on the battery skid plate. How the subframe fits over this rail is a reference to determine how you moved the subframe (straight or rotated) by looking at the gaps at each end. Moving the subframe toward the front or rear affects caster.

Once loosened you should be able to find safe spots to pry against. No need to pry hard enough to break things. It moves relatively easily but only as much as there is play in the bolt holes. If you need more you will have to elongate the bolt holes and that is definitely not recommended.
In my case I just moved the subframe as far as it would go towards the side with the least amount of negative camber which turned out to be about 3mm. The idea was to get the two wheels closer to equal camber values. Since the subframe affects the wheel from the bottom, moving it toward a wheel will increase the negative camber on that wheel.

When you have it where you want it snug down the bolts and torque to the values in the image.
Do not over torque the bolts!!! They are threaded into aluminum and can strip easily.
Double check your work before replacing the plastic plate.
Your steering wheel / yoke will likely be rotated but your alignment shop will be able to fix that. You did make an appointment to get your car aligned ASAP didn’t you?

I was able to improve my camber difference from LF -1.65 degrees and RF -1.17 degrees to LF -1.54 degrees and RF -1.40 degrees. Not perfect but much more balanced. I still may end up needing adjustable front upper control arms to reduce the camber. What do you think?
@Aggmeister2010 @Sam1 @MountainPass @lbowroom @MFrunkerOG
Thank you to @MountainPass for the suggestion to shift the front subframe.
Wheels must be unloaded for this so jack or lift from the lift points only. I used 2 floor jacks and some jack stands, wood, and tire chocks for extra safety. If you use 2 floor jacks as high as I did please alternate sides when lifting and lowering.
Remove the plastic aero plate in front of the battery skid plate.
Using a sharp pencil mark the frame casting where the subframe is currently positioned. This will help you gauge how much movement you got. In my case pushing it to the right moved about 3mm.
There are 5 bolts to loosen on each side. They are #2, #3, #4, and two #6 on each side. Socket size and torque for each is on attached image.
You will need to temporarily remove bolt #4 and measure it. There are two different lengths out there and there is a different torque value for each one.
Do not loosen the middle smaller bolts (#8 in the diagram) holding the rail on the battery skid plate. How the subframe fits over this rail is a reference to determine how you moved the subframe (straight or rotated) by looking at the gaps at each end. Moving the subframe toward the front or rear affects caster.
Once loosened you should be able to find safe spots to pry against. No need to pry hard enough to break things. It moves relatively easily but only as much as there is play in the bolt holes. If you need more you will have to elongate the bolt holes and that is definitely not recommended.
In my case I just moved the subframe as far as it would go towards the side with the least amount of negative camber which turned out to be about 3mm. The idea was to get the two wheels closer to equal camber values. Since the subframe affects the wheel from the bottom, moving it toward a wheel will increase the negative camber on that wheel.
When you have it where you want it snug down the bolts and torque to the values in the image.
Do not over torque the bolts!!! They are threaded into aluminum and can strip easily.
Double check your work before replacing the plastic plate.
Your steering wheel / yoke will likely be rotated but your alignment shop will be able to fix that. You did make an appointment to get your car aligned ASAP didn’t you?
I was able to improve my camber difference from LF -1.65 degrees and RF -1.17 degrees to LF -1.54 degrees and RF -1.40 degrees. Not perfect but much more balanced. I still may end up needing adjustable front upper control arms to reduce the camber. What do you think?
@Aggmeister2010 @Sam1 @MountainPass @lbowroom @MFrunkerOG
Great work and a handy write-up. I bet you'll be helping other people with this one.
I would be happy with those camber specs, personally.
I would be happy with those camber specs, personally.
MFrunkerOG
Active Member
@Bull so if I’m understanding what you did, you moved the subframe away 3mm from the wheel that had more camber towards the other side. Right?Here is a procedure for shifting the front subframe to get better alignment values. I hope it is helpful.
Thank you to @MountainPass for the suggestion to shift the front subframe.
Wheels must be unloaded for this so jack or lift from the lift points only. I used 2 floor jacks and some jack stands, wood, and tire chocks for extra safety. If you use 2 floor jacks as high as I did please alternate sides when lifting and lowering.
View attachment 899702
Remove the plastic aero plate in front of the battery skid plate.
Using a sharp pencil mark the frame casting where the subframe is currently positioned. This will help you gauge how much movement you got. In my case pushing it to the right moved about 3mm.
View attachment 899703
View attachment 899704
There are 5 bolts to loosen on each side. They are #2, #3, #4, and two #6 on each side. Socket size and torque for each is on attached image.
You will need to temporarily remove bolt #4 and measure it. There are two different lengths out there and there is a different torque value for each one.
View attachment 899705
Do not loosen the middle smaller bolts (#8 in the diagram) holding the rail on the battery skid plate. How the subframe fits over this rail is a reference to determine how you moved the subframe (straight or rotated) by looking at the gaps at each end. Moving the subframe toward the front or rear affects caster.
View attachment 899706
Once loosened you should be able to find safe spots to pry against. No need to pry hard enough to break things. It moves relatively easily but only as much as there is play in the bolt holes. If you need more you will have to elongate the bolt holes and that is definitely not recommended.
In my case I just moved the subframe as far as it would go towards the side with the least amount of negative camber which turned out to be about 3mm. The idea was to get the two wheels closer to equal camber values. Since the subframe affects the wheel from the bottom, moving it toward a wheel will increase the negative camber on that wheel.
View attachment 899708
When you have it where you want it snug down the bolts and torque to the values in the image.
Do not over torque the bolts!!! They are threaded into aluminum and can strip easily.
Double check your work before replacing the plastic plate.
Your steering wheel / yoke will likely be rotated but your alignment shop will be able to fix that. You did make an appointment to get your car aligned ASAP didn’t you?
View attachment 899709
I was able to improve my camber difference from LF -1.65 degrees and RF -1.17 degrees to LF -1.54 degrees and RF -1.40 degrees. Not perfect but much more balanced. I still may end up needing adjustable front upper control arms to reduce the camber. What do you think?
@Aggmeister2010 @Sam1 @MountainPass @lbowroom @MFrunkerOG
And all this through the play in the mounting holes? Interesting that there’s be so much play in it. Wonder if it’s by intentional design or shabby design.
Shifting the subframe absolutely works. Just had mine done yesterday. Prior to it was -1.2 and -0.6 in the front. The shop got both to -0.8 even by adjusting the subframe.
first pic is what it was after a shop did the alignment and didn't know what they were doing.

Second pic is from a reputable shop that fixed everything and shifted things.

first pic is what it was after a shop did the alignment and didn't know what they were doing.
Second pic is from a reputable shop that fixed everything and shifted things.
That is correct. The subframe move affects the lower part of the wheels. I'm guessing that larger hole diameter is by design or luck.@Bull so if I’m understanding what you did, you moved the subframe away 3mm from the wheel that had more camber towards the other side. Right?
And all this through the play in the mounting holes? Interesting that there’s be so much play in it. Wonder if it’s by intentional design or shabby design.
Apex did an amazing job on yours. That is where I wanted to be but this was the first Tesla for this shop. I really wish I had less front negative camber but @MountainPass said he would be happy with those specs.Shifting the subframe absolutely works. Just had mine done yesterday. Prior to it was -1.2 and -0.6 in the front. The shop got both to -0.8 even by adjusting the subframe.
first pic is what it was after a shop did the alignment and didn't know what they were doing.
View attachment 899730
Second pic is from a reputable shop that fixed everything and shifted things.
View attachment 899731
Here is where I ended up for comparison.
Apex did an amazing job on yours. That is where I wanted to be but this was the first Tesla for this shop. I really wish I had less front negative camber but @MountainPass said he would be happy with those specs.
Here is where I ended up for comparison.
View attachment 899820
The guys at RMC (not sure why Apex is on the sheet unless it was their old name or something) said you can slide the subframe + adjust the knuckles to get these perfect. What they meant by adjusting the knuckles means, I have no clue how that would work. Maybe @MountainPass knows & could elaborate.
Similar threads
- Replies
- 4
- Views
- 4K
- Replies
- 4
- Views
- 922
- Replies
- 6
- Views
- 2K
- Replies
- 3
- Views
- 841