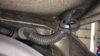
From your description I'm not really sure how you are trying to run the wires. Can you attach a picture? I installed the front and rear camera wires just by pushing the wires behind the trim pieces and door seals. I pretty much did the same thing as the guy in this video:
OneDrive
I only used a plastic spudger like this
Spudger (Trim Removal Tool)
It would have been a bit easier if I had a couple of these, or even a trim removal kit like this one:
Amazon.com: Mastertool Auto Door Clip Panel Trim Removal Tool Kits for Car Dash Radio Audio Installer Pry Tool 4pcs with Car Radio Removal Tool/ Car Trim Removal Tool/ Door Panel Removal Tool/ Car Door Panel Clip: Automotive
I did loosen the nut holding the trim on the A-pillar. This is really easy, the plastic cover that says "air bag" easily pops out and the bolt is right there.
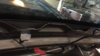
The only part of the install where the wires are not completely hidden is around the mirror cowling. I know you can get the wires behind this, but it seemed a bit difficult and I was worried about breaking it. I'll give it another try at some point. Currently the two wires are up against the mirror cowling and don't stand out, they blend in pretty well.