Hello, Everyone! This is a post that I want to make into a sticky, but I am not sure how to go about that. If someone knows, please let me know. I am going to summarize the state of everything for installation of aftermarket speakers in the Tesla Model 3 with Premium sound as best as I can. There are certainly things I do not know yet, so please reach out and I can edit this post accordingly.
Fairly Low cost build below (Several hundred dollars for all speakers, pins, plugs, and bracket prints).
Tweeters in the front dash and A-Pillars. There are 3 tweeters in the front of the Tesla M3 (as well as 2 "immersive sound" speaker, but I will ignore those as they produce almost no volume and you can even turn them off if desired from the Tesla console).
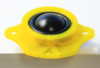
Speakers that can be used to replace: Focal Integration Tweeters (TWU 1.5). Requires bracket adapter for good fit (below).
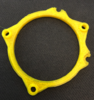
Bracket Adapters: Both A pillars and the center dash tweeter have brackets designed for the Focal tweeters that can be ordered at
www.audioliphe.com or the 3D model can be downloaded there and printed independently. The 3D model is licensed for private use only.
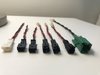
Stock Plugs: Plugs used in the A-Pillars are TE Connectivity
Automotive Connectors MQS STIFT-GEH 2. Part Number 1-968699-. Plugs used in the dash appear to be a relative of the same part as the pillars. They may work there too but need to confirm
Stock Pins: Pins used in Tesla Stock for both dash and pillars appear to be the same as those for the midrange speaker plugs and can be bought individually or as a cut strip.
Benefit of Upgrade: Significantly clearer Highs and crisper Mids. Perhaps the most noticeable upgrade to Tesla stock sound (in poster's opinion).
Midrange Woofers in front Dash. There are 3 midrange speakers in the front of the Tesla M3. They are 4" component woofers with a treated paper cone.
Speakers that can be used to Replace: Infinity 4032cfx (requires bracket adapter for good fit). And some others as well (anyone want to comment on others?)
Bracket Adapters: Brackets for all 3 designed foe the Infinity 4" 4032cfx can be ordered at
www.audioliphe.com or the 3D model can be downloaded there and printed independently. The 3D model is licensed for private use only.
Stock Plugs: TE Connectivity Automotive Connectors MQS PIN HSG 2POS. Part number 1-1534155-1
Stock Pins: TE Connectivity Automotive Connectors MQS CONTACT. Part Number 963716-2. Both pins and plugs can be found at mouser.com or other sites.
Benefit of Upgrade: Much improved clarity in midrange and some added depth. Worthwhile and balanced upgrade.
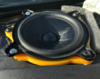
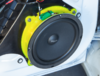
Front Door Woofers. There is a single 6.5" component woofer in both the driver and passenger door. They are treated paper cones.
Speakers that can be used to replace: Focal Integration woofer 8" (Focal ISU 200. big but does fit with correct bracket), focal Integration 6.75" Woofer (Focal ISU 165. similar to stock size. Needs bracket that I can design later if there is demand).
Bracket Adapters: Brackets for the 8" Focal ISU 200 for both doors are the same and I designed these after many iterations; the 3D model can be downloaded at
www.audioliphe.com and printed independently. The 3D model is licensed for private use only. I DO NOT currently sell these as the prints take all day for one door and I would have to charge too much to make it worth the time. I suggest you download the model and print them yourself or order them printed in PETG or ABS from an online printing service that you like.
Stock Plugs: Yazaki YES Kaizen Connector 1.5mm Male Green. Part number 7282-6444-60.
Stock Pins: Yazaki YESC 1.5 Male Contact 0.85-1.25mm. Part number 7114-4101-02. Both plugs and pins ares somewhat hard to find. I ordered at
All Products - automotiveconnectors.com .
Benefit of Upgrade: Increased power and range on the low end. The 8" speakers are incredibly powerful and provide subwoofer-like bass. They probably should have a high pass filter added for better balance. I have not yet figured out the best filter to use, but DO NOT use the included capacitor that Focal gives you in the box. It simply cuts out too much to make the upgrade worthwhile.
Very high cost build below (more than $2000 for speakers, but same pins, plugs, and different printable brackets).
Travis Llado did a full rebuild of Tesla Stock system using Focal Utopia M speakers (very expensive) and a new amp and subwoofer. Link to his work is below. This includes a guide and printable brackets:
Tesla Model 3 Stereo - Part 9: Summary and Lessons Learned


") .
.