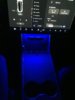
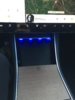
To anyone who is interested, I installed this LED light bar right above the phone dock. Pictures don’t do it justice but it is AWESOME. If anyone wants the details on how I did it I would love to share. Cost was less than $50 and super easy to do.


Welcome to Tesla Motors Club
Discuss Tesla's Model S, Model 3, Model X, Model Y, Cybertruck, Roadster and More.
Register
Install the app
How to install the app on iOS
You can install our site as a web app on your iOS device by utilizing the Add to Home Screen feature in Safari. Please see this thread for more details on this.
Note: This feature may not be available in some browsers.
-
Want to remove ads? Register an account and login to see fewer ads, and become a Supporting Member to remove almost all ads.
You are using an out of date browser. It may not display this or other websites correctly.
You should upgrade or use an alternative browser.
You should upgrade or use an alternative browser.
Center console LED light bar
- Thread starter torch0395
- Start date
davidalai
Member
Yes, please share!To anyone who is interested, I installed this LED light bar right above the phone dock. Pictures don’t do it justice but it is AWESOME. If anyone wants the details on how I did it I would love to share. Cost was less than $50 and super easy to do.
To anyone who is interested, I installed this LED light bar right above the phone dock. Pictures don’t do it justice but it is AWESOME. If anyone wants the details on how I did it I would love to share. Cost was less than $50 and super easy to do.
@torch0395,
Love it! Looks amazing. Nice work! I’d love any information on your install.
Regards,
Ski
Akikiki
A'-Lo-HA ! y'all
Nice job.
You should detail this in a parts list, tools and instructions and send it to Teslatap.com. He has a section for mods.
Many of us have provided project details so everyone can access them "forever".
You should detail this in a parts list, tools and instructions and send it to Teslatap.com. He has a section for mods.
Many of us have provided project details so everyone can access them "forever".
follow.johnny
FSD Beta Tester
Wow! Let me digest a lot of the feedback.
This was accomplished by plugging the USB powered light into a USB hub below the phone dock. So for those who are asking, it is on when the car is on, maybe if someone makes a USB powered timer or something you could program it to be off during the day and on at night. But during the day you can’t really see it. So I’m good with it being on when the car is running.
I would want to refine the install before sharing it too much. Also, let it be noted that I am in the north east. So this has not had a chance to stand the test of warm weather possibly degrading the adhesives used.
So yeah this is really simple, the hardest part was actually finding out how to do it and what parts I needed.
Here is what you need:
1) The actual LED bar: This comes in a 10 pack which is obviously excessive. You only need a 1 pack but I didn’t see it on Amazon right now. I don’t know if anyone can find a single pack but I bought this 10 pack. You take one of the LED bars and covers, cut it to your desired fit.
https://www.amazon.com/gp/aw/d/B01LL2SLME?psc=1&ref=yo_pop_mb_pd_title
2) Adhesive strip to attach LED bar to the phone dock cover: This is also an excessively long adhesive strip. Can probably use any generic strip, but this one was designed and recommended for this particular LED bar.
https://www.amazon.com/gp/aw/d/B074J3X2SJ?psc=1&ref=yo_pop_mb_pd_title
3) The LED light: So this is the actual LED light. You cut it to fit the LED bar, put the cover over the LED bar and plug it in. That’s it folks.
https://www.amazon.com/gp/aw/d/B01LG99O0K?psc=1&ref=yo_pop_mb_pd_title
Like I said, I will look into more refining to make it better. But it looks awesome right now as it is. This really is super simple. If you get everything from amazon all you will need additionally is some kind of saw to cut the LED bar and cover. I used a small multi tool but you could use a small sawzall or other small cutting saw.
Hope this helps everyone. Any improvements and/or recommendations to make this better would be great to share with the community.
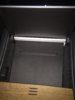
Thank you for showing this! I purchased the same materials as you, and it worked well. For others who want to try, just one suggestion: as you can see from OP's second picture, the cover is not flat (see arrows).
You either apply the tape only at the ends (somewhat hard to do), or very gently give a curve to the aluminum backing. I did the second:
1. Have a ~1 inch flat object on the workbench (I used the flat part of a chisel, but can be anything).
Cover the object with a soft cloth so it does not mark the aluminum (you press on the side that will be visible).
2. Place the aluminum rail centered on top of that 1. Have a ~1 inch flat object on the workbench (I used the flat part of a chisel, but can be anything).
Cover the object with a soft cloth so it does not mark the aluminum (you press on the side that will be visible).
3. Gently push down on both ends.
That gave enough curvature for the rail to connect in the middle too. Will see how well this works - I will take some pictures later.

That gave enough curvature for the rail to connect in the middle too. Will see how well this works - I will take some pictures later.
Thank you for showing this! I purchased the same materials as you, and it worked well. For others who want to try, just one suggestion: as you can see from OP's second picture, the cover is not flat (see arrows).
You either apply the tape only at the ends (somewhat hard to do), or very gently give a curve to the aluminum backing. I did the second:2. Place the aluminum rail centered on top of that
1. Have a ~1 inch flat object on the workbench (I used the flat part of a chisel, but can be anything).
Cover the object with a soft cloth so it does not mark the aluminum (you press on the side that will be visible).
3. Gently push down on both ends.
That gave enough curvature for the rail to connect in the middle too. Will see how well this works - I will take some pictures later.
View attachment 351207
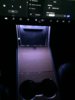
My go around for the curved cover was just to add a second layer of adhesive and it gave it enough cushion to appear flat. Your suggestions should work as well. Looks awesome at night doesn’t it?? Interior really needed something like this.
My go around for the curved cover was just to add a second layer of adhesive and it gave it enough cushion to appear flat. Your suggestions should work as well. Looks awesome at night doesn’t it?? Interior really needed something like this.
Got it. Still have to see it at night - I surely can find a reason to get out of the house
")
Wow! Let me digest a lot of the feedback.
This was accomplished by plugging the USB powered light into a USB hub below the phone dock. So for those who are asking, it is on when the car is on, maybe if someone makes a USB powered timer or something you could program it to be off during the day and on at night. But during the day you can’t really see it. So I’m good with it being on when the car is running.
I would want to refine the install before sharing it too much. Also, let it be noted that I am in the north east. So this has not had a chance to stand the test of warm weather possibly degrading the adhesives used.
So yeah this is really simple, the hardest part was actually finding out how to do it and what parts I needed.
Here is what you need:
1) The actual LED bar: This comes in a 10 pack which is obviously excessive. You only need a 1 pack but I didn’t see it on Amazon right now. I don’t know if anyone can find a single pack but I bought this 10 pack. You take one of the LED bars and covers, cut it to your desired fit.
https://www.amazon.com/gp/aw/d/B01LL2SLME?psc=1&ref=yo_pop_mb_pd_title
2) Adhesive strip to attach LED bar to the phone dock cover: This is also an excessively long adhesive strip. Can probably use any generic strip, but this one was designed and recommended for this particular LED bar.
https://www.amazon.com/gp/aw/d/B074J3X2SJ?psc=1&ref=yo_pop_mb_pd_title
3) The LED light: So this is the actual LED light. You cut it to fit the LED bar, put the cover over the LED bar and plug it in. That’s it folks.
https://www.amazon.com/gp/aw/d/B01LG99O0K?psc=1&ref=yo_pop_mb_pd_title
Like I said, I will look into more refining to make it better. But it looks awesome right now as it is. This really is super simple. If you get everything from amazon all you will need additionally is some kind of saw to cut the LED bar and cover. I used a small multi tool but you could use a small sawzall or other small cutting saw.
Hope this helps everyone. Any improvements and/or recommendations to make this better would be great to share with the community.
I'm a little late to the thread but thanks for sharing this. Looks really great. And thanks for the instructions on installing it.
Flyguyaaron
Member
here is the other one mentioned, I may do a mix of the two, power from the side (save my USB's) but use the LED from this thread
Any way to upgrade the dome lights
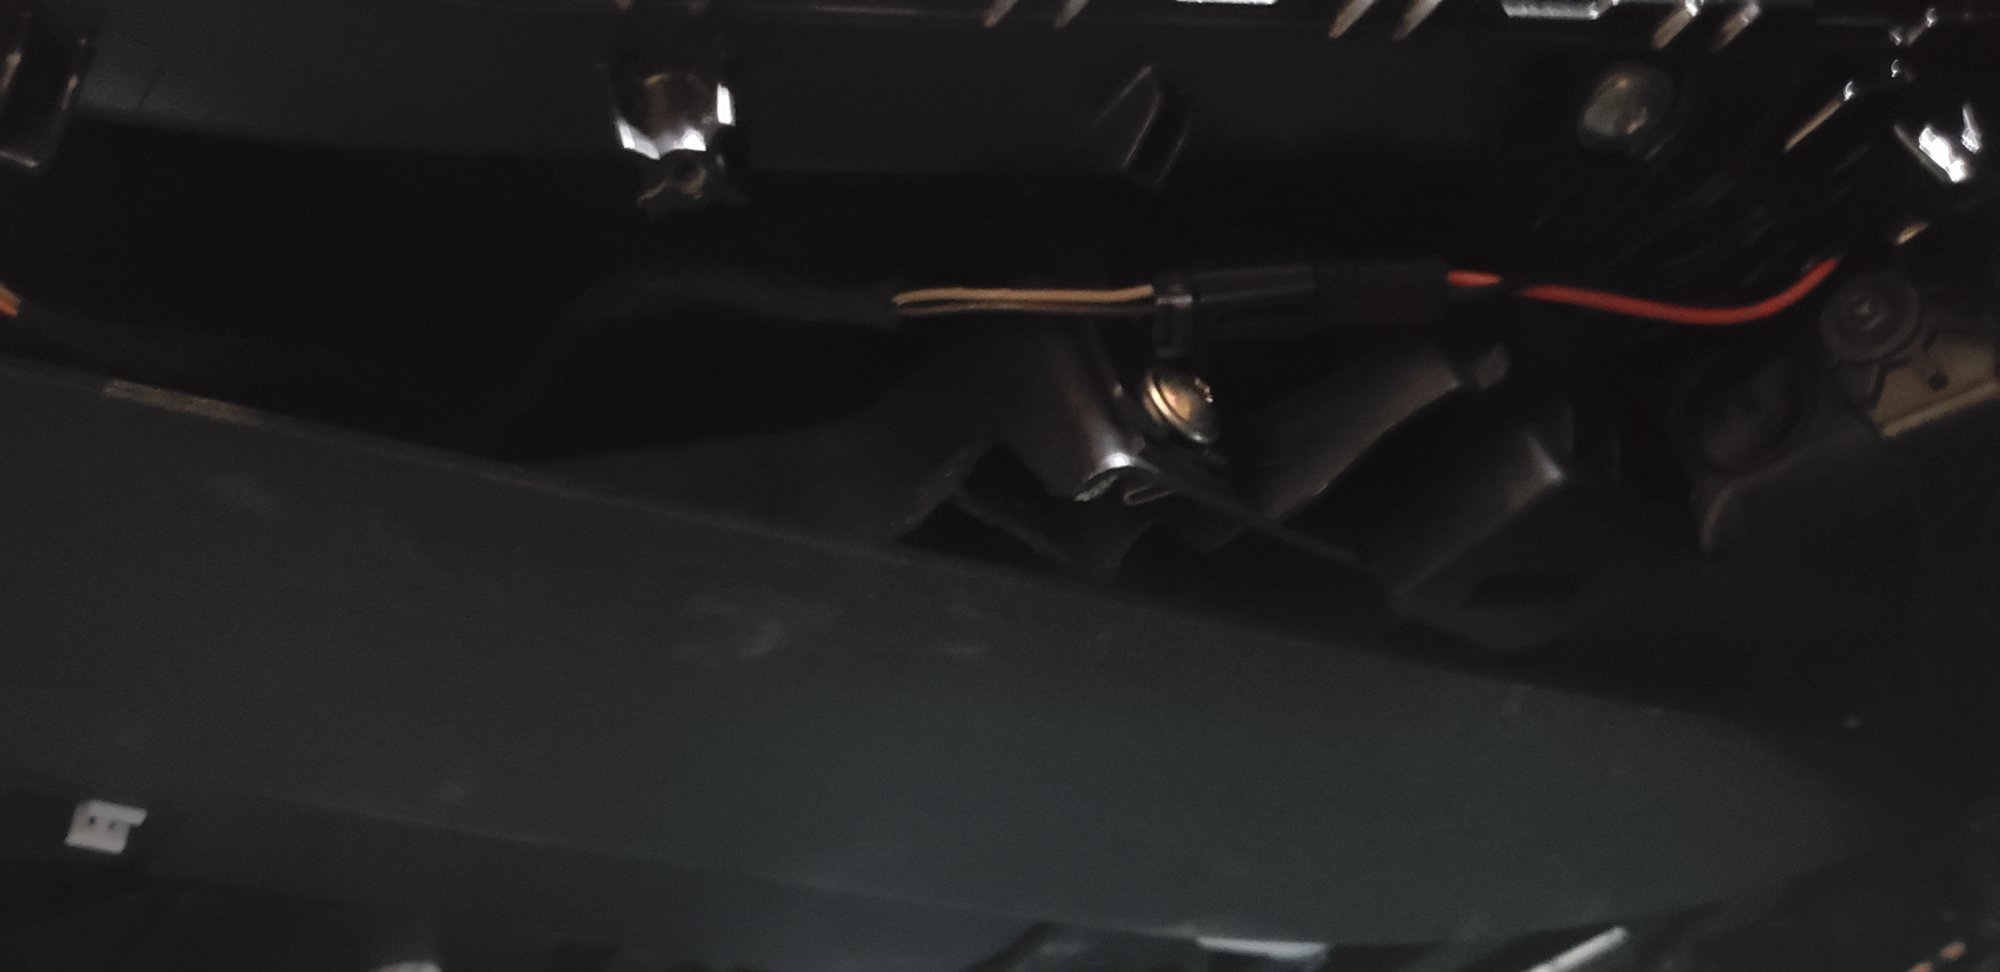
Open the right side of the center console.
There is a two wire (brown and white) plug which connects the LED from inside the middle center console to 12v.
Unplug this, and plug in your own 12v LED. The plug/connector is the same one used in all the interior LED's.
Attach that LED to the underside of the display mount.
The lid open/close sensor is not wired in line with this power line, so you're good to go.
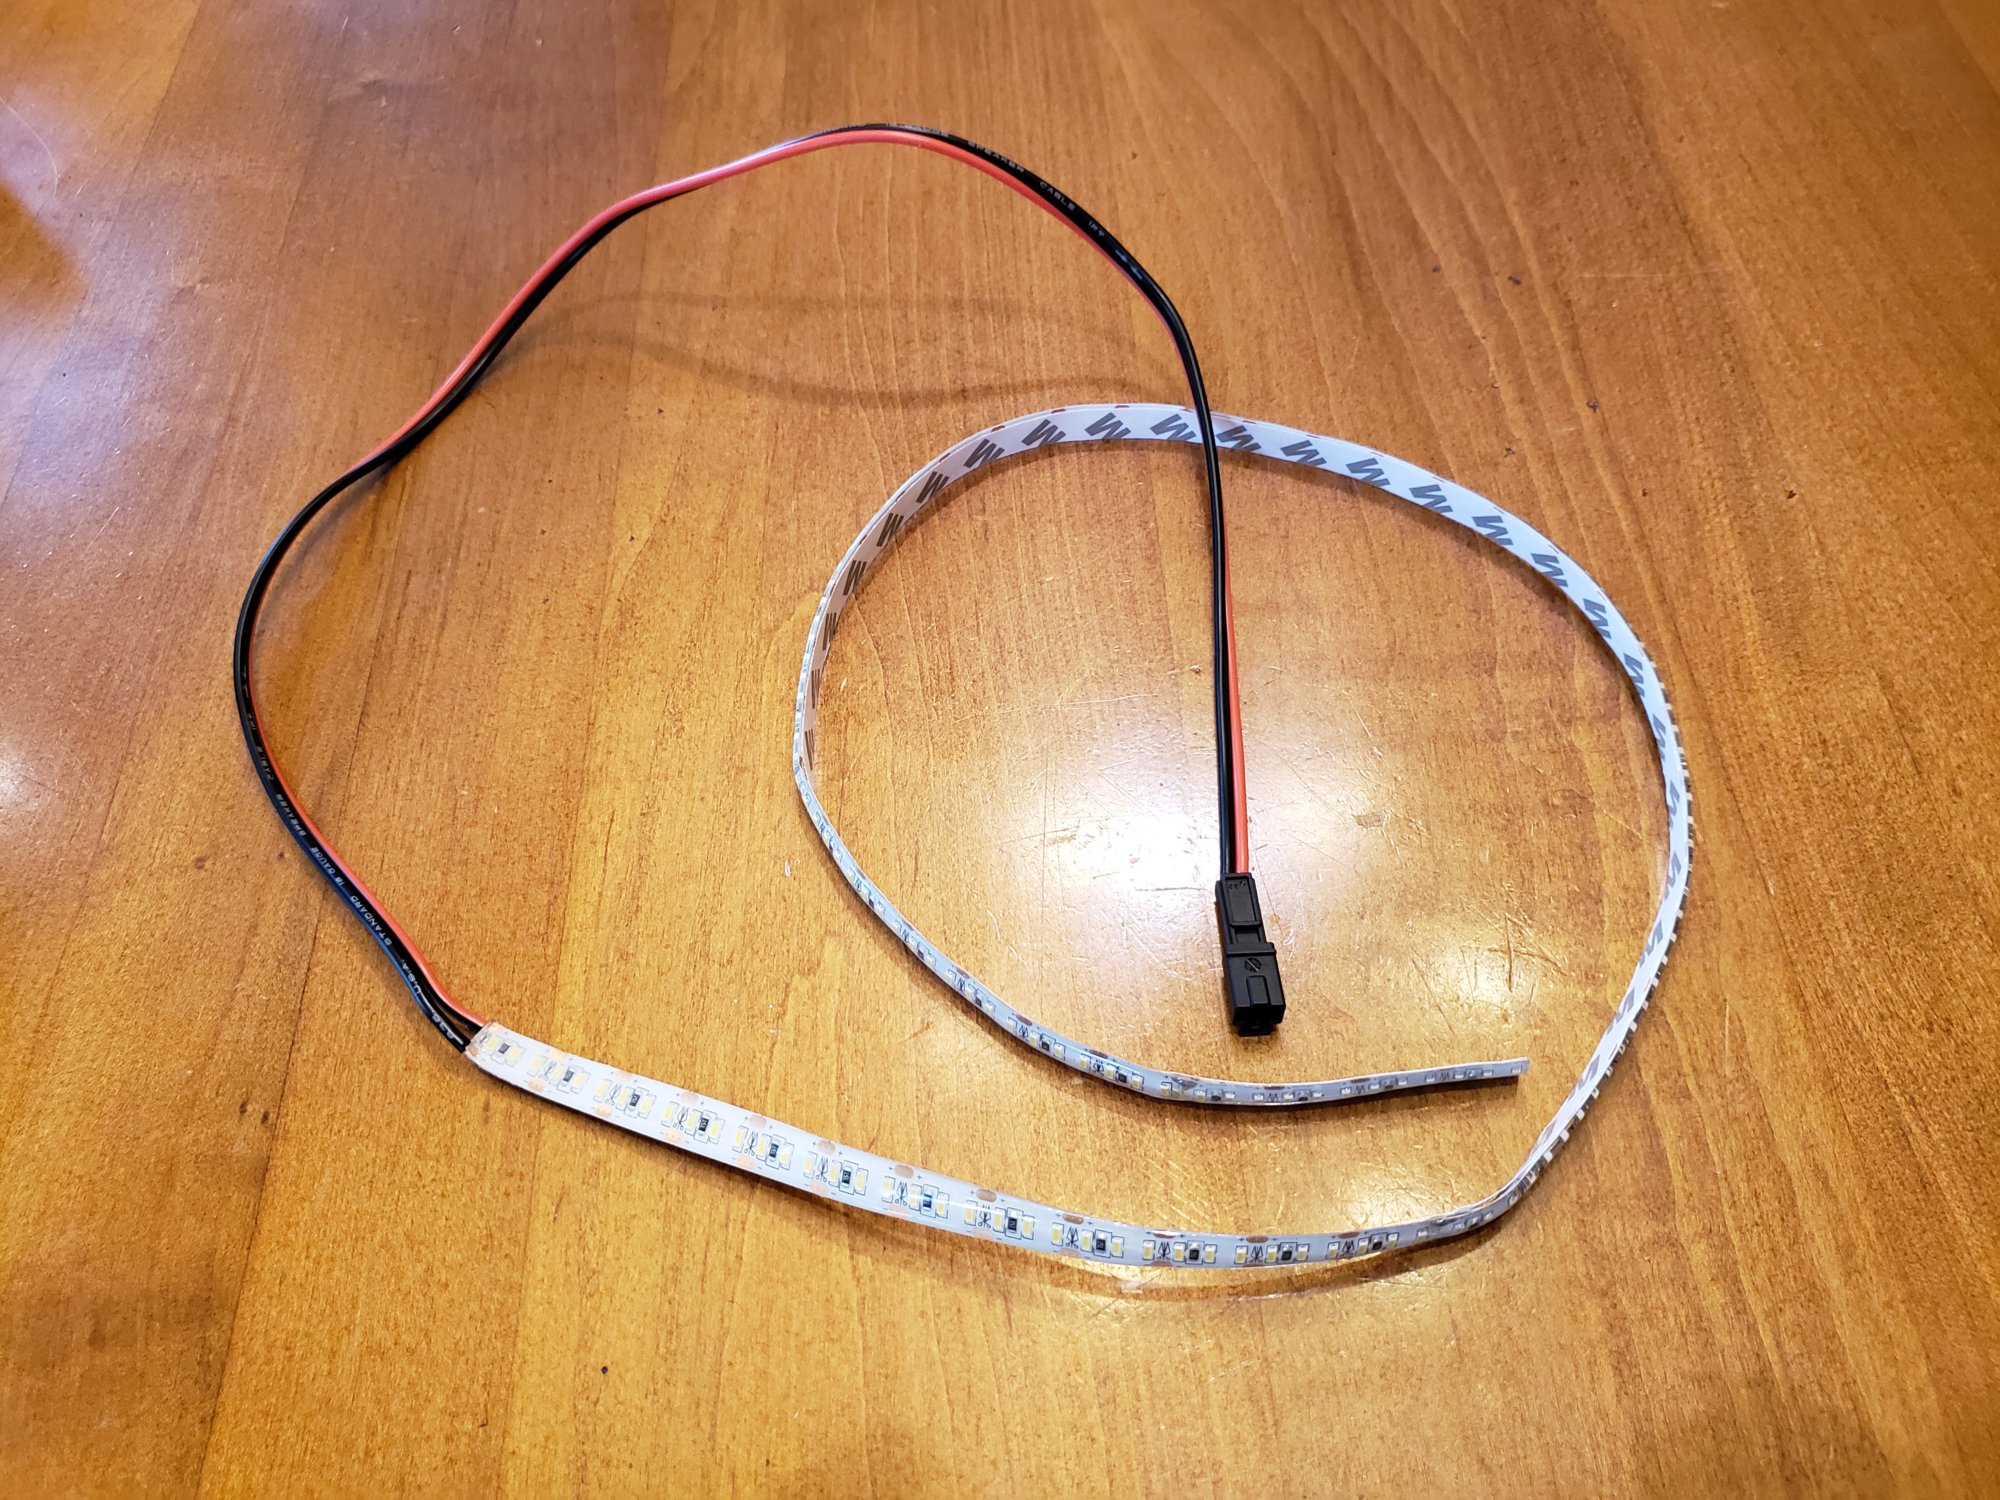
This is the LED strip and connector I used for the trunk. You only need a strip of 3 LED for this purpose.
Posted originally by :
chojn1
Any way to upgrade the dome lights
Open the right side of the center console.
There is a two wire (brown and white) plug which connects the LED from inside the middle center console to 12v.
Unplug this, and plug in your own 12v LED. The plug/connector is the same one used in all the interior LED's.
Attach that LED to the underside of the display mount.
The lid open/close sensor is not wired in line with this power line, so you're good to go.
This is the LED strip and connector I used for the trunk. You only need a strip of 3 LED for this purpose.
Posted originally by :
chojn1
Similar threads
- Replies
- 1
- Views
- 1K
- Replies
- 0
- Views
- 617
- Replies
- 1
- Views
- 1K