View attachment 329348 View attachment 329349
Hi there, I finally finished installing the Suntek PPF kit this weekend, after spending various late nights from 11pm all the way until 5:30am ( the main bumper), but also 5 nights in Portland delayed my project timeline.
With regards to the kit, the quality of the Suntek kit from Servo PPF was top notch. All the cuts were precise and fit very well. Being the first time I’ve ever done an install like this, I can appreciate the quality and craftsmanship it requires to install it. Several times I had to pull up sections that got lint stuck to the adhesive side of the film, and you literally have to scrape the micro fibers off of the film. That is probably the biggest time delay, as I tried to remove as much of any lint or debris that showed.
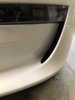
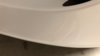
My take away from the precut kit install, it’s not advised to attempt to wrap around the edges. If anything, you want it to be just slightly in from the edge, so that there is no overhanging material. You don’t want the film to get caught by s sponge or drying towel when caring for the surface, so it’s best if it the PPF seals just before the edge. You can stretch the material to a certain degree, but it’s not enough to wrap and have a good deal on the other side. There was a section of the full hood that had about 1mm of overhang, and it wouldn’t stay down around the corner. I used a fine blade with the flat side against the edge of the hood and gliding that against the film.
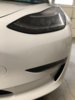
For the bumper, the one-man install was pretty hard, and I tried to follow the tack guide according to the numbers, but there is some leeway on when you align the parking sensors. The design of the template requires that you stretch the film so that it contours around the shapes and curves, such as the top of the bumper where it meets the hood. Along that curvature, I ended up with a lot of fingering along the edge, such that there were about 15 ripples forming at the edge all along the hood seam. The film had soap solution underneath so it wouldn’t tackand stay down. I knew it would be best to just leave it alone until dries further, and so the next day I was able to slowly and carefully squeegee it down, but without and slip solution to lubricate the squeegee. I did it dry as to prevent any water from getting in there again. I did it with a softer rubber squeegee so that I wouldn’t scratch the surface.
Also, when stretching the film, it is best to do so from center sections, and no by pulling on the film from the end/edge your are working on. I used my flat palm from the center of the film piece and pushed out towards the direction the film needed to be stretched, that way the film cutout wouldn’t lose its precise curvature, in this case the wheel-well. Also, cutouts like the parking sensors-you don’t want to stretch the film around there and make the circle look like like an oval, so push the material from a few inches away from the circle and slide the film cutout ‘towards’ the sensor.
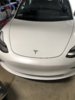
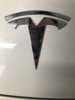
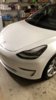
Some shots of the finished project!


I'm on to the hood which I clay barred last night, and now needs a polish before putting down the film. I'll report back how the pre-cut emblem looks upon install. View attachment 325939 View attachment 325939 View attachment 325940 View attachment 325941 View attachment 325942