Here’s the differentiating factor between the S and X; the engineers who designed and built them say the X is capable of towing 5000lbs and the S is not.If you can tell us what exactly is different in Model X that gives it the 5000lb towing capacity the whole community will be grateful to you‚ because nobody seems to have a definitive answer on that.
Not really. According to EU standard the vendor had to show extensive test result with the target vehicle and the product was finally approved for use with Model S.
Not sure where you are finding this relationship between gross vehicle weight and its towing capacity. I don't find this a sound argument and this is why. The towing capacity you mentioned may be true for F250 but lookup the specs for F150. F150 weighs 5900lbs (barely 200lbs more than my Model S) but has a towing capacity of 14000lbs. On the same token Model X is also only 400lb heavier for the same battery size and has a 5000lb towing capacity. The vehicle weight is relevant to towing only in relation to the tongue weight (or vertical pressure on the hitch) and that weight along with all passenger and luggage shouldn't exceed the gross weight or GVWR.
The following factors impact towing:
Engine/Transmission (drive train)‚ engine cooling (or battery cooling if I want to draw a parallel)‚ chassis/structure‚ suspension‚ breaking. As far as I could find‚ dual motor Model S is identical to Model X in all these categories. Please tell us if you are aware of anything different.


Welcome to Tesla Motors Club
Discuss Tesla's Model S, Model 3, Model X, Model Y, Cybertruck, Roadster and More.
Register
Install the app
How to install the app on iOS
You can install our site as a web app on your iOS device by utilizing the Add to Home Screen feature in Safari. Please see this thread for more details on this.
Note: This feature may not be available in some browsers.
-
Want to remove ads? Register an account and login to see fewer ads, and become a Supporting Member to remove almost all ads.
You are using an out of date browser. It may not display this or other websites correctly.
You should upgrade or use an alternative browser.
You should upgrade or use an alternative browser.
Class 3 Tow Hitch For Model S
- Thread starter arman1010
- Start date
Evoforce
Active Member
It wasn't made known what the engineers did or didn't address at Tesla. But, other engineers outside of Tesla have designed aftermarket products that work for the car. Go sling mud somewhere else...Here’s the differentiating factor between the S and X; the engineers who designed and built them say the X is capable of towing 5000lbs and the S is not.
There are many reports out there in various forums (refering to ex Tesla engineers) that claims Tesla was in the process of certifying Model S for towing but then simply ran out of time before the release date and then later they got busy with other priorities.Here’s the differentiating factor between the S and X; the engineers who designed and built them say the X is capable of towing 5000lbs and the S is not.
Many suspect this was deliberately done by Tesla to give Model X a marketing edge and I believe them. When I bought my Tesla I seriously considered model X due to Canadian winters. But when I noticed that with air suspension Model S's ground clearance is only 0.1 inch less than X‚ on top of it I can get an S with awd dual motor option and also get a 3rd row seating for occasional 7 passenger (2 children) hauling‚ all of a sudden X's were no longer appealing to me. I decided to sacrifice the funky falcon wing doors for extra range‚ faster acceleration and a much better looking (In my opinion) car.
Yes. Tesla says NO for towing but try getting an answer from them for "Why not?"
So you just confirmed what I said. The manufacturer, for whatever reason, does not certify the MS for towing.There are many reports out there in various forums (refering to ex Tesla engineers) that claims Tesla was in the process of certifying Model S for towing but then simply ran out of time before the release date and then later they got busy with other priorities.
Many suspect this was deliberately done by Tesla to give Model X a marketing edge and I believe them. When I bought my Tesla I seriously considered model X due to Canadian winters. But when I noticed that with air suspension Model S's ground clearance is only 0.1 inch less than X‚ on top of it I can get an S with awd dual motor option and also get a 3rd row seating for occasional 7 passenger (2 children) hauling‚ all of a sudden X's were no longer appealing to me. I decided to sacrifice the funky falcon wing doors for extra range‚ faster acceleration and a much better looking (In my opinion) car.
Yes. Tesla says NO for towing but try getting an answer from them for "Why not?"
All the rest of the conjecture is 100% meaningless and, to top it off, the sources are “ex engineers” and “many” people.
Okay.
I’m not slinging mud. Do me a favor and don’t drive anywhere near me with your bootleg tow hitch and whatever you’re pulling. Are you even installing a brake controller for your 4000lb rig? I’m guessing “no”. Because why be safe?It wasn't made known what the engineers did or didn't address at Tesla. But, other engineers outside of Tesla have designed aftermarket products that work for the car. Go sling mud somewhere else...
Evoforce
Active Member
I’m not slinging mud. Do me a favor and don’t drive anywhere near me with your bootleg tow hitch and whatever you’re pulling. Are you even installing a brake controller for your 4000lb rig? I’m guessing “no”. Because why be safe?
Don't go play in the street and you will be a little safer... Now go and sling some more mud in your own back yard...
For anyone else looking for high capacity hitch‚ here is a more expensive option to consider and it is certified for use in Germany and Switzerland.
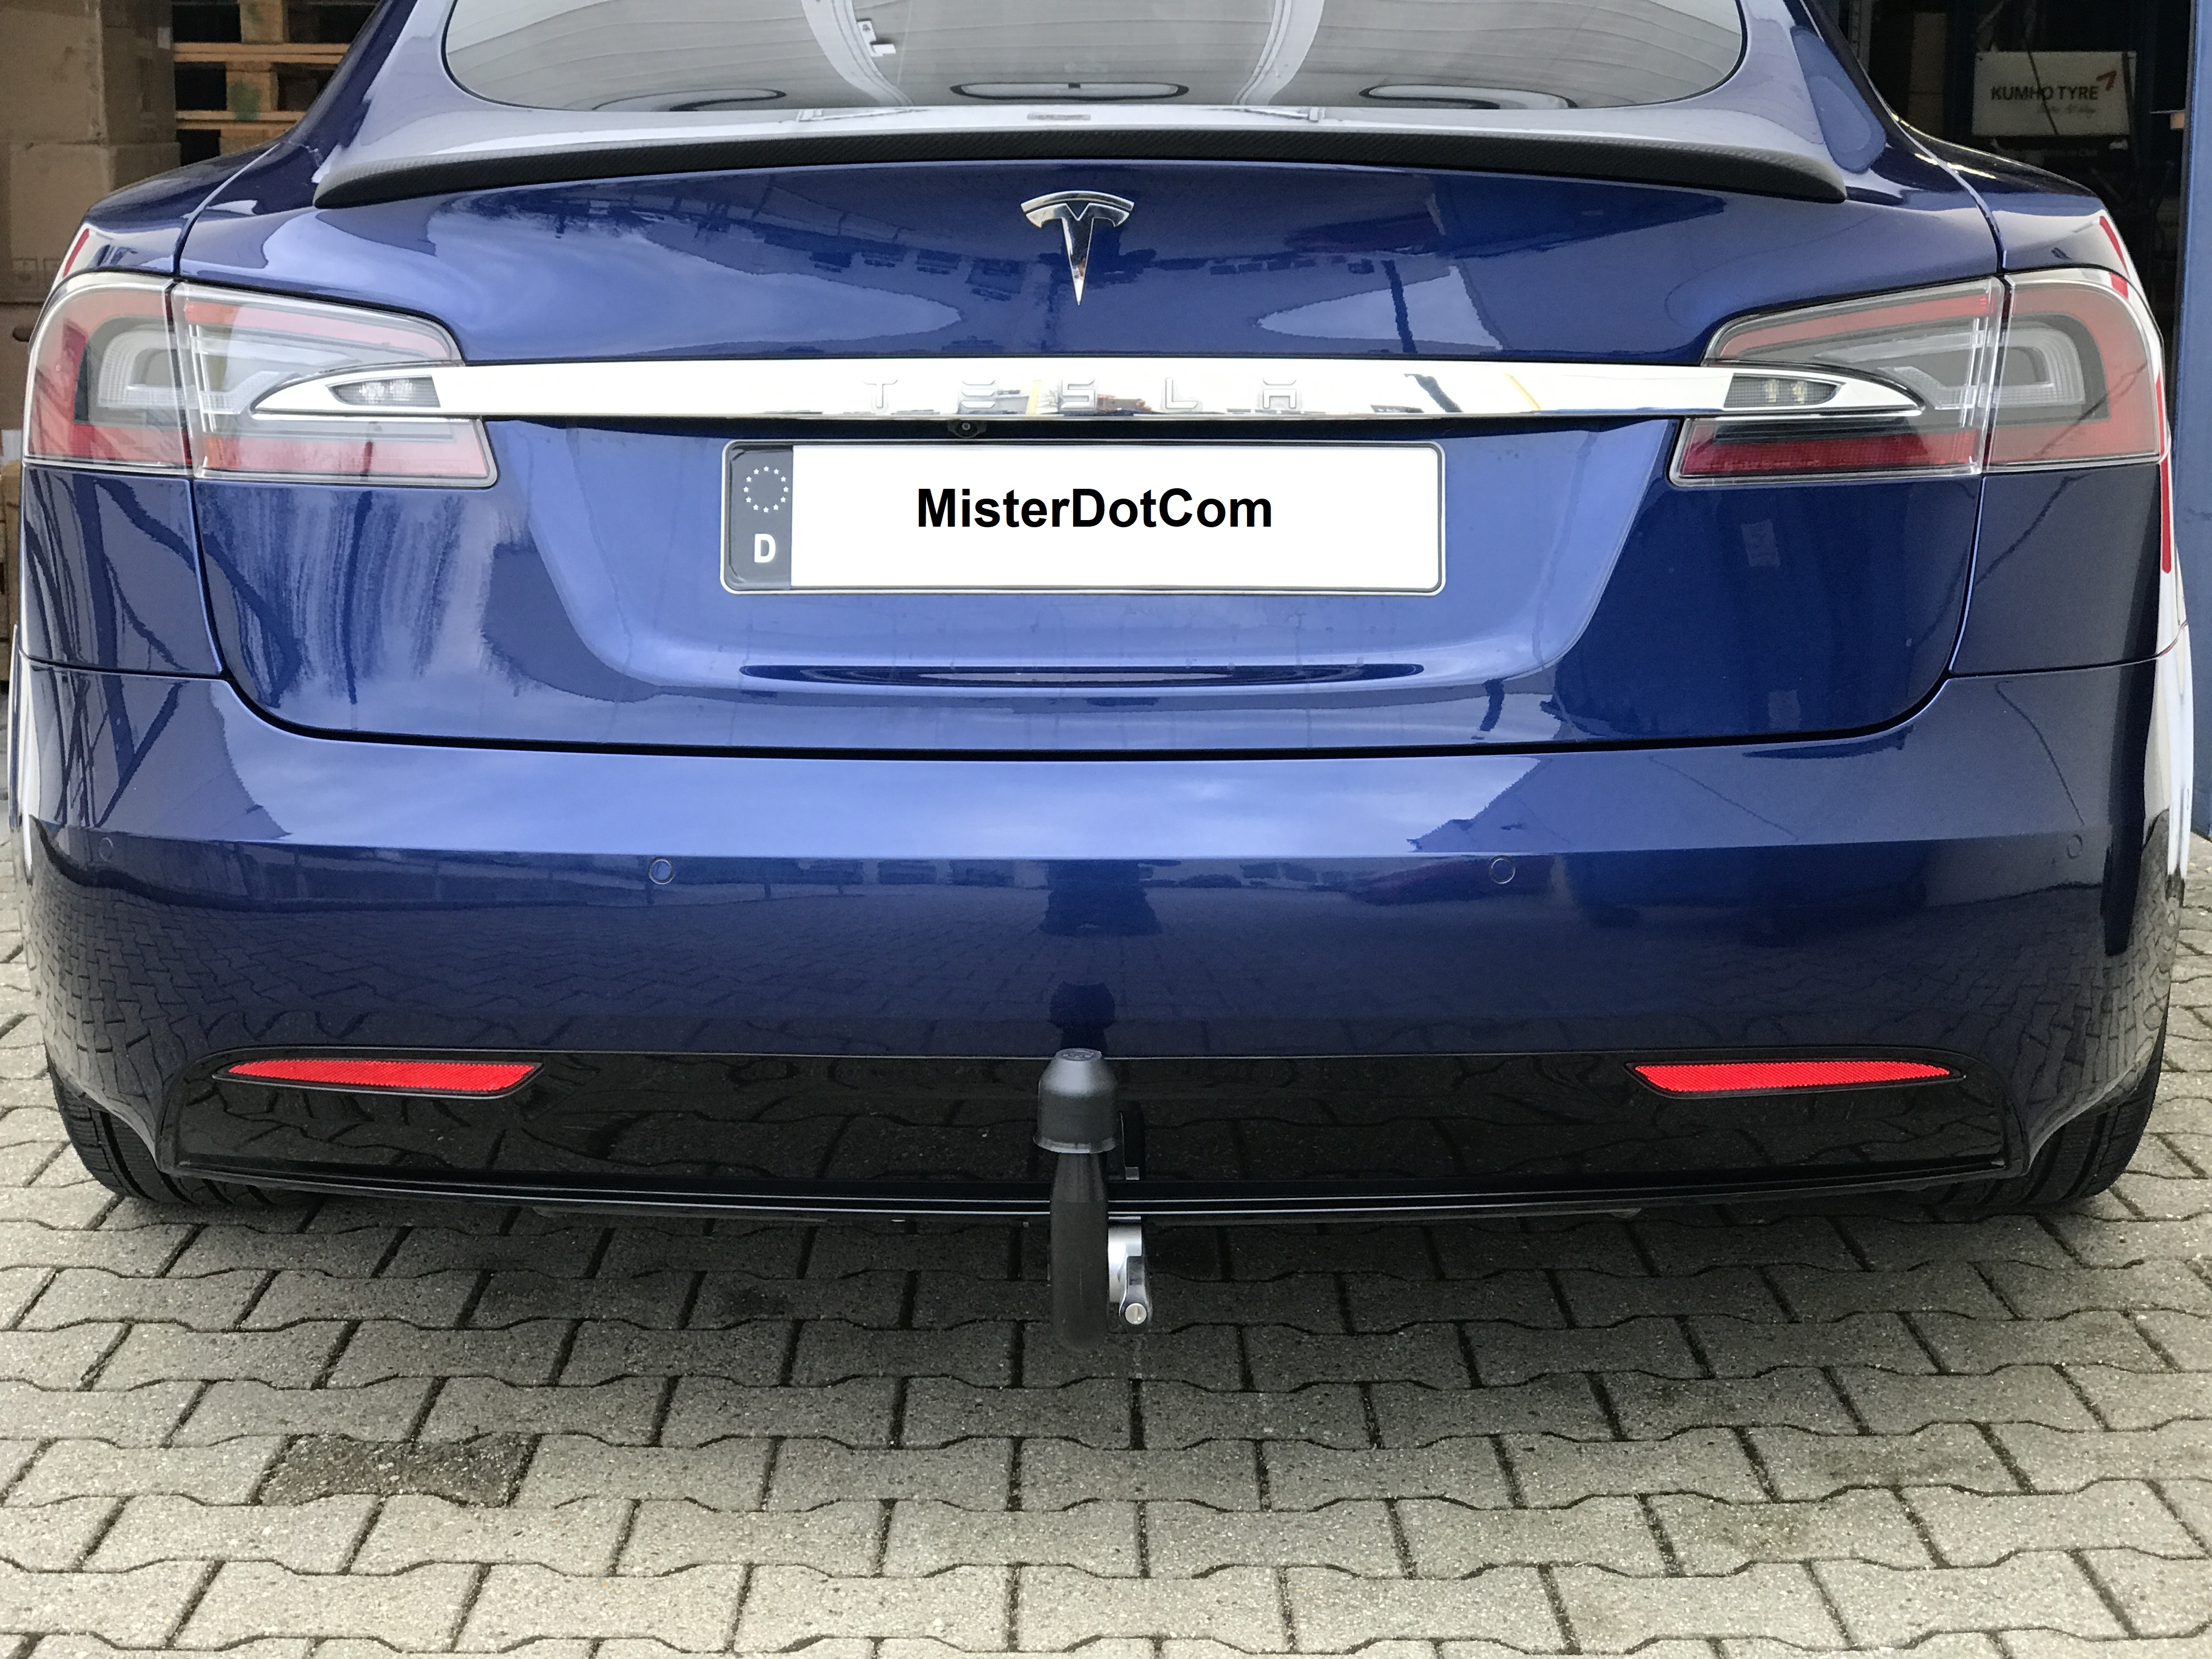
 www.misterdotcom.de
Anhängerkupplung Tesla Model S
Abnehmbare Anhängerkupplung für Tesla Model S - Alle Typen und Baujahre Sie haben sich für einen Tesla Model S entschieden oder planen sich dieses…
Please check inbox.Don't go play in the street and you will be a little safer... Now go and sling some more mud in your own back yard...
For anyone else looking for high capacity hitch‚ here is a more expensive option to consider and it is certified for use in Germany and Switzerland.
Anhängerkupplung Tesla Model S
Abnehmbare Anhängerkupplung für Tesla Model S - Alle Typen und Baujahre Sie haben sich für einen Tesla Model S entschieden oder planen sich dieses…
There's actually pictures of the TUV approval testing... It's not just welded in some garage, "ah I'm sure that's strong enough", this is pro quality stuff.
It's an expensive hitch, but this kind of testing can't be cheap.


ucmndd
Well-Known Member

I was finally able to finish the project. It took a while but I cannot be happier with the way it came out. I have followed the same steps as @Evoforce‚ except that all his heard work saved me from all the trial an error that he had to go through. Thanks @Evoforce.
These are the steps I followed:
1. Ordered a Class 1 Model S and a class 3 Model X Hitch( Drawtite 24958 & 76143)
2. Used the model s hitch to transfer the bolt pattern into the class 3 hitch (remember the new hitch will be installed on bottom 3 rows of bolts and the top row of bolt will remain unused)
3. Took the Class 3 hitch into a machine shop and drilled 4 new holes and adjusted the the top inner holes on each side
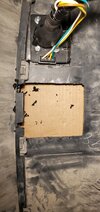
4. Built an isolation circuit using Optocouplers for the 7 pin trailer hitch connector so that the trailer lights donot draw power from Tesla light circuits
5. Custom built a wiring harness using the isolation circuit combined with Takonsha ZCI circuit isolator (Yah its a bit of an overkill)
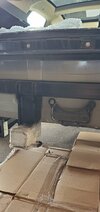
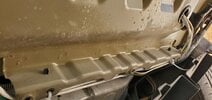
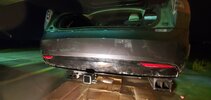
6. Removed the rear outer bumper cover following the Uhaul hitch installation video
7. Removed the bumper support
8. Cut and installed a layer of heavy duty pastic over the bolts so that the hitch doesn't touch the aluminium body and cause any corrosion issues
9. Cut the plastic under panel so that the hitch receiver can stick out.
10. Installed the 7 pin plug on the plastic under panel and pulled the wires through a grommet under the trunk.
11. Cut 2 additional notches on the plastic underpanel right behind the bumper light reflectors and two more near the center so that the hitch flanges can slide into those grooves
12. Installed the bumper cover‚ pulled a 30amp positive all the way from the battery (following UHaul wiring harness video) and completed the wiring harness installation Andrew braught a few extra 12V outlet in the trunk area by afding a new fuse box.
Here are the parts I used:
1.https://www.amazon.ca/gp/aw/d/B07121N4YV?psc=1&ref=ppx_pop_mob_b_asin_title
2.https://www.amazon.ca/gp/aw/d/B0721TDDMG/ref=yo_ii_img?ie=UTF8&psc=1
3.https://www.amazon.ca/gp/aw/d/B07WWHFJKS?psc=1&ref=ppx_pop_mob_b_asin_image
4.https://www.amazon.ca/gp/aw/d/B001EP0HPI?psc=1&ref=ppx_pop_mob_b_asin_image
5.https://www.amazon.ca/gp/aw/d/B07V2MVM2K?psc=1&ref=ppx_pop_mob_b_asin_image
6.https://www.amazon.ca/gp/aw/d/B0834WD483?psc=1&ref=ppx_pop_mob_b_asin_image
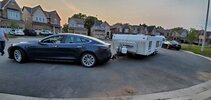
I used the following rig:
1. Trailmanor 3023 popup camper (2900lb empty weight)
2. Takonsha Prodigy RF wireless break controller
3. Camco Eaz Lift weight distribution hitch with sway control.
4. Receiver height was approximately 10" with air suspension in standard mode. The tongue height when level was around 19". The ball was 3"‚ so I used the hitch shank in a 6" rise configuration.
Initial test results:
1. The hitch feels very secure.
2. The bumper feels solid over it‚ even without the stock bumper support underneath
3. The towing experience was factastic. I drove over a bridge while there was a wind gust adviaory and still didn't feel a thing. There were no swawing and had no issue maintaining the center of the lane. If it wasn't for the moaning and rattling noises coming from the hitch I wouldn't even know that I was towing something.
4. The auto pilot performed beautifully.
5. My weight distribution hitch was distributing very little weight because it wasn't properly setup (as I didn't have the required torque wrench). Nevertheless‚ the load was very steady and the experience will only get better when I set it up properly
6. Energy consumption without the rig that day was about 180Wh/km. Considering that I was pulling a flat box befind me these were the numbers:
A) at110km/hr I was burning 352Wh/km
B) at 100km/hr it was 340
C) at 90km/hr it came down to 320
Lessons learned:
1. Must use a backup camera behind the camper
2. The rattling noise from the receiver can unsettled inexperienced drivers. Use a tie in bolt clamp to address that (Trimax THC200 Univeral Anti-Rattle Clamp Fits 2" Hitch, Chains, Clamps & Hooks - Amazon Canada)
3. Use Lithium Dry Grease on all hitch friction surfaces
Next Step:
1. Continue gathering range data in different driving conditions
2. Properly configure the weight distribution hitch and measure each axle wieght by taking the rig into a weighing station
3. Program different breaking profiles for the prodigy break controller in order to maximize the regen from forward momentum but still having full breaking ability at the finger tips.
For anyone who maybe interested but cautious about this mod‚ consider the following:
1. All components that impacts towing performance or parts that are impacted by towing are identical between Model S and Model X.
2. Your Model S is even heavier than certain year models of Ford F150
3. Tesla cannot deny any warranty unless they can prove that the claimed damage resulted directly because of the mod.
4. Range will be severely impacted by towing. For my use case‚ I am hoping to get at least 50% of the rated range while towing.
5. Even if I don't tow with the vehicle‚ having the class 3 hitch will allow me to use up to a 500lb cargo carrier on the back.
6. Most importantly‚ consider your local laws regarding towing and follow them
These are the steps I followed:
1. Ordered a Class 1 Model S and a class 3 Model X Hitch( Drawtite 24958 & 76143)
2. Used the model s hitch to transfer the bolt pattern into the class 3 hitch (remember the new hitch will be installed on bottom 3 rows of bolts and the top row of bolt will remain unused)
3. Took the Class 3 hitch into a machine shop and drilled 4 new holes and adjusted the the top inner holes on each side
4. Built an isolation circuit using Optocouplers for the 7 pin trailer hitch connector so that the trailer lights donot draw power from Tesla light circuits
5. Custom built a wiring harness using the isolation circuit combined with Takonsha ZCI circuit isolator (Yah its a bit of an overkill)
6. Removed the rear outer bumper cover following the Uhaul hitch installation video
7. Removed the bumper support
8. Cut and installed a layer of heavy duty pastic over the bolts so that the hitch doesn't touch the aluminium body and cause any corrosion issues
9. Cut the plastic under panel so that the hitch receiver can stick out.
10. Installed the 7 pin plug on the plastic under panel and pulled the wires through a grommet under the trunk.
11. Cut 2 additional notches on the plastic underpanel right behind the bumper light reflectors and two more near the center so that the hitch flanges can slide into those grooves
12. Installed the bumper cover‚ pulled a 30amp positive all the way from the battery (following UHaul wiring harness video) and completed the wiring harness installation Andrew braught a few extra 12V outlet in the trunk area by afding a new fuse box.
Here are the parts I used:
1.https://www.amazon.ca/gp/aw/d/B07121N4YV?psc=1&ref=ppx_pop_mob_b_asin_title
2.https://www.amazon.ca/gp/aw/d/B0721TDDMG/ref=yo_ii_img?ie=UTF8&psc=1
3.https://www.amazon.ca/gp/aw/d/B07WWHFJKS?psc=1&ref=ppx_pop_mob_b_asin_image
4.https://www.amazon.ca/gp/aw/d/B001EP0HPI?psc=1&ref=ppx_pop_mob_b_asin_image
5.https://www.amazon.ca/gp/aw/d/B07V2MVM2K?psc=1&ref=ppx_pop_mob_b_asin_image
6.https://www.amazon.ca/gp/aw/d/B0834WD483?psc=1&ref=ppx_pop_mob_b_asin_image
I used the following rig:
1. Trailmanor 3023 popup camper (2900lb empty weight)
2. Takonsha Prodigy RF wireless break controller
3. Camco Eaz Lift weight distribution hitch with sway control.
4. Receiver height was approximately 10" with air suspension in standard mode. The tongue height when level was around 19". The ball was 3"‚ so I used the hitch shank in a 6" rise configuration.
Initial test results:
1. The hitch feels very secure.
2. The bumper feels solid over it‚ even without the stock bumper support underneath
3. The towing experience was factastic. I drove over a bridge while there was a wind gust adviaory and still didn't feel a thing. There were no swawing and had no issue maintaining the center of the lane. If it wasn't for the moaning and rattling noises coming from the hitch I wouldn't even know that I was towing something.
4. The auto pilot performed beautifully.
5. My weight distribution hitch was distributing very little weight because it wasn't properly setup (as I didn't have the required torque wrench). Nevertheless‚ the load was very steady and the experience will only get better when I set it up properly
6. Energy consumption without the rig that day was about 180Wh/km. Considering that I was pulling a flat box befind me these were the numbers:
A) at110km/hr I was burning 352Wh/km
B) at 100km/hr it was 340
C) at 90km/hr it came down to 320
Lessons learned:
1. Must use a backup camera behind the camper
2. The rattling noise from the receiver can unsettled inexperienced drivers. Use a tie in bolt clamp to address that (Trimax THC200 Univeral Anti-Rattle Clamp Fits 2" Hitch, Chains, Clamps & Hooks - Amazon Canada)
3. Use Lithium Dry Grease on all hitch friction surfaces
Next Step:
1. Continue gathering range data in different driving conditions
2. Properly configure the weight distribution hitch and measure each axle wieght by taking the rig into a weighing station
3. Program different breaking profiles for the prodigy break controller in order to maximize the regen from forward momentum but still having full breaking ability at the finger tips.
For anyone who maybe interested but cautious about this mod‚ consider the following:
1. All components that impacts towing performance or parts that are impacted by towing are identical between Model S and Model X.
2. Your Model S is even heavier than certain year models of Ford F150
3. Tesla cannot deny any warranty unless they can prove that the claimed damage resulted directly because of the mod.
4. Range will be severely impacted by towing. For my use case‚ I am hoping to get at least 50% of the rated range while towing.
5. Even if I don't tow with the vehicle‚ having the class 3 hitch will allow me to use up to a 500lb cargo carrier on the back.
6. Most importantly‚ consider your local laws regarding towing and follow them
Attachments
-
 20210908_131757.jpg269.2 KB · Views: 138
 -
 20210908_131808.jpg296.7 KB · Views: 122
 -
 20210908_163449.jpg271.8 KB · Views: 117
 -
 20210908_204735.jpg379.5 KB · Views: 111
 -
 20210908_204856.jpg324.6 KB · Views: 125
 -
 20210908_230833.jpg283.3 KB · Views: 119
 -
 20210908_230841.jpg197.7 KB · Views: 141
 -
 20210911_193833.jpg312.1 KB · Views: 120
 -
 20210911_211057.jpg376.6 KB · Views: 189
I was finally able to finish the project. It took a while but I cannot be happier with the way it came out. I have followed the same steps as @Evoforce‚ except that all his heard work saved me from all the trial an error that he had to go through. Thanks @Evoforce.
These are the steps I followed:
1. Ordered a Class 1 Model S and a class 3 Model X Hitch( Drawtite 24958 & 76143)
2. Used the model s hitch to transfer the bolt pattern into the class 3 hitch (remember the new hitch will be installed on bottom 3 rows of bolts and the top row of bolt will remain unused)
3. Took the Class 3 hitch into a machine shop and drilled 4 new holes and adjusted the the top inner holes on each side
4. Built an isolation circuit using Optocouplers for the 7 pin trailer hitch connector so that the trailer lights donot draw power from Tesla light circuits
5. Custom built a wiring harness using the isolation circuit combined with Takonsha ZCI circuit isolator (Yah its a bit of an overkill)
6. Removed the rear outer bumper cover following the Uhaul hitch installation video
7. Removed the bumper support
8. Cut and installed a layer of heavy duty pastic over the bolts so that the hitch doesn't touch the aluminium body and cause any corrosion issues
9. Cut the plastic under panel so that the hitch receiver can stick out.
10. Installed the 7 pin plug on the plastic under panel and pulled the wires through a grommet under the trunk.
11. Cut 2 additional notches on the plastic underpanel right behind the bumper light reflectors and two more near the center so that the hitch flanges can slide into those grooves
12. Installed the bumper cover‚ pulled a 30amp positive all the way from the battery (following UHaul wiring harness video) and completed the wiring harness installation Andrew braught a few extra 12V outlet in the trunk area by afding a new fuse box.
Here are the parts I used:
1.https://www.amazon.ca/gp/aw/d/B07121N4YV?psc=1&ref=ppx_pop_mob_b_asin_title
2.https://www.amazon.ca/gp/aw/d/B0721TDDMG/ref=yo_ii_img?ie=UTF8&psc=1
3.https://www.amazon.ca/gp/aw/d/B07WWHFJKS?psc=1&ref=ppx_pop_mob_b_asin_image
4.https://www.amazon.ca/gp/aw/d/B001EP0HPI?psc=1&ref=ppx_pop_mob_b_asin_image
5.https://www.amazon.ca/gp/aw/d/B07V2MVM2K?psc=1&ref=ppx_pop_mob_b_asin_image
6.https://www.amazon.ca/gp/aw/d/B0834WD483?psc=1&ref=ppx_pop_mob_b_asin_image
I used the following rig:
1. Trailmanor 3023 popup camper (2900lb empty weight)
2. Takonsha Prodigy RF wireless break controller
3. Camco Eaz Lift weight distribution hitch with sway control.
4. Receiver height was approximately 10" with air suspension in standard mode. The tongue height when level was around 19". The ball was 3"‚ so I used the hitch shank in a 6" rise configuration.
Initial test results:
1. The hitch feels very secure.
2. The bumper feels solid over it‚ even without the stock bumper support underneath
3. The towing experience was factastic. I drove over a bridge while there was a wind gust adviaory and still didn't feel a thing. There were no swawing and had no issue maintaining the center of the lane. If it wasn't for the moaning and rattling noises coming from the hitch I wouldn't even know that I was towing something.
4. The auto pilot performed beautifully.
5. My weight distribution hitch was distributing very little weight because it wasn't properly setup (as I didn't have the required torque wrench). Nevertheless‚ the load was very steady and the experience will only get better when I set it up properly
6. Energy consumption without the rig that day was about 180Wh/km. Considering that I was pulling a flat box befind me these were the numbers:
A) at110km/hr I was burning 352Wh/km
B) at 100km/hr it was 340
C) at 90km/hr it came down to 320
Lessons learned:
1. Must use a backup camera behind the camper
2. The rattling noise from the receiver can unsettled inexperienced drivers. Use a tie in bolt clamp to address that (Trimax THC200 Univeral Anti-Rattle Clamp Fits 2" Hitch, Chains, Clamps & Hooks - Amazon Canada)
3. Use Lithium Dry Grease on all hitch friction surfaces
Next Step:
1. Continue gathering range data in different driving conditions
2. Properly configure the weight distribution hitch and measure each axle wieght by taking the rig into a weighing station
3. Program different breaking profiles for the prodigy break controller in order to maximize the regen from forward momentum but still having full breaking ability at the finger tips.
For anyone who maybe interested but cautious about this mod‚ consider the following:
1. All components that impacts towing performance or parts that are impacted by towing are identical between Model S and Model X.
2. Your Model S is even heavier than certain year models of Ford F150
3. Tesla cannot deny any warranty unless they can prove that the claimed damage resulted directly because of the mod.
4. Range will be severely impacted by towing. For my use case‚ I am hoping to get at least 50% of the rated range while towing.
5. Even if I don't tow with the vehicle‚ having the class 3 hitch will allow me to use up to a 500lb cargo carrier on the back.
6. Most importantly‚ consider your local laws regarding towing and follow them
Well done @arman1010! I am getting ready to do the same thing and I have already marked my Drawtite Model X hitch with the holes from a Model S Ecostealth hitch.
In step 11 you describe cutting additional notches to fit the bumper panel over the hitch. Is that visible from the exterior when it's all assembled? Do you have some pictures of that?
roblab
Active Member
People will do what they want to do. They can even overstep bounds and do somewhat unsafe things, simply because they can. Some trailer owners will make sure their hitch is heavy enough to haul a certain load, and another owner will see it, buy it, and haul ten times the weight because their trailer is heavier.
Problem is that many drivers are unaware of the weight distributions necessary to haul a trailer, and will do things because they "look OK to me".
Problem is that many drivers are unaware of the weight distributions necessary to haul a trailer, and will do things because they "look OK to me".
roblab
Active Member
This is like having your neighbor tell you the hitch is cool. Nothing like a professional opinion.They have never said a word to me about my trailer hitch except "cool" when it has been in for service. My warranty now has since mileage/time expired.
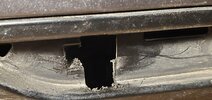
The 4th picture shows the 2 notches behind the cutout for your receiver. Cut as much rubbery material as you can without touching the plastic.Well done @arman1010! I am getting ready to do the same thing and I have already marked my Drawtite Model X hitch with the holes from a Model S Ecostealth hitch.
In step 11 you describe cutting additional notches to fit the bumper panel over the hitch. Is that visible from the exterior when it's all assembled? Do you have some pictures of that?
The 5th pic shows similar notches but those will be covered up when you reinstall the red light reflectors. Nothing shows from outside. Goodluck with your project.
I am here to learn and I went through any material I found on that subject. Educate us please.Problem is that many drivers are unaware of the weight distributions necessary to haul a trailer, and will do things because they "look OK to me".
Evoforce
Active Member
I wasn't looking for and didn't ask them for professional opinion. My statement was in regards to them not having any problem with warranty because the hitch was on the car.This is like having your neighbor tell you the hitch is cool. Nothing like a professional opinion.
NewbyMaybe
Newby1Kenowby
Installed the 76143 on my S, lessons learned:
The 4 new holes required turned out to be 5 on each side.
My car didn't have the rear jump seats or the crush pad so I didn't have a bolt pattern to copy.
My pilot holes were accurate but the cheap drill press I borrowed spun a little too fast and the final holes were off. Used a milling bit to oval them a bit.
Made plastic spacers out of some old bumper material.
Glad I went with the $200 draw-tite, no parts to wear out or brake.
It's barely noticeable, i forget it's there until I'm backing into a parking space with a curb. It sits higher than "most" curbs.
I'm looking to take on this project ") I need help with the electrical... How to wire the lights and power delivery.
I need help with the electrical... How to wire the lights and power delivery.
Also thinking it might be cool to wire an Inverter to the back to get power to a Trailer
@arman1010 , You got time to help? LOL I'm in Richmond Hill....
I need help with the electrical... How to wire the lights and power delivery.Also thinking it might be cool to wire an Inverter to the back to get power to a Trailer
@arman1010 , You got time to help? LOL I'm in Richmond Hill....
Similar threads
- Replies
- 2
- Views
- 342
- Replies
- 19
- Views
- 1K
- Replies
- 17
- Views
- 438
- Replies
- 14
- Views
- 1K