I replaced my hard-to-get-to cabin filter cover screw with a thumbscrew. Instead of having to use a short T20 wrench or bit and driver, I can now just twist the thumbscrew with 2 fingers.
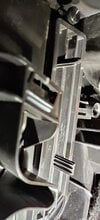
The purpose of this post is to show how I made my own thumbscrew from the original screw, a knob purchased at Ace Hardware, and some epoxy. I did buy a premade thumbscrew on eBay for $10 and think it's worth it, but it is out of stock currently. The above picture is of the eBay thumbscrew installed in my car. Very easy to screw and unscrew, and highly recommended if available for purchase.
If you want to DIY, here are the steps and pictures to help you along. Just remember that whatever epoxy you choose to use needs to fully cure before you try to screw the thumbscrew back into the car.
Tools and materials needed:
-Original cabin filter cover screw (you can try finding a replacement and sharing the exact specs, here's my post with measurements that might help.)
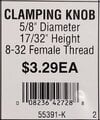
-Knob for thumbscrew head (bought at Ace Hardware, but any knob should work that's not taller than 0.75" and with a stem diameter equal to or less than 0.5". See picture for part #).
-Epoxy of your choosing
-Drill and 11/64” drill bit
-Hacksaw or other tool to cut off the screw head
-Alcohol or other degreaser to clean the screw and knob before epoxying
-Vise or other means of holding the knob while drilling into it.
Steps to get it done:
-Remove the cabin filter cover screw.
-Drill out the threaded hole on the knob with a 11/64" bit. Recommend holding it in a vise with rubber or wood to keep the knob from being damaged.
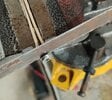
-Cut off the head of the screw with a hacksaw. Recommend holding it in a vise (to protect the threads I used a popsicle stick broken in half).
-Test fit screw to make sure you can insert it into the knob easily. Threaded part should protrude about 0.3" or more from the knob.
-Clean screw and knob with alcohol and let them dry.
-Mix the epoxy together well (I use popsicle sticks, but you may have chosen self-mixing) and put a small amount inside the knob's hole. Insert the screw and let it cure fully before trying to screw it back in.
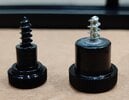
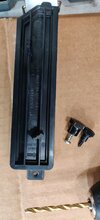
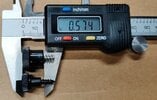
Note that in the pictures, the small black thumbscrew is the one I purchased from eBay and the bigger 2-color one is my homemade one. If anybody has questions about measurements (especially about the knob size limits I listed above), ask and I can explain and show more pictures I took with my calipers.

The purpose of this post is to show how I made my own thumbscrew from the original screw, a knob purchased at Ace Hardware, and some epoxy. I did buy a premade thumbscrew on eBay for $10 and think it's worth it, but it is out of stock currently. The above picture is of the eBay thumbscrew installed in my car. Very easy to screw and unscrew, and highly recommended if available for purchase.
If you want to DIY, here are the steps and pictures to help you along. Just remember that whatever epoxy you choose to use needs to fully cure before you try to screw the thumbscrew back into the car.
Tools and materials needed:
-Original cabin filter cover screw (you can try finding a replacement and sharing the exact specs, here's my post with measurements that might help.)
-Knob for thumbscrew head (bought at Ace Hardware, but any knob should work that's not taller than 0.75" and with a stem diameter equal to or less than 0.5". See picture for part #).

-Epoxy of your choosing
-Drill and 11/64” drill bit
-Hacksaw or other tool to cut off the screw head
-Alcohol or other degreaser to clean the screw and knob before epoxying
-Vise or other means of holding the knob while drilling into it.
Steps to get it done:
-Remove the cabin filter cover screw.
-Drill out the threaded hole on the knob with a 11/64" bit. Recommend holding it in a vise with rubber or wood to keep the knob from being damaged.
-Cut off the head of the screw with a hacksaw. Recommend holding it in a vise (to protect the threads I used a popsicle stick broken in half).

-Test fit screw to make sure you can insert it into the knob easily. Threaded part should protrude about 0.3" or more from the knob.

-Clean screw and knob with alcohol and let them dry.
-Mix the epoxy together well (I use popsicle sticks, but you may have chosen self-mixing) and put a small amount inside the knob's hole. Insert the screw and let it cure fully before trying to screw it back in.

Note that in the pictures, the small black thumbscrew is the one I purchased from eBay and the bigger 2-color one is my homemade one. If anybody has questions about measurements (especially about the knob size limits I listed above), ask and I can explain and show more pictures I took with my calipers.


