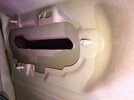
So it seems that one of the new "features" of the 2021 Model 3 is sunken rear door handles. This was one of the issues I noted after bringing my new car from the delivery center straight to the repair center on day 1 as so many people do.
The SA gasped at my door handles and exclaimed "That isn't right!".
But when I picked it up a week later the sunken handles were unchanged and that very same SA told me they didn't work on them because "It's within spec."
I measured the misalignment to be 1.8mm.
Then when the mobile tech came out with the backordered parts I asked if he would fix the handles but he politely declined. I asked him for tips on fixing it myself and he said "don't".
I didn't listen, so here we go. Before/after pics to get you motivated:

These are the tools in order of use:
T27 driver, medium length for the 2 door panel bolts
Trim tool, though maybe the fork kind would be better because the snaps are pretty far inboard from the edges.
Jeweler's flathead to unlock the door & window switch connectors
13mm socket with a short extension for the glass (small ratchet is easier as bolts are not very tight)
8mm socket perhaps powered for the 9 door module bolts
Long flathead for poking at the release clip on the door handle wiring connector
10mm socket on a long driver for removing the 3 door handle nuts

Step 1 is to remove the glass and here's a great video that tells you how to do it in 3 minutes:
I'll add that you might not be able to just yank the interior panel off like that and be careful when you do - the wires are very short! Once the panel is loose you should remove one of the round rubber covers and roll down the window about half-way so that you can see the 13mm bolts securing the glass. Then use the jeweler's screwdriver to disconnect the wires to the window switch and door release button. The other two wires can be removed by hand but you may find it easier to pull the puddle light out so you can see the connector.
I recommend sitting on a tacklebox or something so that the door panel can rest on your knees as you unplug everything.
Next pull all the snaps on both ends of the inner belt molding:

The orange snaps are clearly visible here and once they're all loose you can easily lift the molding up off the door edge:

And here's one of the two 13mm bolts you positioned earlier by rolling down the window. The round rubber covers pop right off:

Note the location of the threads within the square aluminum support after removing the first 13mm bolt. If you put it back this way then your window fore/aft loaction will be about the same as it was before. Check your window before starting the process to see if you want to put it back exactly as it was or shift it a little bit fore/aft.

The glass shouldn't fall when you remove the bolts and should lift out easily. Be careful not to snag the 2 attachment clamps as it seems they are only held in place with a loose piece of masking tape. I suspect that if you knock these loose it'll be harder to get the window back in its exact original location.

Now you can unplug the window motor and unclip the emergency release cable. The motor wire has a slightly tricky lock:

Then remove the door module by removing *only the perimeter bolts*. It remains in place with 2 snaps illustrated in the aforementioned video.

Now pull out the rectangular cover to expose the 3rd door handle nut:

See part 2....
The SA gasped at my door handles and exclaimed "That isn't right!".
But when I picked it up a week later the sunken handles were unchanged and that very same SA told me they didn't work on them because "It's within spec."
I measured the misalignment to be 1.8mm.
Then when the mobile tech came out with the backordered parts I asked if he would fix the handles but he politely declined. I asked him for tips on fixing it myself and he said "don't".
I didn't listen, so here we go. Before/after pics to get you motivated:
These are the tools in order of use:
T27 driver, medium length for the 2 door panel bolts
Trim tool, though maybe the fork kind would be better because the snaps are pretty far inboard from the edges.
Jeweler's flathead to unlock the door & window switch connectors
13mm socket with a short extension for the glass (small ratchet is easier as bolts are not very tight)
8mm socket perhaps powered for the 9 door module bolts
Long flathead for poking at the release clip on the door handle wiring connector
10mm socket on a long driver for removing the 3 door handle nuts
Step 1 is to remove the glass and here's a great video that tells you how to do it in 3 minutes:
I'll add that you might not be able to just yank the interior panel off like that and be careful when you do - the wires are very short! Once the panel is loose you should remove one of the round rubber covers and roll down the window about half-way so that you can see the 13mm bolts securing the glass. Then use the jeweler's screwdriver to disconnect the wires to the window switch and door release button. The other two wires can be removed by hand but you may find it easier to pull the puddle light out so you can see the connector.
I recommend sitting on a tacklebox or something so that the door panel can rest on your knees as you unplug everything.
Next pull all the snaps on both ends of the inner belt molding:
The orange snaps are clearly visible here and once they're all loose you can easily lift the molding up off the door edge:
And here's one of the two 13mm bolts you positioned earlier by rolling down the window. The round rubber covers pop right off:
Note the location of the threads within the square aluminum support after removing the first 13mm bolt. If you put it back this way then your window fore/aft loaction will be about the same as it was before. Check your window before starting the process to see if you want to put it back exactly as it was or shift it a little bit fore/aft.
The glass shouldn't fall when you remove the bolts and should lift out easily. Be careful not to snag the 2 attachment clamps as it seems they are only held in place with a loose piece of masking tape. I suspect that if you knock these loose it'll be harder to get the window back in its exact original location.
Now you can unplug the window motor and unclip the emergency release cable. The motor wire has a slightly tricky lock:
Then remove the door module by removing *only the perimeter bolts*. It remains in place with 2 snaps illustrated in the aforementioned video.
Now pull out the rectangular cover to expose the 3rd door handle nut:
See part 2....
Last edited: