Welcome to Tesla Motors Club
Discuss Tesla's Model S, Model 3, Model X, Model Y, Cybertruck, Roadster and More.
Register

DIY Power Lift gate for Tesla Model S Walkthrough Video

This site may earn commission on affiliate links.
If the wire map is not in this thread its in the other one. Power lift gate DIY possible?

I found it earlier in this thread. Thanks!

I'm proud to report, i successfully installed this! Thanks to everybody here, especially AMPUP and BigTonyTones, for the initial legwork and invaluable tutorials. This is by far the best, most practical, and most reasonably priced upgrade for the non-tech package/non premium interior upgrade owners.

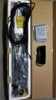
I personally, for whatever reason, had the most trouble getting the power wire up through the headliner to the hatch. There's just not a lot of space and for me it seemed to require pulling wire at odd angles. I'm sure there was an easier way but I struggled.

The yellow wire for the OBD was confusing. I didn't realize at first it wasn't used.

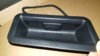
The infamous large rear hatch piece was surprisingly not horrible for me. I did have my wife help and we just ran the button through the right pull cup hole. I held the piece in place while she plugged in the trunk light. Then we lined up and pushed in the two clips closest to the pull cups. I jumped in the hatch from there and made sure the upper most clips on the opposite end of the pull cups were aligned and started gently pushing up from the middle to get the rest of the in place. I know we didn't get them all back in, but I can live with it. It seems secure enough, but if I hear too much rattling I'll pull them off and try again.

Extra clips are a must!

Anyway, great thread and product! Thanks again.

If someone isn't comfortable doing this but wants the upgrade, a skilled audio shop could do this pretty easily. Just show them this great thread.
 
Oh, to wire into the Tesla OEM button I ended up leaving the aftermarket button and its terminal connector intact. I cut the wires from the control module leading to that button and was left with yellow, red, and black wires. I crimped those to the connectors from Mouser mentioned upthread.

From left to right, the wires are:

Black, Red, Yellow.

If anyone needs the connectors from Mouser PM me. I have a few extra. I'll drop them in the mail to you for free - although if you're in a hurry, Mouser ships fast. I chose USPS priority mail and the parts arrived in 2 days.
 
i verified at the Tesla Service Center today that they do not have to option to add the Power Liftgate to Model S. I was there anyway and thought I would ask to see if that had changed.

So im planning on buying this DIY version. The price is right and it sounds easy enough but i expect the getting the big liftgate panel back on might be a pain. Is this a two man job to get it back on?

May wait for a cool fall day to start this project.
 
  • Informative
Reactions: Sawyer8888
I've removed and re-installed the big back panel in the liftgate a couple of times. If you can find an extra two hands it really makes a difference, but I did it myself. I found it useful to use some short bungee cords to help get it into position. And I used them to let the panel back down while I rested. Its not a grab it and stick it up there in one try trick. Be most prepared when a retainer clip breaks or slips off, you can reach another to put its replacement back in.
 
The good news is that the large interior liftgate panel installation is not a show stopper. You really do not need it to drive the car if you can't get it back in place by yourself. Sure, it looks tacky if its missing. But the car will function while you drive over to a buddy's mansion to have him get off his yacht to help you man-handle it back in place.
 
I have a BRAND NEW TESLA Model S Power Liftgate Kit & TESLA OEM Liftgate Button for sale. The kit sells for $518 at COzero.co. I'm willing to sell for $45
s-l1600.jpg
IMG_6611.JPG
IMG_6612.JPG
0. Let me know if you're interested.

------------ DETAILED DESCRIPTION ------------
For that extra touch of luxury and sophistication with your Tesla, why not add the smooth action of the COzero power liftgate retrofit kit?

You can operate the electronic power liftgate via key fob, touch screen, the external handle or a control button inside the boot lid, giving you total control wherever you are.

Normally you would need to have added this functionality as a Premium Upgrade when you bought your Tesla, but our retrofit kit comes with all the same features and functionality.

The installation is fully reversible if required, but we’re sure this is a premium feature you won’t regret adding.

The box contains everything you need to install the power lift gate.

  • 2 linear electric actuators (right / left)
  • Control box
  • Power Cables
  • OBD decoder
  • Inner trunk button - ALSO INCLUDES TESLA OEM LIFTGATE BUTTON so complete install looks and works like from the Tesla factory
  • Installation manual
  • Extra panel clips
  • Panel removal tool
ITEMS ARE BRAND NEW IN UNOPENED BOX.
 
I just ordered one of these kits from COzero. Though I don't have a spoiler yet I was concerned that if I decided to get one that it could support the additional weight. I emailed Cozero and they promptly replied with the following:

Thank you for contacting us!

We actually just started selling an updated version 2.0 of our Power Liftgate kit that works on cars with and without spoiler installed, so no need to worry. It has slightly upgraded components compared to the previous kit, not just different control box firmware as was the case before with spoiler/no spoiler.
 
  • Informative
Reactions: Sawyer8888
I got mine installed a few weekends ago but it acts strangely. Sometimes it will automatically start closing....not good when i'm loading stuff in and it starts closing on me. Other times, it will start to raise and will immediately close. Thoughts?
I had a similar problem, in my case, it was a problem with the button, replacing the butting with Tesla's one fixed the problem.
 
I have just received a power liftgate kit fro COzero, unfortunately it is a version 2 kit which does not match their installation manual. It also contains a latch base a latch cable and a latch motor which do not appear in the version 1 kit. Apparently there is no installation manual for this version ! Has anyone else received this version 2 kit ?
Has anyone else installed this version kit ?
I enclose link to image of parts provided by COzero.
https://cozero.zendesk.com/attachme...3IwFJ7uTCu/?name=COzero-Power-Liftgate-v2.png
 
Has anyone else received this version 2 kit ?
Has anyone else installed this version kit ?

I got my kit and attempted the install and yes the instructions are not adequate. Looking at that picture makes more sense now but there are still some more directions needed for this. Here is what I've been able to make out so far:

  • The poles are not labeled Left and Right. The heads swivel so this may not be necessary to identify left or right anymore?
  • The cables on the poles are short, if trying to run them into the liftgate the connectors would be in an inaccessible part of the frame. This leads me to believe the control unit is going in the trunk instead of the liftgate now, most likely on the left side of the trunk behind the rear seats (possibly installers choice if left/right is really interchangeable)
  • Look at the left pole cable, it's very close to the control unit so the unit would need to be mounted close to that left pole.
  • The right pole cable is longer and looks like it can go over the headliner of the rear seats to reach from the control unit on the left side of the car
  • The Power and Ground are long and plenty to go over to the power tap on the right of the car
  • The cable for the gate button is long and looks like it can run through the grommet and to the lift gate handle
  • The problem here is the lock adapter. The bare orange, red and white wires are very short and close to the control unit...I'm guessing just get some wire and run your own to the liftgate lock...
  • One cool thing is the buzzer is now an option. I was doing some trial and error and it started buzzing so I just unplugged it
  • The latch motor assembly has me excited if it'll make this kit work like the factory, just need some guidance on installation. I pulled apart the area around the latch it's not obvious where the latch string routes or where to mount the actuator. The wire harness end is separate so it leads me to believe the running of this wire will be going through some tight spaces that the head of the connector would not fit through.
  • Lastly, and this is the one piece where I think prevented me from getting it partially working, is the white bare wire on the harness. The picture says to wire it to the original gate button control wire. It doesn't look like there's a button harness anywhere near where the factory button goes. COzero provided an empty connector that looks like you should be able to put the white wire into to plug somewhere but cannot find where this is.
I've emailed COzero support to hopefully get some guidance soon as half my trunk is sitting in my garage right now and driving around feels a bit ghetto. I'm pretty sure I can get this fully installed if I can understand where exactly that white wire goes and how/where to mount the latch assembly.
 
  • Informative
Reactions: Akikiki
Looks like this kit is vastly improved on the one I installed and have occasional problems (Even after 4 replacement controllers). Im curious how this goes as I may well upgrade if it indeed closes slowly and clamps itself like OEM and fixes the issues i have with closing on its own etc.


I got my kit and attempted the install and yes the instructions are not adequate.
Looking at that picture makes more sense now but there are still some more directions needed for this. Here is what I've been able to make out so far:

  • The poles are not labeled Left and Right. The heads swivel so this may not be necessary to identify left or right anymore?
  • The cables on the poles are short, if trying to run them into the liftgate the connectors would be in an inaccessible part of the frame. This leads me to believe the control unit is going in the trunk instead of the liftgate now, most likely on the left side of the trunk behind the rear seats (possibly installers choice if left/right is really interchangeable)
  • Look at the left pole cable, it's very close to the control unit so the unit would need to be mounted close to that left pole.
  • The right pole cable is longer and looks like it can go over the headliner of the rear seats to reach from the control unit on the left side of the car
  • The Power and Ground are long and plenty to go over to the power tap on the right of the car
  • The cable for the gate button is long and looks like it can run through the grommet and to the lift gate handle
  • The problem here is the lock adapter. The bare orange, red and white wires are very short and close to the control unit...I'm guessing just get some wire and run your own to the liftgate lock...
  • One cool thing is the buzzer is now an option. I was doing some trial and error and it started buzzing so I just unplugged it
  • The latch motor assembly has me excited if it'll make this kit work like the factory, just need some guidance on installation. I pulled apart the area around the latch it's not obvious where the latch string routes or where to mount the actuator. The wire harness end is separate so it leads me to believe the running of this wire will be going through some tight spaces that the head of the connector would not fit through.
  • Lastly, and this is the one piece where I think prevented me from getting it partially working, is the white bare wire on the harness. The picture says to wire it to the original gate button control wire. It doesn't look like there's a button harness anywhere near where the factory button goes. COzero provided an empty connector that looks like you should be able to put the white wire into to plug somewhere but cannot find where this is.
I've emailed COzero support to hopefully get some guidance soon as half my trunk is sitting in my garage right now and driving around feels a bit ghetto. I'm pretty sure I can get this fully installed if I can understand where exactly that white wire goes and how/where to mount the latch assembly.
 
  • Informative
Reactions: Akikiki
I got my kit and attempted the install and yes the instructions are not adequate. Looking at that picture makes more sense now but there are still some more directions needed for this. Here is what I've been able to make out so far:

  • The poles are not labeled Left and Right. The heads swivel so this may not be necessary to identify left or right anymore?
  • The cables on the poles are short, if trying to run them into the liftgate the connectors would be in an inaccessible part of the frame. This leads me to believe the control unit is going in the trunk instead of the liftgate now, most likely on the left side of the trunk behind the rear seats (possibly installers choice if left/right is really interchangeable)
  • Look at the left pole cable, it's very close to the control unit so the unit would need to be mounted close to that left pole.
  • The right pole cable is longer and looks like it can go over the headliner of the rear seats to reach from the control unit on the left side of the car
  • The Power and Ground are long and plenty to go over to the power tap on the right of the car
  • The cable for the gate button is long and looks like it can run through the grommet and to the lift gate handle
  • The problem here is the lock adapter. The bare orange, red and white wires are very short and close to the control unit...I'm guessing just get some wire and run your own to the liftgate lock...
  • One cool thing is the buzzer is now an option. I was doing some trial and error and it started buzzing so I just unplugged it
  • The latch motor assembly has me excited if it'll make this kit work like the factory, just need some guidance on installation. I pulled apart the area around the latch it's not obvious where the latch string routes or where to mount the actuator. The wire harness end is separate so it leads me to believe the running of this wire will be going through some tight spaces that the head of the connector would not fit through.
  • Lastly, and this is the one piece where I think prevented me from getting it partially working, is the white bare wire on the harness. The picture says to wire it to the original gate button control wire. It doesn't look like there's a button harness anywhere near where the factory button goes. COzero provided an empty connector that looks like you should be able to put the white wire into to plug somewhere but cannot find where this is.
I've emailed COzero support to hopefully get some guidance soon as half my trunk is sitting in my garage right now and driving around feels a bit ghetto. I'm pretty sure I can get this fully installed if I can understand where exactly that white wire goes and how/where to mount the latch assembly.
Hi, I also have e-mailed Fredrico Gomzales about install of version 2.
I am completely mystified by the wiring for the Lock Conversion.
According to Fredrico the red and yellow wires on the lock converter are joined to the red and yellow wires on the harness.
However the white wire connects to the original gate Button control wire ! This makes no sense to me, as there was no original button !
I enclose link to photo he sent me.
https://cozero.zendesk.com/attachments/token/sNNTEZYKwAR3osDuX9QzqAUzQ/?name=WIRING.JPG
As for the poles, I think left and right are defined by the different wiring. The right poles is connected to one connector in on the harness, the left pole to two connectors.
I have also received the following two photos of the latch mechanism in situ
https://cozero.zendesk.com/attachments/token/kVFotkVEp2E5pZS4efs0ysrhK/?name=IMG_6568.png
https://cozero.zendesk.com/attachments/token/FJX4Q2MRhbX1Mtyb6Eed0zmXH/?name=IMG_6567.PNG
 
Last edited: