Model S is one week old. I've spent the last four months YouTubing PPF. This first post is practice on the front license plate holder which I will not put back on. It's a good test piece for practicing several techniques. There are compound curves in the corners, edges to wrap and circles to cut out. I tested slip solution, tack solution, squeegee type, use of ghost glove and heat gun for wrapping edges. Stretching around a complex curve was difficult and required practicing another technique ... popping air bubbles. I used a sample of Xpel Stealth. I have decided to not use matte but will use SunTek Reaction.


Welcome to Tesla Motors Club
Discuss Tesla's Model S, Model 3, Model X, Model Y, Cybertruck, Roadster and More.
Register
Install the app
How to install the app on iOS
You can install our site as a web app on your iOS device by utilizing the Add to Home Screen feature in Safari. Please see this thread for more details on this.
Note: This feature may not be available in some browsers.
-
Want to remove ads? Register an account and login to see fewer ads, and become a Supporting Member to remove almost all ads.
You are using an out of date browser. It may not display this or other websites correctly.
You should upgrade or use an alternative browser.
You should upgrade or use an alternative browser.
DIY PPF on 2022 Blue Model S
- Thread starter zoomer0056
- Start date
Ha, this will be a one off for sure. Even before doing this I have a better understanding of why it cost so much $ in labor expertise.Wow. When do you start taking orders")
gcardona
Member
Ah, sorry to hear that. Only $300, just partial front? What was the problem? What brand did you try?I tried PPF DIY, it was a disaster. $300 down the drain.
gcardona
Member
Front bumper and side skirts. I'd never done this before, didn't realize what I was getting into. Had my teenage daughter to help me, and it was like the blind leading the blind. I'm pretty handy, having painted several cars in the past and done some pretty good body work on one, so I thought how hard can this be? Well, I have a new appreciation for the PPF installers after that fiasco.Ah, sorry to hear that. Only $300, just partial front? What was the problem? What brand did you try?
Well, you had some good one on one time with your daughter! I am guessing you had lots of bubbles. Good thing it can come off. I'm like you: if a man can do it I can do it. From my research I have developed a respect for the price of installation as there is a lot of expertise you pay for. This is a one off for me but I am practicing on small pieces knowing that I have to get a feel for the film. I will buy a whole car kit and get an extra door and maybe an extra fender. I will also start on the small pieces first. I will ask my neighbor to help as he is a perfectionist.Front bumper and side skirts. I'd never done this before, didn't realize what I was getting into. Had my teenage daughter to help me, and it was like the blind leading the blind. I'm pretty handy, having painted several cars in the past and done some pretty good body work on one, so I thought how hard can this be? Well, I have a new appreciation for the PPF installers after that fiasco.
gcardona
Member
The problem is time, especially for the large pieces with intricate shapes like the bumper. I think you need more than two people because it is important to keep the whole surface wet while you work out the kinks and bubbles. I found that there was not enough time to work one side before the other side started drying. Maybe it comes with practice, which I did not have. I hope you have better luck, and I suggest you get at least two people to help you.Well, you had some good one on one time with your daughter! I am guessing you had lots of bubbles. Good thing it can come off. I'm like you: if a man can do it I can do it. From my research I have developed a respect for the price of installation as there is a lot of expertise you pay for. This is a one off for me but I am practicing on small pieces knowing that I have to get a feel for the film. I will buy a whole car kit and get an extra door and maybe an extra fender. I will also start on the small pieces first. I will ask my neighbor to help as he is a perfectionist.
stopcrazypp
Well-Known Member
You tried the hardest part, the front bumper. I did DIY on the whole car and started with the hood, which was quite easy as there are no complex curves and or any stretching/shrinking required.The problem is time, especially for the large pieces with intricate shapes like the bumper. I think you need more than two people because it is important to keep the whole surface wet while you work out the kinks and bubbles. I found that there was not enough time to work one side before the other side started drying. Maybe it comes with practice, which I did not have. I hope you have better luck, and I suggest you get at least two people to help you.
The front bumper was a huge pain (especially the part that meets the frunk) to the point while I was doing it, I wished I paid someone to do it. I did it with bulk film, so didn't need to do much stretching. If you did it with precuts, you need to do a lot of stretching (which has the positive that you have reference points by aligning the holes for ultrasonic sensors, negative being you have no margin do error).
It helps to have a garden sprayer bottle to apply the soap solution evenly and sufficiently, and the right type of squeegee that can force all the water out.
gcardona
Member
Yes, because this was the largest part that I was installing. Knowing what I learned, I would have used something like a power sprayer instead of the spray bottles, and I would have had 2 more people helping me to hold the film while spraying and placing it down.You tried the hardest part, the front bumper. I did DIY on the whole car and started with the hood, which was quite easy as there are no complex curves and or any stretching/shrinking required.
The front bumper was a huge pain (especially the part that meets the frunk) to the point while I was doing it, I wished I paid someone to do it. I did it with bulk film, so didn't need to do much stretching. If you did it with precuts, you need to do a lot of stretching (which has the positive that you have reference points by aligning the holes for ultrasonic sensors, negative being you have no margin do error).
It helps to have a garden sprayer bottle to apply the soap solution evenly and sufficiently, and the right type of squeegee that can force all the water out.
I think I'll start on a door. I'll remove top door trim and wrap the back and the bottom. It has some shape but not much.Yes, because this was the largest part that I was installing. Knowing what I learned, I would have used something like a power sprayer instead of the spray bottles, and I would have had 2 more people helping me to hold the film while spraying and placing it down.
stopcrazypp
Well-Known Member
Definitely using a sprayer that is pressurized (so you can pump it up beforehand) is pretty much a necessity. It's not viable to use regular spray bottles that you have to pump for every spray, as it's hard to get a consistent even spray in large volume (plus your hands get tired quickly).Yes, because this was the largest part that I was installing. Knowing what I learned, I would have used something like a power sprayer instead of the spray bottles, and I would have had 2 more people helping me to hold the film while spraying and placing it down.
I used something similar to this:
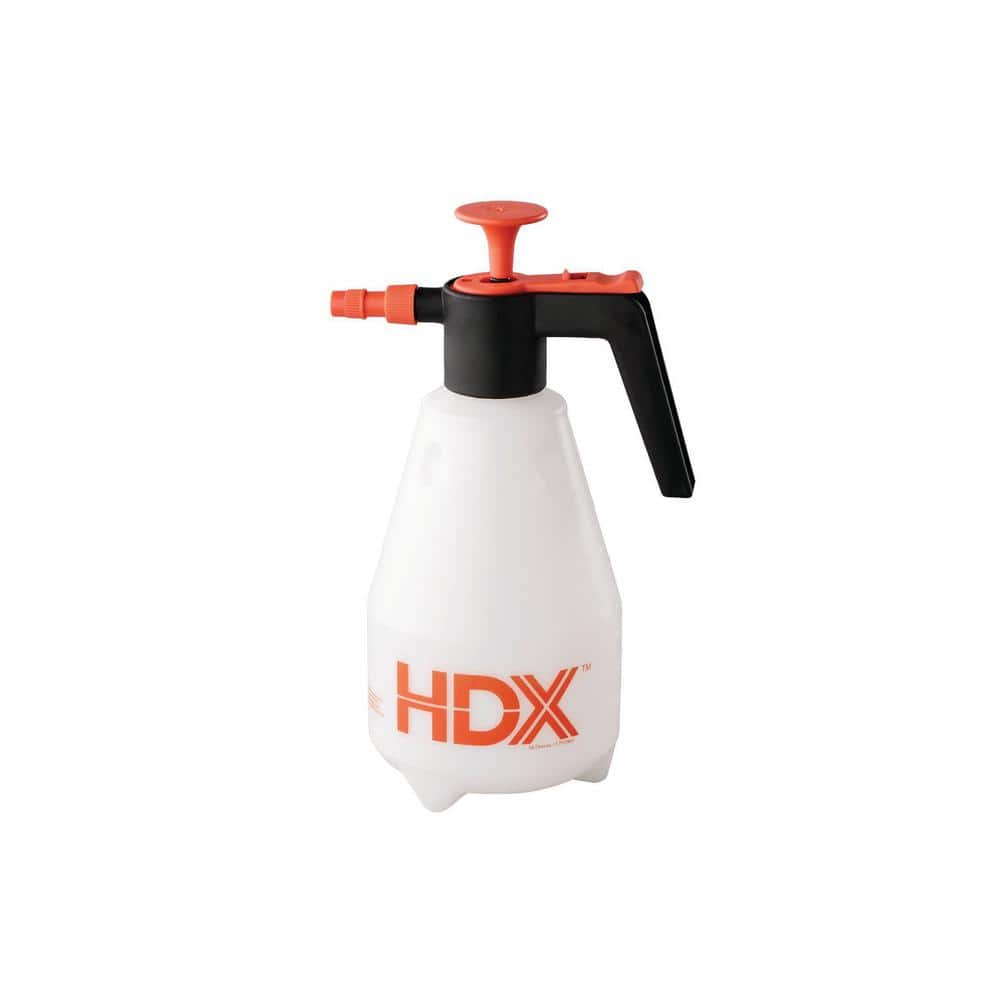
HDX 56oz Handheld Multi-Purpose Pump Sprayer 56HDX - The Home Depot
The HDX 56oz Handheld Multi-Purpose Sprayer is ideal for weed control, pest control, fertilizing and watering plants, and non-harsh cleaners. This sprayer comes pre-assembled with no tools required. It
www.homedepot.com
stopcrazypp
Well-Known Member
Doors are pretty easy, I didn't even remove the trim (I used bulk PPF though so I can cut wherever I want). I started with the hood though as that was the easiest out of all the panels.I think I'll start on a door. I'll remove top door trim and wrap the back and the bottom. It has some shape but not much.
Your store is WAY overpriced! Below is the SAME PPF for half the price.Hey there, I have some DYI PPF kits for the new Model S here:

Your store is WAY overpriced! Below is the SAME PPF for half the price.
That's not nearly the same. Here are a few major differences:
- Mine are made with XPEL which is far more expensive than any of the options that these guys offer. If you want XPEL (i.e. the very best quality) I am pretty much the only option as far as I know.
- Mine are custom made models (I make them) while what you show me is the models made by companies such as 3M etc, with someone just reselling them. Why that matters? Because mine can be self-installed by a non-pro, don't require a heat gun, there is no seaming, fit perfectly. The others are a bit too big as they require seaming and trimming (and if you are not a pro, you are likely to scratch your paint while trimming with a utility knife). I know because I tried the software from such vendors to generate cut models and they did not fit perfectly like mine, as they are intended for pro-installers/shops and not for self install.
- Mine come with a full install kit and install video for my specific model, making the install easy without the need to buy anything extra.
Awesome! I with you on DIY.I am planning on taking on this job myself. After being quoted some prices I think I am going to try. I can get bulk rolls at a pretty good price and plan on only doing the front bumper, hood and mirrors. Wish me luck.
If you can, consider documenting the process on youtube. If not, at least post an update in this thread as you progress.I am planning on taking on this job myself. After being quoted some prices I think I am going to try. I can get bulk rolls at a pretty good price and plan on only doing the front bumper, hood and mirrors. Wish me luck.
I will see what I can do.If you can, consider documenting the process on youtube. If not, at least post an update in this thread as you progress.
Similar threads
- Replies
- 15
- Views
- 2K
- Replies
- 12
- Views
- 2K
- Replies
- 6
- Views
- 1K