


Welcome to Tesla Motors Club
Discuss Tesla's Model S, Model 3, Model X, Model Y, Cybertruck, Roadster and More.
Register
Install the app
How to install the app on iOS
You can install our site as a web app on your iOS device by utilizing the Add to Home Screen feature in Safari. Please see this thread for more details on this.
Note: This feature may not be available in some browsers.
-
Want to remove ads? Register an account and login to see fewer ads, and become a Supporting Member to remove almost all ads.
You are using an out of date browser. It may not display this or other websites correctly.
You should upgrade or use an alternative browser.
You should upgrade or use an alternative browser.
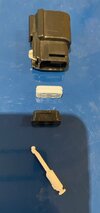
thank you, glad to know what a one in good shape looks like. The front section of mine (white pin and black lever) is gone… see pictures. Would it make any difference if I tried sticking a flat screwdriver in the hole at the top of the picture?
Attachments
There is nothing but friction keeping that plug in. Get some spray on it and try and get a flat under the lip and carefully, and more importantly, evenly pull the plug down. You need to replace the plug anyhow, I don’t have any 6 cable plugs, only the 4 cable ones otherwise I would send you a new one.
Quick update, I cut the cable and shipped the PEM to Gruber for rebuild. Does anybody know where I can buy a new connector to replace the one that was causing me trouble? I understand that it will be changed as part of the PEM rebuild but I would also like to have a spare…
0194180010 Molex | Connectors, Interconnects | DigiKey
Order today, ships today. 0194180010 – 6 Rectangular Connectors - Housings Receptacle - 0.230" (5.84mm) from Molex. Pricing and Availability on millions of electronic components from Digi-Key Electronics.
these do not come with pins, you need to order them separately, gold plate ones are the only one I have a ref for.
0194200003 Molex | Connectors, Interconnects | DigiKey
Order today, ships today. 0194200003 – Socket Contact Gold 14-16 AWG Crimp - from Molex. Pricing and Availability on millions of electronic components from Digi-Key Electronics.
I would grab the 4 pin housing while you are at it.
0194180004 Molex | Connectors, Interconnects | DigiKey
Order today, ships today. 0194180004 – 4 Rectangular Connectors - Housings Receptacle - 0.230" (5.84mm) from Molex. Pricing and Availability on millions of electronic components from Digi-Key Electronics.

My car goes "under the knife" tomorrow. In reading the thread I didn't see it mentioned what (if any) specific torque one should re-tighten the high voltage cables to. This is for both the battery to PEM and PEM to Motor. Is there a particular setting, or just get them nice and tight?
einhalv
Member
Ok, so first warning to others, the 7mm nuts holding the cable clamp for the 3 wires going to the motor needs to use a small outside socket, in order to fit the recess. My socket set's 7mm was too fat; had to get thinner one at the local auto supply store.
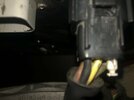
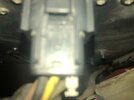
Now a question. The 3rd cable on the underside of the PEM isn't coming off. I have the release pulled down, but it's not budging. I had the same problem with the APS power on the end of the PEM, and managed to get the connector off with enough force. I can't get that much leverage under the PEM to make this one budge. It feels like it's still locked in place.
Besides sliding the white latch down, is there anything else I need to do?
Ok, never mind... Got it off. The trick is to push on the middle section (above the slide), then pull.
All done, but during the disassembly the VDS registered an error 264 (power train problem, restart when safe). So, all is back together (so now it's safe)... How to "restart"?
EDIT: Apparently you have to turn the car all the way to ON, not just ACC. All clear, charging happily.
Yay!
All done, but during the disassembly the VDS registered an error 264 (power train problem, restart when safe). So, all is back together (so now it's safe)... How to "restart"?
EDIT: Apparently you have to turn the car all the way to ON, not just ACC. All clear, charging happily.
Yay!
Last edited:
So with everything reassembled and going for a drive on a hot day (102 F), things are still running hot. I'm not sure how much of that is the ambient and how much is debris that might have been missed; I'll monitor things for a few days before digging back in. Significantly, the 1115 & 1116 alerts are still occurring; I'll start a separate thread for debugging that.
But to this thread, a further thought and suggestion. When cleaning the motor, there's a section under the shroud at the bottom where the ducting connects that can't be reached from above. Blowing air back through the fins with an air compressor, simultaneously using a shop vac under the shroud, cleans most of the crud out, but I think it also could result in stuff dropping down into that duct. Without actually removing the blower assembly from under the car (not a trivial task, apparently), there's no way to get down in there to remove the stuff, so it will return to the motor on the next drive.
A suggestion (let me know if this is a bad idea). When I rebuilt the PEM Fan cable a few years ago, I installed a tap onto the blower motor power cable, bringing the wires up above to the end of the PEM so I could monitor things after it all was put back together. I could have easily hooked a 12v supply to that tap and driven the blower. With the motor shroud open and PEM removed, running the blower should clear out any remaining loose stuff in the duct work, especially while using the air compressor to back-flush the motor fins. Maybe tap on the ducting to dislodge anything semi-loose.
Lacking the electrical tap, one can easily unhook a power lead at the motor - it's a dual "F" style connector, easy to access with the rear pan dropped - to apply power. Do note that the blower motor draws some 15+ amps, so a relatively beefy supply or battery will be needed.
ML Auto
Member
The motor shroud is in two sections that are bolted together. Every time I take those off I am amazed at how much crap is in there. Most of it gets jammed in the bottom of the motor, which would explain your uneven temp readings. You should consider taking the shroud off to clean the motor.
Thanks, that makes sense.The motor shroud is in two sections that are bolted together. Every time I take those off I am amazed at how much crap is in there. Most of it gets jammed in the bottom of the motor, which would explain your uneven temp readings. You should consider taking the shroud off to clean the motor.
I removed the two top screws and spread the shroud as much as I dared, as I didn't want to break it. Are there other screws at the bottom, and if so, how does one access them? Or is there some sort of hinge or clip that I just need to apply a bit more force to?
Separately, any thoughts about me running the blower to push the loose stuff out the top?
I made a flexible tube that barely fits in the fan shroud that I use on the end of my shop vac hose. It's flexible enough that I can snake it all the way around the bottom of the shroud. It's pretty effective.
I haven't investigated what holds the bottom of the shroud together; bolts? clips? Maybe ML Auto knows. Whatever it is, the access looks too difficult to split the bottom so I never do. Running the blower might not be a bad idea but it doesn't sound like a good substitute for getting good suction down to the bottom of the shroud.
I haven't investigated what holds the bottom of the shroud together; bolts? clips? Maybe ML Auto knows. Whatever it is, the access looks too difficult to split the bottom so I never do. Running the blower might not be a bad idea but it doesn't sound like a good substitute for getting good suction down to the bottom of the shroud.
Youll need the molex crimpt tool as well for those pins and sockets.0194180010 Molex | Connectors, Interconnects | DigiKey
Order today, ships today. 0194180010 – 6 Rectangular Connectors - Housings Receptacle - 0.230" (5.84mm) from Molex. Pricing and Availability on millions of electronic components from Digi-Key Electronics.www.digikey.ca
these do not come with pins, you need to order them separately, gold plate ones are the only one I have a ref for.
0194200003 Molex | Connectors, Interconnects | DigiKey
Order today, ships today. 0194200003 – Socket Contact Gold 14-16 AWG Crimp - from Molex. Pricing and Availability on millions of electronic components from Digi-Key Electronics.www.digikey.ca
I would grab the 4 pin housing while you are at it.
0194180004 Molex | Connectors, Interconnects | DigiKey
Order today, ships today. 0194180004 – 4 Rectangular Connectors - Housings Receptacle - 0.230" (5.84mm) from Molex. Pricing and Availability on millions of electronic components from Digi-Key Electronics.www.digikey.ca
Similar threads
- Replies
- 8
- Views
- 1K
- Replies
- 19
- Views
- 1K
- Replies
- 6
- Views
- 2K
- Replies
- 0
- Views
- 679