


Welcome to Tesla Motors Club
Discuss Tesla's Model S, Model 3, Model X, Model Y, Cybertruck, Roadster and More.
Register
Install the app
How to install the app on iOS
You can install our site as a web app on your iOS device by utilizing the Add to Home Screen feature in Safari. Please see this thread for more details on this.
Note: This feature may not be available in some browsers.
-
Want to remove ads? Register an account and login to see fewer ads, and become a Supporting Member to remove almost all ads.
You are using an out of date browser. It may not display this or other websites correctly.
You should upgrade or use an alternative browser.
You should upgrade or use an alternative browser.
Drill free mudflaps for MY
- Thread starter Gy2020
- Start date
I ordered when in stock the followed up a week later to see if they shipped. Told me it wouldn’t ship till end of feb when the shipment came in. Never again will buy from RPM.

TomServo
Active Member
Tesla 20-21 Model Y Standard Rock GuardsAnybody have pictures of good mud flaps for the Model Y (non-Tesla)?
these are the ones that I purchased...they arrived in 3 days and were easy to install no drilling required. After watching a YouTube video that compares this to another type I decided on these and am satisfied with my purchase.
VaxAce
Member
amazon has a number of mud flat for the Y -- go to amazon and search -- free returns. I had one set arrive today and another Monday....
Xminus6
Member
They all just look like a sheet of HDPE plastic glued to the wheel well.The one with rpm, amazon and ebay all look same to me. Let us know your feedback
These are front only and flimsy likenthemOEM. But at least in stock.Tesla 20-21 Model Y Standard Rock Guards
these are the ones that I purchased...they arrived in 3 days and were easy to install no drilling required. After watching a YouTube video that compares this to another type I decided on these and am satisfied with my purchase.
everydaychris
Active Member
VaxAce
Member
just pop off the plastic retainers - use new retainers that come with these guards. Ive tried 4 types - Tesla retains snow with a large hole - others on amazon same - not this brand and looks like OEM - took 20 mins to do all wheels. No need to drill - no ned to remove wheel
Attachments
USC-Hawk
Member
I bought these on Amazon. I am quite happy with them. I believe the brand is Basenor.


JLOC
Member
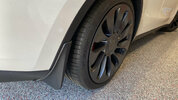
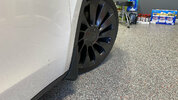
@USC-Hawk, can you confirm these are drill-free and easy to install? Do you just use a flathead screwdriver and/or a pry tool to remove the existing rivets?I bought these on Amazon. I am quite happy with them. I believe the brand is Basenor.View attachment 645814View attachment 645815View attachment 645816View attachment 645817View attachment 645818
Also, do they feel pretty secure after installation, or did you have to make modifications to make the fit tighter (e.g., using double-sided tape)?
USC-Hawk
Member
I am the least hands on fix it type person and they were pretty easy. Pop out two rivets(or whatever they are on your wheel base), pop anchors into the holes, align flaps and insert rivets, do one clip mid way up.
Backs took a little more, remove nut from screw in wheel well midway up in the back, remove two rivet, remove bolt from bottom of frame. Then, insert two anchors, align flap making sure little tab on flap goes inside trim(easy part to forget and will cause small gap if you don’t remember, reinstall nut and insert and tighten bolt on bottom. Insert two rivets. Do one clip mid way up. Stand back and enjoy the new look.
No drilling, no adhesives.
AlexHung
Member
Is there any torque rating for the nuts in the rear?I am the least hands on fix it type person and they were pretty easy. Pop out two rivets(or whatever they are on your wheel base), pop anchors into the holes, align flaps and insert rivets, do one clip mid way up.
Backs took a little more, remove nut from screw in wheel well midway up in the back, remove two rivet, remove bolt from bottom of frame. Then, insert two anchors, align flap making sure little tab on flap goes inside trim(easy part to forget and will cause small gap if you don’t remember, reinstall nut and insert and tighten bolt on bottom. Insert two rivets. Do one clip mid way up. Stand back and enjoy the new look.
No drilling, no adhesives.
USC-Hawk
Member
Don’t know. I used a wrench and the bolts came out and I was able to reinstall and they are tight.Is there any torque rating for the nuts in the rear?
JLOC
Member
I am the least hands on fix it type person and they were pretty easy. Pop out two rivets(or whatever they are on your wheel base), pop anchors into the holes, align flaps and insert rivets, do one clip mid way up.
Backs took a little more, remove nut from screw in wheel well midway up in the back, remove two rivet, remove bolt from bottom of frame. Then, insert two anchors, align flap making sure little tab on flap goes inside trim(easy part to forget and will cause small gap if you don’t remember, reinstall nut and insert and tighten bolt on bottom. Insert two rivets. Do one clip mid way up. Stand back and enjoy the new look.
No drilling, no adhesives.
Thank you! I may be in competition with you as the person who is the least handy, but your reply gives me more confidence I can do this without breaking anything. I checked underneath the rear tire well, and can confirm there is a bolt, rather than a plastic rivet, at the bottom of the frame. Hopefully mine comes off easily, as someone posted in another thread that he or she ended up breaking the bolt.Don’t know. I used a wrench and the bolts came out and I was able to reinstall and they are tight.
Berkshire1
Member
Similar threads
- Replies
- 19
- Views
- 2K
- Replies
- 3
- Views
- 308
- Replies
- 3
- Views
- 490
- Replies
- 4
- Views
- 174