Hello, everyone.
I have a Long Range Model Y, January 2021 build date, VIN 100XXX. Stock 19" wheels, tires, suspension. It has the premium interior. I picked it up on February 12. The VIN seemed too low, but I did not find any problems during my initial inspection, so I accepted the vehicle. If this car was someone else's reject, I could not see the reason.
I noticed buffeting and booming right away driving it home from the dealership. I read this thread with interest. Over the last few days, I finally had a chance to try out some of the techniques you all have presented.
Hatch Stops
First of all, my hatch stops were screwed "in" all the way (not making contact with the pads at all). It seems Tesla did not adjust them during assembly. I adjusted the stops until they held an envelope, and the buffeting went away - except perhaps a tiny bit, at a very specific speed, around 45-55 miles per hour, with a tolerance/range of perhaps 2 miles per hour. It is also possible that I am making that up or hearing something else. I no longer experience any ear pressure or pain.
The booming took me longer to address. I ordered
gundarx's recommended butyl and foam from Amazon.
First of all, a tip while working with this stuff. If you are planning on using it to insulate your car, wear heavy gloves. The butyl has jagged metal on top that will cut your hands open. The foam might be even worse, with an adhesive that is less like that of mailing tape and more like oil-based paint. Once it gets on something, it does not come off without a fight.
Hatch
I started with the hatch. First I removed the two pieces of trim. This video was useful:
As you can see, removing the two pieces of trim is not difficult. You can use either an automotive clip remover tool or simply a flathead screwdriver to pop the heads of the clips up, then pull them out. If you break any of the clips, they are standard automotive clips available anywhere. Be careful to unplug the power connector from the large piece of trim, as shown in the above video.
By the way, I am not 100% sure that the plastic latch stopper is supposed to be installed on the inside of the large hatch trim piece, as Minh says in the video above. My car's latch stopper was also installed on the outside, and it does look "wrong" that way, so I also moved mine to the inside of the trim (where it still looks wrong, but maybe less wrong). I doubt moving the latch stopper affected the booming either way. I'm curious whether anyone can explain why Tesla might be installing these latch stoppers "inside out." Is it just faster/easier to assemble cars with them that way? Are the line workers confused? Or is there a technical reason?
With the hatch trim pieces removed, I applied pieces of butyl, then foam (layered on top of the butyl) to every large interior metal surface of the hatch. This is the silver surface you can reach through the holes in the painted metal closer to you (when standing with your back to the car, with the open hatch pulled down in front of you). I did not attempt to cover 100% of these surfaces, as MY-Y had warned against adding too much weight to the hatch. I covered perhaps 75% of what I could see, leaving small gaps between the large pieces of butyl/foam to reduce weight.
Insulating the hatch in this way improved the booming, but not by much. It was just enough that I am confident in saying that deadening the hatch made a difference. Perhaps I could have squeezed out some additional improvement by weighing down the hatch more, but I am not willing to live without the automatic open/close.
Verdict: ~10% reduction in booming
Subtrunk
I moved on to the subtrunk. I continued to reference Minh's video above for removing the pieces of trim surrounding the bucket trim and the bucket trim itself. I did not remove the bucket from the car, because I did not want to get down under the car for what seemed like a problem I had already solved by deadening the top of the bucket.
By the way, like gundarx, I also had to make "incisions" around the inside base of the bucket in order for the bucket trim to seat back down inside the bucket. It seems the foam doesn't like to curve flush across a 90 degree turn, i.e. from the side of the bucket to its base or vice versa.
I discarded the OEM piece of styrofoam that goes below the bucket trim, because it was also interfering with the bucket trim going back in, and I figured butyl+metal+foam is a better insulator than styrofoam anyway.
Knocking on the bottom of the stock/uninsulated bucket with my hand had produced a loud, low frequency boom. I was sure I had solved my booming problem by applying butyl and foam until I could no longer produce the boom by hitting the bucket. But testing afterward was a disappointment. If there was any improvement, I could not be sure it was not placebo. I decided to try insulating the inside of the quarter panels, as in MY-Y's report, before taking out the bucket and insulating under it.
Verdict: No perceptible reduction in booming
Quarter Panels
Also called "trunk side trim." I completely removed the passenger's side lower trim panel (no need to touch the smaller, upper part). The lower trim is a big part. Taking it out and especially putting it back in are awkward. I spent over two hours trying to get the part to fit back in by the passenger's side rear seat. I think I either bent or broke one or more of the small metal clips, so the panel would not meet flush with the other side of the trim under the gasket.
You can't tell there's anything wrong with my attempt at reinstalling the panel unless you look closely, but because of this experience, I do not recommend completely removing the quarter panels when insulating behind them. Instead, begin by prying the panels away from the rear/hatch side. They are held on only with toolless clips. Again, you can reference Minh's video above. Rotate the partially disconnected panel so that the part of the panel that goes into the well can lift up out of the well. Then you should be able to pull the panel back enough to get your hands behind it without disconnecting the clips holding the front part of the panel by the passenger seat. When I later insulated the driver's side, I did not disconnect the panel up by the passenger seat, and this made getting the panel back on a "snap," so to speak. It's a little awkward working behind the panel with it in your way, but that is much better than trying to get the thing back on by the passenger's seat.
Following
MY-Y's example, I applied some large and some small pieces of butyl and foam to the copper-colored metal interior of the vehicle body behind the quarter panels. On the passenger side, you will encounter the subwoofer and what I believe to be a power junction box. I did not remove either the subwoofer or the power junction box, simply rolling on butyl and foam around them.
On the driver's side, you will need to disconnect two power cables as you pull back the panel. One is for the 12V power "cigarette lighter" and the other is for the two rear seat fold buttons. The 12V connector was easy, but I had to use needle nose pliers to disconnect the little connector on the seat fold button assembly. I could not for the life of me figure out where a release tab would be on that connector, if there is one.
Anyway, with the driver's side panel pulled back, I reached in as far as I could trying to find the block of foam Sandy Munro pulls out at 6:37 in the below video:
... but I could not find the foam in my car. Was leaving the foam out of my car an oversight on Tesla's part? I noticed in the comments of the above video that a Model 3 owner also reported finding a block of foam in his car. But MY-Y reported in this thread that his Model Y did not have one. And both he and I experienced excessive booming until we insulated behind the quarter panels.
After I applied butyl and foam to as much of the inside of the driver's side quarter panel as I could reach, I put the panel back on and went for a drive. I was, in fact, pleased with the improvement. I thought: "Maybe this is what the car is supposed to sound like."
Verdict: 50-80% reduction in booming
I guess if I'm bored or want to squeeze out even more improvement, I might try removing the subtrunk bucket and insulating under it. But I'm satisfied with the improvement for now. A lot of research, a lot of labor for a missing block of foam, if indeed that was the root cause of the booming in my car.
Thanks again to all the contributors here.
Pictures
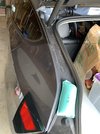
Subtrunk bucket (facing into the car, with hatch latch at bottom):
View attachment 648440
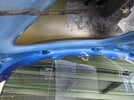
Passenger side, with quarter panel totally removed:
View attachment 648441
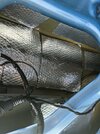
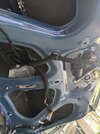
Driver's side, with quarter panel tilted out:
View attachment 648442
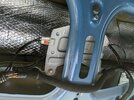
Inside the driver's side quarter panel, facing the front of the vehicle. No foam:
View attachment 648443