Welcome to Tesla Motors Club
Discuss Tesla's Model S, Model 3, Model X, Model Y, Cybertruck, Roadster and More.
Register

Ear pain/Pressure help

This site may earn commission on affiliate links.
Thanks for the update and I agree with your thoughts.

To reduce the floaty-ness, and get handling that’s significantly better than stock Performance, try these settings especially as the shocks get more miles and become even better:

front 12/12 (compression/rebound turns from full stiff)

rear 10/9 (compression/rebound turns from full stiff)

Essentially the same settings recommended on MPP’s “initial settings” but one turn softer on rear rebound makes it just perfectly balanced for me on the factory 21” wheels. With the noise treatment you’ve performed it should be a sweet combination of great handling and front/rear passenger comfort.

If that’s too firm for you especially with the new suspension which should get even better over the months, you can set the rears to:

12/10 (compression/rebound turns from full stiff)

BTW, you will soon find that you will be hearing the interior rattles, crashing sounds, creaking, etc. that plague this car but have not been as noticeable due to all the other prevailing noise (pressure, cabin boom, stiff ride) which have been addressed by the coilovers and noise treatment. Felt tape to any panels that contact (including phone charger area, armrest cover, seatbelt tracks) and applying Krytox grease (GPL 205 is what I used) to any vegan leather surfaces that contact, especially the 2nd-row middle seat and headrests will reduce/eliminate the annoyances.
Yeah, for the fronts I used someones recommended settings off Reddit/Youtube, 16/13 for the front and rear is 12/13. I will play around with it as I want a happy medium. I did notice more creaks and road/tire noise now that it's more quiet. The boom is still there but very minimally as the rear is absorbing the harsh bumps. Hope these shocks last awhile as they were pricey. I did notice when I had my rear seat down (just one of them) it was louder. If it would be possible, I'd consider putting sound deadening under the seat covers for the rear but I don't know how. I'll see how the suspension settles first.
 
I second what @MY-Y says about the buffeting, at least for my car, making sure the catch is lowered (mine was already low but was able to adjust for a few more mm) and adjusting the 4 stops.

What was harder to address was the booming coming from the back. I ordered sheets of Noico from Amazon some time ago, and got to do this today:
Butyl sheets: https://amzn.to/2NH3sCK
PE foam sound deadener: https://amzn.to/3sC6qqY
roller: https://amzn.to/3q43IZA

I had been experimenting by putting very heavy books in the rear subtrunk area and noticed how weighing down that area reduced unwanted noise. I suspect that repeated contact with the foam board and the bottom of the semi-rigid subtrunk liner was producing a pounding noise. Weighing down the subtrunk likely reduced movement and unwanted banging and the additional mass also reduced noise.

This is the first time I've applied sound deadener to a car, but after repeatedly driving our Model 3 and the Y, it was clear that the Y produced too much noise from the back, even though I've already changed tires and to MPP comfort coilovers. I also have used the butyl sheets for my home theater to reduce vibrations in some aluminum shelves and window roller shade facia covers that would become distracting on loud movies, and have noticed the big improvements from using these sheets. I'll probably use extra sheets for my washer/dryer.

This is just DIY, so it's an amateur application, though I did my best to roll each sheet with multiple passes as well as I could; it's going to be a workout and would cost about $130 in amazon supplies. It took me about 3 hours to do all of these today.

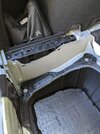
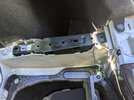
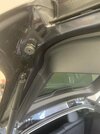
First applying the thinner, but heavy butyl sheets. Need to use a roller with this. Wear gloves, otherwise butyl will stick to your fingers. Used scissors to cut the sheets, but you can also use a knife.

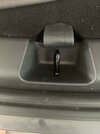
To determine what needed application and how much, I knocked each surface and listened for resonating noise. The metal portions I left alone for the butyl sheets were either sufficiently solid (ex. the diecast structures) or needed to be left exposed for fasteners or potentially ventilation (would not want to introduce further ear pressure issues). I also applied under the smaller sub trunk area (butyl + PE foam), which already has 2 strips of sound material from the factory, but there was still plenty of resonating noise; pretty sure Tesla did not want to expend too much material, time and add weight to the car (and get less range) for comfort improvements.

Afterwards I topped it with the PE foam which can simply be stuck on like a sticker; no roller involved. I made sure to especially apply this thoroughly in the subtrunk area as I suspect that's where most of the booming sound is coming from. As I was applying this and continued pounding the panels, I noticed less and less resonating noise, and the metal pieces were sounding much more substantial and solid.

After I took these photos I made a few incisions in the PE foam corners in the subtrunk area to relieve some pressure and allow the subtrunk to be inserted more flush. I probably over-applied and had overlapping PE foam which caused the subtrunk liner to crease a bit after I was done; might revisit that and cut out the overlapping foam another day.

Applying just 2 sheets of butyl to the frame made a surprising sound difference on what is a very rigid metal frame; made this short video clip:

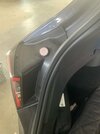
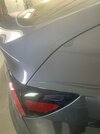
View attachment 640801
View attachment 640805 View attachment 640802 View attachment 640803 View attachment 640804

After a good drive and deliberately driving over rough patches (potholes, rutted portions of road, road reflectors), there's a significant improvement in reduced noise from the back. I'm very happy with the outcome. Can focus more on driving and driving fast than always minding the large increase in noise that usually comes with it.
I wanted to share some pictures of my May 2021 build Model Y that I took while applying the butyl sheets and foam that @gundarx showed in the above post. Looks like there were some minor changes in this sub-trunk area. Hope it's helpful to anyone planning on applying the butyl sheets and foam. Next up is trying the wheel well applications when I can borrow a jack.
 

Attachments

  • PXL_20210610_195733282.jpg
    PXL_20210610_195733282.jpg
    609.2 KB · Views: 258
  • PXL_20210610_204738834.jpg
    PXL_20210610_204738834.jpg
    436.1 KB · Views: 218
  • PXL_20210610_204743382.jpg
    PXL_20210610_204743382.jpg
    435.7 KB · Views: 224
After many trials and experimentation, I've found a fix for this problem. See: Easy and effective low frequency fix
Thanks for the update, I am unfortunatly selling the car as it's just too loud even with the fix. After driving other luxury ICE suv that have active noise cancellation and a panoramic cover, I'm going back to ICE until a more luxury all electric comes out. The biggest change that helped was coilovers but even then the boom is still there and wind/road noise.
 
Thanks for the update, I am unfortunatly selling the car as it's just too loud even with the fix. After driving other luxury ICE suv that have active noise cancellation and a panoramic cover, I'm going back to ICE until a more luxury all electric comes out. The biggest change that helped was coilovers but even then the boom is still there and wind/road noise.
It may be worth the couple of bucks for the PVC caps to eliminate the boom before making a final decision. You could just use a sheet of sand paper to make them a bit bigger inside so they'll fit over the rubber bumper. The same sheet of sandpaper will quickly shorten them to the right length. Just take some off until the hatch will close. 30 minutes and $5 may make you enjoy the car again. I tried the butyl, foam, bumper adjustment... all made some improvements. The $5 fix I posted about makes a profound difference.
 
Thanks for the update, I am unfortunatly selling the car as it's just too loud even with the fix. After driving other luxury ICE suv that have active noise cancellation and a panoramic cover, I'm going back to ICE until a more luxury all electric comes out. The biggest change that helped was coilovers but even then the boom is still there and wind/road noise.
What are you selling it for w/ the coilovers?
 
Hi
I'm a little late to the discussion, but I bought a model Y about 6 weeks ago. My previous car was a model 3.

I still have the model 3 and for a few weeks I switched back and forth between the cars. About a month ago I started just driving the model Y. Around that same time I started getting pain in my left ear. I also have quite pronounced ringing in that ear. As a child I had ear Infections often, but I don't remember having them as an adult. (I'm in my 50's)
I started reading this thread an I'm stunned by it. It seems a really strange coincidence that the ear pain started at the same time as I started driving the model Y. I would like anyone who has this pain to comment on my symptoms to see if they are similar to their's. I do still think it is an infection and I am seeing a doctor shortly.

the pain started a few weeks ago and has been constant since. I have driven the car almost daily, but sometimes with a day or two break. Because of my job there have been several days that I have spent literally 14 hours in the car, getting out occasionally, AC running sometimes. I didn't notice any worsening of my symptoms. My ear is slightly tender. I also get clicking sounds in that ear

I'm going to drive the model 3 for a few weeks and see what happens
 
  • Like
Reactions: polyphonic54
Hi
I'm a little late to the discussion, but I bought a model Y about 6 weeks ago. My previous car was a model 3.

I still have the model 3 and for a few weeks I switched back and forth between the cars. About a month ago I started just driving the model Y. Around that same time I started getting pain in my left ear. I also have quite pronounced ringing in that ear. As a child I had ear Infections often, but I don't remember having them as an adult. (I'm in my 50's)
I started reading this thread an I'm stunned by it. It seems a really strange coincidence that the ear pain started at the same time as I started driving the model Y. I would like anyone who has this pain to comment on my symptoms to see if they are similar to their's. I do still think it is an infection and I am seeing a doctor shortly.

the pain started a few weeks ago and has been constant since. I have driven the car almost daily, but sometimes with a day or two break. Because of my job there have been several days that I have spent literally 14 hours in the car, getting out occasionally, AC running sometimes. I didn't notice any worsening of my symptoms. My ear is slightly tender. I also get clicking sounds in that ear

I'm going to drive the model 3 for a few weeks and see what happens
If you have an Android phone, could you download Spectroid (it's free) and share a screenshot from your M3 and MY on the same highway? It would be interesting to see if your MY has the same issue mine had.

If your hatch bumpers aren't adjusted right, you'll have a very low frequency buffeting that can't be healthy. That takes 5 minutes and no money to fix. Some don't seem to hear (sense maybe) the buffeting - I found it nearly unbearable. I fixed that the second day I had the car. If I couldn't fix it right away, I would have returned the car.
 
It may be worth the couple of bucks for the PVC caps to eliminate the boom before making a final decision. The $5 fix I posted about makes a profound difference.
I read your linked post and have to admit that it wasn’t clear to me in the end what you did.

Seems like you extended the adjustable bumpers further than their maximum extension would otherwise permit?

If so, that’s interesting because other advice has been to extend them only to the point that they make a tight seal and no further (the envelope test).
My rigid stops are shorter than my original ones were set to. The problem is that the original ones are too soft. The PVC caps I added have the original rubber piece, set to the lowest height, inside. The caps sit on the original ridged plastic hex collar to form a solid plastic piece between the hatch and the landing pad.

Since they have no give, you have to make them just the right length - a hair longer than touching when the hatch is closed. There is some give in the hatch that still allows it to latch every time.

It may be easier to find the correct length by setting the stops to their lowest height and using a ball of playdoh or clay on the landing pad.
 
Last edited:
Inspired by @MY-Y, I used epoxy putty to create a rigid cap over the stop. First, measure the length of the stop, then turn the stop all the way in. Add epoxy putty over the stop to create a cap and make the whole length a bit longer than the original length. Put a non-sticky paper on the putty cap and close the hatch. Open the hatch and check the putty cap to make sure it's compressed a bit (pic 1), then close the hatch. After some time when the putty is supposed to become hard, open the hatch, remove the non-sticky paper, and add a layer of 1mm butyl-aluminum tape on the cap (pic 2) to ensure tight contact with a bit of flexibility. The final step is to paint the cap black.

The booming sound seemed to be lower than before. Spectroid shows that the peak is now 47Hz instead of 3xHz.

(My other soundproofing works:
- Two months ago, I installed soundproofing materials inside of the trunk, especially the bucket.
- Two weeks ago, I added soundproofing around the outside of the rear wheel wells, without removing the wheels. It was a bit awkward with the wheels there, but it was doable.
Both works seemed to reduce road noise but not the booming.)
 

Attachments

  • putty.jpg
    putty.jpg
    255.3 KB · Views: 208
  • putty2.jpg
    putty2.jpg
    494.2 KB · Views: 222
Inspired by @MY-Y, I used epoxy putty to create a rigid cap over the stop. First, measure the length of the stop, then turn the stop all the way in. Add epoxy putty over the stop to create a cap and make the whole length a bit longer than the original length. Put a non-sticky paper on the putty cap and close the hatch. Open the hatch and check the putty cap to make sure it's compressed a bit (pic 1), then close the hatch. After some time when the putty is supposed to become hard, open the hatch, remove the non-sticky paper, and add a layer of 1mm butyl-aluminum tape on the cap (pic 2) to ensure tight contact with a bit of flexibility. The final step is to paint the cap black.

The booming sound seemed to be lower than before. Spectroid shows that the peak is now 47Hz instead of 3xHz.

(My other soundproofing works:
- Two months ago, I installed soundproofing materials inside of the trunk, especially the bucket.
- Two weeks ago, I added soundproofing around the outside of the rear wheel wells, without removing the wheels. It was a bit awkward with the wheels there, but it was doable.
Both works seemed to reduce road noise but not the booming.)
Do you have any pictures of the wheel well project? I'm going to tackle both the remaining three wheel wells (I did the front passenger) and the inside bucket/hatch area in September. How much of a road noise reduction did you end up with? I don't have any noise issues, but just love this project and making my car even more quiet than it already is.
 
Do you have any pictures of the wheel well project? I'm going to tackle both the remaining three wheel wells (I did the front passenger) and the inside bucket/hatch area in September. How much of a road noise reduction did you end up with? I don't have any noise issues, but just love this project and making my car even more quiet than it already is.
Sorry, I didn't take any pictures. It's pretty much like Ear pain/Pressure help except that the wheel blocks some sight (but the whole well is still accessible). I also put more butyl almost covering the whole surface. I'm not sure about the amount noise reduction because I'm really not very good at evaluating my subjective perception and I didn't measure the noise level. Perhaps the satisfaction of finishing a project made the driving more enjoyable :).
 
  • Helpful
Reactions: Sudsington
Sorry, I didn't take any pictures. It's pretty much like Ear pain/Pressure help except that the wheel blocks some sight (but the whole well is still accessible). I also put more butyl almost covering the whole surface. I'm not sure about the amount noise reduction because I'm really not very good at evaluating my subjective perception and I didn't measure the noise level. Perhaps the satisfaction of finishing a project made the driving more enjoyable :).
Thanks! I'm right there with you on the evaluation. ;-) I do have the sound frequency app on my Android so I will make some measurements. Hoping to do the rear passenger wheel well this weekend. That's where I can here the motor whining sometimes.
 
biggest unsealed gap on the rear triangle window after rpmtesla noise reduction kit:
View attachment 658806

also added supplemental piece to top of hatch to seal against wind, being careful not to overlap on glass portion, to not risk glass failure
View attachment 658812
View attachment 658811

hatch gaps have much-improved sealing
View attachment 658810

added additional longer section along top length of rear fender, to improve sealing against rpmtesla kit
View attachment 658809
(twin size wool blanket, about 4 lbs.; helps dampen noise from the back)

View attachment 658808

can see the rubber pieces on top of hatch and on side of fender meet for good seal
View attachment 658807
hi,gundarx, could you please give a link for the rpm product?
 
Inspired by @MY-Y, I used epoxy putty to create a rigid cap over the stop. First, measure the length of the stop, then turn the stop all the way in. Add epoxy putty over the stop to create a cap and make the whole length a bit longer than the original length. Put a non-sticky paper on the putty cap and close the hatch. Open the hatch and check the putty cap to make sure it's compressed a bit (pic 1), then close the hatch. After some time when the putty is supposed to become hard, open the hatch, remove the non-sticky paper, and add a layer of 1mm butyl-aluminum tape on the cap (pic 2) to ensure tight contact with a bit of flexibility. The final step is to paint the cap black.

The booming sound seemed to be lower than before. Spectroid shows that the peak is now 47Hz instead of 3xHz.

(My other soundproofing works:
- Two months ago, I installed soundproofing materials inside of the trunk, especially the bucket.
- Two weeks ago, I added soundproofing around the outside of the rear wheel wells, without removing the wheels. It was a bit awkward with the wheels there, but it was doable.
Both works seemed to reduce road noise but not the booming.)
I'm glad this is working for you. One thing to consider. The PVC caps I used (and painted flat black) looks OEM.

I was just driving this morning thinking how much more I enjoy my car after this quick fix.
 
2021 Model Y (May build). It seems some have a minor issue here others are more serious. Mine was the later. After multiple sessions adjusting bumpers, i took some additional corrective actions today which had positive results.

1.) I adjusted the top hinge to be slightly lower then the roof glass, but most importantly even between the 2 sides. From the factory it was 3/8 to 1/2 of an inch different. One was quite low and one was quite high. This led the lid to be not aligned side to side by the time it got to the bottom.
2.) I added little felt pads to the trim side of the bumper. This raised the pad up a 1/4 inch which give added rigidity to the bumper. Less rubber bumper exposed outside of the plastic collar. The collar gives it strength.
3.) At the advice of the SC, I moved the striker down a bit. I had to remove the lower trim, loosen the 2 torx screws and tap on the striker until it moved 3-4mm.
4.) Completed the bumper adjustment again as seen in the video. Start with the uppers move to the lowers. Check the uppers again once you do the lowers. If you put too much pressure on the lower, the upper will gap again, and IMO the uppers are more important.

Now the gap is perfectly aligned and its MUCH closer together. When i push on the decklid or "thump" it with my had it moves only a fraction of a MM vs multiple MMs previously. Its not as rock solid as my BMW with a very similar design, but vastly improved.
 

Attachments

  • image0 (6).jpeg
    image0 (6).jpeg
    513.9 KB · Views: 209
  • image1 (2).jpeg
    image1 (2).jpeg
    330.2 KB · Views: 184
  • image2 (2).jpeg
    image2 (2).jpeg
    322.2 KB · Views: 190
  • image3.jpeg
    image3.jpeg
    271.4 KB · Views: 194
2021 Model Y (May build). It seems some have a minor issue here others are more serious. Mine was the later. After multiple sessions adjusting bumpers, i took some additional corrective actions today which had positive results.

1.) I adjusted the top hinge to be slightly lower then the roof glass, but most importantly even between the 2 sides. From the factory it was 3/8 to 1/2 of an inch different. One was quite low and one was quite high. This led the lid to be not aligned side to side by the time it got to the bottom.
2.) I added little felt pads to the trim side of the bumper. This raised the pad up a 1/4 inch which give added rigidity to the bumper. Less rubber bumper exposed outside of the plastic collar. The collar gives it strength.
3.) At the advice of the SC, I moved the striker down a bit. I had to remove the lower trim, loosen the 2 torx screws and tap on the striker until it moved 3-4mm.
4.) Completed the bumper adjustment again as seen in the video. Start with the uppers move to the lowers. Check the uppers again once you do the lowers. If you put too much pressure on the lower, the upper will gap again, and IMO the uppers are more important.

Now the gap is perfectly aligned and its MUCH closer together. When i push on the decklid or "thump" it with my had it moves only a fraction of a MM vs multiple MMs previously. Its not as rock solid as my BMW with a very similar design, but vastly improved.

thanks for the post! few questions.

1. did you have the ear pressure/buffetting issues like everyone else? did these fixes resolve the issues?

2. what did you use to adjust the bumpers on the hatch? single sheet of paper? envelope? How tight did you make the fit? to the point where you couldnt remove the sheet at ALL? or remove with some resistance

3. when you say tap on the striker, are you talking about tapping down onto the top of the striker (the horizontal bar part) so that it is a tighter fit into the car? or are you saying tapping on the back of the striker (the vertical bar part) so that the striker slides towards the front of the car?
 
I lowered my catch and used felt pads as well. It was better, but still had the 41 Hz sadness.

I cannot recommend the mod I suggested enough. It is a big improvement, inexpensive, and not that hard to do.