Welcome to Tesla Motors Club
Discuss Tesla's Model S, Model 3, Model X, Model Y, Cybertruck, Roadster and More.
Register

Fix your door that won't open

This site may earn commission on affiliate links.
Hey guys,

I’m a new member just joined to say thank you to everyone who contributed in the article. I was able to fix my passenger side door handle on my 14 S85. Works fine now used all existing micro switch ripped off the back of it and used hot glue to make a seal around it and soldered the wire that fell off.

However some minor issues which popped up since:

  • I couldn’t get the top door handle bolt on even with the window trim off so I just left it out.
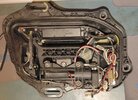
  • I accidentally did something that has left my window loose and it isn’t aligning properly when I close the door. The window going up when the door was closed ended up peeling some of the black rubber insulation and it doesn’t go up all the way unless the door is open.{Main issue} I can basically move the whole window up from the corner so when the door closes it over laps on to glass instead of sitting in the rubber.

  • Sorry if it’s confusing not sure how to explain it any advice if someone knows which bolt is tied with the window adjustment would be great

Looks like you loosened the bolt that positions the glass in place, seems like your window is too far back in your pic. It needs to be positioned correctly and tightened. There is a video for adjusting the glass. I'll see if I can post some pics this week about the windows since I have the parts to get some good pictures now.
 
  • Like
Reactions: pilotSteve
P.S. With the gear repaired and the door reassembled, it operates as before: the door operates normally but the car handles don't come out when this handle is pressed.

I forgot to mention that at the bottom of the door interior, I also found the rubber pad supposed to cover the handle assembly. So I suspect that, once the pad fell, the wire could be caught by the corner of the window while lowering it, and the window motor can certainly apply sufficient force to tear away the position sensor wire.

Might be a little late, but there is also a switch to detect the push for extending handle. That wire is likely broken also.
 
Looks like you loosened the bolt that positions the glass in place, seems like your window is too far back in your pic. It needs to be positioned correctly and tightened. There is a video for adjusting the glass. I'll see if I can post some pics this week about the windows since I have the parts to get some good pictures now.

Thanks for the quick reply which bolt would that be?
 
Update 1 month later window alignment but tightened so fixed but handle started causing same issue again and occasionally wouldn’t open and now doesn’t open again so I’m guessing the wires came out again of the same front passenger handle.

also the rubber seal where the door closes between side of window is peeled and ripped which I haven’t found a solution for yet.

however not sure if I’m going to be able to go through this all again since the last time I soldered the wire on the existing micro switch and used a hot glue gun as a seal for the backing I removed.

maybe it’s time to throw in the towel and pay the $400 something they quoted to replace handle :/

It was really tough taking the handle out and putting it back in the first time..
 
This is a great thread. Thank you to all who have posted advice and instructions for DIY door handle repairs.

I purchased some Panasonic ASQ10410 microswitches from Mouser Electronics.

Can someone please advise which 2 of the 3 solder posts to use? Should I use the 2 posts furthest from the mounting hole? I saw a photo posted in which someone soldered the white wire to the middle post and the black wire to the post furthest from the screw hole. Is that the correct configuration?

Many thanks.

asq-p.jpg
 
Did this repair this weekend, thanks a lot to OP for the write-up!

I left the microswitches in place during repair.
Just pulled the black rubber off the back, soldered the wires back on and covered it with hotglue.
Routed the wires in a loop and tacked them down to the moving part of the handle using more hotglue to prevent wire movement at the switch.
Not pretty, but it works :)
 

Attachments

  • ModelSHandleHotglue.jpg
    ModelSHandleHotglue.jpg
    253.8 KB · Views: 151
Last edited:
Recently pass side front door handle presents properly but half the time fails to release latch so I'm looking for a frayed wire or else a faulty/intermittent switch, right? I'll probably wait until total failure to do the repair since clambering in thru driver's side is such good exercise:)
--
 
  • Like
Reactions: MikkoJ
Both front doors on my 2013 S will not present. At first, the driver side door would present; but door would not open. Several open/close attempts and door could be opened. Now, both front doors handles do not present and when handles are pulled out manually, neither door can be opened. Have to climb in from back and either lower the window and/or pull on front door handle from inside.

Thank You. Going to attempt this DIY repair.
 
One of the switches has a "simulated roller" (metal lever on it)... the switch with the longer length of wire.. the other switch doesn't use a level. Just direct pressure on the plunger.

You could detach and move the lever over to a new switch if you ordered a replacement without. Just pulls straight off the switch. Has a couple "barbs" on the sides to hold it from wiggling out on its own.

Notice the direction of wires / orientation of switch plunger w.r.t. to the "exit path" of wires is different on each switch. One is a lefty the other is a righty.

Both switches use only the Normally Open contacts for this application. It doesn't matter which wire is which going to the 2 terminals you care about on the switch. You could reverse black and white and it would still work fine. View attachment 182653 View attachment 182654

Also shown is connector pin-out.
Do you know the part number of this micro connector?
 
Thanks for the video, it is very well done and complete! I figured there was a microswitch that had the wires broken off. Today I will attempt to resolder and strain relief the wires using the old switch. Stupid design that obviously was not life tested and they have the nerve to charge > $1000 to fix it. Next I need a fix my headlight DRLs turning yellow. I have already replaced them both with eBay parts but one of those has now failed at 74K miles.
 
If Tesla were to do this design (right) again, the switch would be mounted on the fixed (non-moving) part of the assembly (plunger facing up), and there would be a tab on the arm that comes down to press the lever. No flexing of wires.

I know they re-designed this part, maybe more than once. You can see unused vestigial / potential mounting spots were considered for this switch.. On the metal arm. And on the plastic ... wherever there's a couple holes or dimples that look like it would accommodate a microswitch. So we know they've played a bit.

Notice this one switch has an adjustable striking plate for the plunger. The other microswitch of the pair does not. I did not play with the adjustment height when replacing a switch.

View attachment 182656
 
Three hours later after working in 90 deg FL weather my door is fixed, and this post definitely helped. I was able to solder the wires back on without removing the switch from the handle assembly. I used a razor blade to cut away the rubber, slid over shrink tubing and soldered the wires back onto the terminals. I then redressed them longer and then hot melt glued them in place so as not to have a flex stress point. See below:

I had several major hassles! Getting the door panel and window trim off was uneventful; just be careful. I sat on a low work stool and supported the bottom of the panel while I unplugged the four connectors.

On my 16 S there was a push clip holding the door handle wires, I took the one-way plug out of the hole in the door but after found a release tab to slide the connector pair off. Then there were two tie wraps that were very difficult to get at to cut off and release the cable from the door's back edge. Then I absolutely could not release the latch on the connector. The small lever you push down would not release it even if you had three hands. After about 30 minutes of trying; I got the right sized screwdriver and pried two tangs up on the female body while pushing down the lever from the plug side and it came apart.

I taped up the chrome and removed the nuts. The nut at the top is barely accessible with the window down and all the rubber weatherstripping removed. I used a 10mm socket with a 1/4 inch rachet handle but had to tape an extension to the handle. Getting that nut back on was even harder. I used a magnet stick and various tools to get the tread started.

The handle assembly came out fairly easily but putting it back up in was another story. I think because I redressed the bundle of wires on the inside right side of the handle made a 1/4 inch lump that made it hit the window track and not get the angle to get it over the mounting studs. I got rid of the lump and found I could angle it back up in. The top left corner must be push up and back and then the assembly angled up into the door corner. Good luck!

Oh! One tip, before I put everything back together, I wanted to test it. You can latch the latch with a screwdriver and then the handle should retract slightly and open the latch when you try the handle. Make sure you don't close the door with the latch already latched. Also make sure the inside handle works with the same method before putting the door panel back on, i case, god forbid, the door shuts and both handles don't work :)

I hope Elon doesn't engineer his rockets like this nightmare!
IMG_0795.JPEG
IMG_0794.JPEG
 
Our 2013 is doing this on the drivers' side, now. I'm tempted to just let Tesla fix it if it's the $300-$500, but if they replace the nice metal handle with a plastic one I'll just repair what I have. Anyone happen to know what they typically do these days?