Welcome to Tesla Motors Club
Discuss Tesla's Model S, Model 3, Model X, Model Y, Cybertruck, Roadster and More.
Register

Fresh Air Intake Upgrade

This site may earn commission on affiliate links.
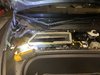
When you change the cabin filter in cars they are usually full of leaves, bugs, and all kinds of particles. Looking at the intake under the frunk I thought it would be easy and cheap to add some pre-filtration there. Went to the hardware store and purchased a sheet of "cut to size" universal furnace filter material. This will prevent the bigger stuff from getting into the system and substantially prolong the OEM filter. Cost was $15 and I was able to cut 3 out so about $5 a piece.

Cut the piece out just a little larger so it kinda squeezes in place. The structure of the material against the foam surround is almost like velcro and holds in place really well.

Though some of you would be interested in this simple, inexpensive addition.

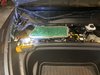
By the way, there are special intake filters similar to this for the model 3 however they are much too restrictive and cause issues, this works so much better and is dirt cheap in comparison.

Click on the photo for a larger view. ;)

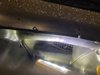
This put in a couple of weeks ago, already crap on there and although hard to see it is starting to blacken. Going to dty to hose wash one with some degreaser when it gets bad enough as they may be reusable a few times. Good part is you get a good visual on how dirty it is every time you open the frunk.


The ingenuity of some folks is amazing. I like the idea and for the $$ involved it's worth a try. What did you use as a template?

BTW does this look right:
True Blue 24 x 36 x 1 Budget FRP 2 Washable Filter-HD0124361 - The Home Depot

Yep, 99% sure thats the one I got. As for cutting. Just eyeballed it a little bigger and made some small final adjustments. Once you got one that fits to your liking just use it as a template for the remainder. Remember, you want it a little bigger 1/4" or so, so it kinda squeezes into place for lack of a better word.

Do not go out and purchase some super "hepa" filtration material that is very dense, this will restrict air flow and cause all kinds of problems. The cheap bargain/budget stuff is what you want. This is only a pre-filter, your OEM unit does the hepa part. ;)
 
Last edited:
Yep, 99% sure thats the one I got. As for cutting. Just eyeballed it a little bigger and made some small final adjustments. Once you got one that fits to your liking just use it as a template for the remainder. Remember, you want it a little bigger 1/4" or so, so it kinda squeezes into place for lack of a better word.

Do not go out and purchase some super "hepa" filtration material that is very dense, this will restrict air flow and cause all kinds of problems. The cheap bargain/budget stuff is what you want. This is only a pre-filter, your OEM unit does the hepa part. ;)


Thanks, i just picked up some. Mine was green (even though it was listed as the blue stuff on the Home Depot app). 5 minutes and done. My other cars didn’t have an intake like that to put a pre-filter on it. I remember making a mess of my interior on most cars when I changed them. I’m sure this will help greatly.
 
this is great idea.
but i am worry that most of these filter are made for indoor temperatures.
they may not stand up well in very hot and very cold weather..
The foam may become brittle and break into small pieces or dust and got suck into the car.

Make sure you get the material that’s suitable.
There are aftermarket engine foam filter for ICE car. Modding one of those should work.
They will be sucked right into the hepa filter xD
 
So would this mean you can go materially longer with the original cabin filter,..... since you are using a prefilter?

I think the objective is to stop all the debris from loading up the HEPA filter prematurely. I was always pulling out leaves and dead bees and such out of the HEPA filters in my other cars. Now they will be stopped early. It will probably allow the HEPA filter with some longevity, but practically I think overall the HEPA filter will be more effective for longer since the static load should be reduced (assuming the prefilter is shaken or washed regularly).
 
I think the objective is to stop all the debris from loading up the HEPA filter prematurely. I was always pulling out leaves and dead bees and such out of the HEPA filters in my other cars. Now they will be stopped early. It will probably allow the HEPA filter with some longevity, but practically I think overall the HEPA filter will be more effective for longer since the static load should be reduced (assuming the prefilter is shaken or washed regularly).
Also less smell as the hepa filter is not absorbing moisture as much from wet leaves sitting in it
 
Also less smell as the hepa filter is not absorbing moisture as much from wet leaves sitting in it

Yes, the smell is my primary motivation for this mod.
I don’t know how easy leaves will get inside on MY.
For my other car, if the leaves get inside, they will decompose over time and become dirt, and sometimes there is a bad smell to it, sometimes it doesn’t.

once the smell is there, changing filter doesn’t help to get rid of the smell.

there is no such option to add a pre filter in my other car, i am glad MY does.
And if M3 is doing it, there must be a reason for it.
 
The purpose is 2 fold as mentioned. Prevent larger particles from loading up the OEM cabin filter and not getting rotting insects, leaves and other stuff that will smell bad and be difficult to address. On most cars this cannot be done due to the way the intakes are set up however the Y is just begging to have something put in place.

I cannot see how this material could decompose or get brittle and break with time unless it stayed there for 50 years. LOL.

Again, do not try tighter woven material. One person mentioned carbon infused. The carbon ones I have seen are rather restrictive so be aware. The system is designed to flow X amount of air, reducing this will have undesired consequences.

Not sure if any of you have seen what is involved in changing the OEM filters. There are actually 2 of them side by side to increase surface area substantially compared to your average car that only has one. Not very well thought out but then again changing the filter happens probably once a year at best unless you live in dust country.

Here is a cabin filter change video. As you will see it is pretty involved compared to opening a glove box which is pretty much standard on all other cars. Personally I do not agree on the foam cleaner being used unless you have an odor issue, only then would I think of doing this.


Tool Tip for removing that poorly placed screw.


Last edited:
Just gotta say that I'm glad you've joined TMC. Your posts are great! :)

The purpose is 2 fold as mentioned. Prevent larger particles from loading up the OEM cabin filter and not getting rotting insects, leaves and other stuff that will smell bad and be difficult to address. On most cars this cannot be done due to the way the intakes are set up however the Y is just begging to have something put in place.

I cannot see how this material could decompose or get brittle and break with time unless it stayed there for 50 years. LOL.

Again, do not try tighter woven material. One person mentioned carbon infused. The carbon ones I have seen are rather restrictive so be aware. The system is designed to flow X amount of air, reducing this will have undesired consequences.

Not sure if any of you have seen what is involved in changing the OEM filters. There are actually 2 of them side by side to increase surface area substantially compared to your average car that only has one. Not very well thought out but then again changing the filter happens probably once a year at best unless you live in dust country.

Here is a cabin filter change video. As you will see it is pretty involved compared to opening a glove box which is pretty much standard on all other cars. Personally I do not agree on the foam cleaner being used unless you have an odor issue, only then would I think of doing this.


Tool Tip for removing that poorly placed screw.


  • Like
Reactions: captanzuelo
I completed this pre-filter mod today.

Simple job. Costs about 7-8bucks, takes about 10-15minutes.

I’d like to find a filter media that is less than 1” thick as the frunk cover bulges a bit now but only if you look close under the hood.

When I looked down the cabin intake, I did notice a large ~2-3” square mesh (like chicken wire) waay down there but before the cabin filters near the foot wells. I only found one piece of large debris that I removed w a claw like device.
 

Attachments

  • FE7C4C64-CC04-4E40-BE8C-AE1768CD5B04.jpeg
    FE7C4C64-CC04-4E40-BE8C-AE1768CD5B04.jpeg
    335.2 KB · Views: 719
  • 80F528B2-8248-4A23-8135-43AFDCA60093.jpeg
    80F528B2-8248-4A23-8135-43AFDCA60093.jpeg
    765.9 KB · Views: 180
  • 8B61311E-D97F-44DA-AE35-16A68D360C3A.jpeg
    8B61311E-D97F-44DA-AE35-16A68D360C3A.jpeg
    504.6 KB · Views: 188
  • 871DFF86-5BC9-4621-B22A-4E802E9F58C6.jpeg
    871DFF86-5BC9-4621-B22A-4E802E9F58C6.jpeg
    558.9 KB · Views: 179