Welcome to Tesla Motors Club
Discuss Tesla's Model S, Model 3, Model X, Model Y, Cybertruck, Roadster and More.
Register

Front aft lower control arms - OEM vs Beck-Arnley?

This site may earn commission on affiliate links.
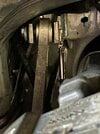
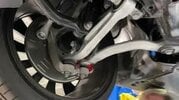
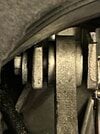
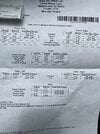
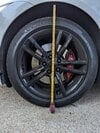
Just had my '15 S go through state inspection. Mechanic indicated that while everything passed, that I'm starting to get play in the ball joint on the lower left aft control arm. I just as soon as have my local guy do it versus back to the service center.

Questions -

Any one purchase these new from the SC, recall what the price was?
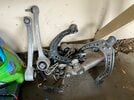
I see that Beck-Arnley has a replacement (2012-2020 Tesla S Control Arm and Ball Joint Assembly - Suspension - Beck Arnley, Front Lower Rearward 12-20 S Control Arm and Ball Joint Assembly - 125252-06065545 - PartsGeek) Is this saving me anything? Has anyone used this part, or compared to the OEM one?

Mechanic says I have sometime, but want to line everything up so it's not an issue.
 
Beck Arnley is a good brand. I've used some of their stuff, it's OEM quality. From the service center, I believe the Aft arms are $375.....if they have them in stock.

You'll need to re-align the car once it's replaced, because the aft arm controls your front camber.
 
Beck Arnley is a good brand. I've used some of their stuff, it's OEM quality. From the service center, I believe the Aft arms are $375.....if they have them in stock.

You'll need to re-align the car once it's replaced, because the aft arm controls your front camber.
Thanks! Yes, the BA are quite a bit less. And yes, I assumed we'd be realigning the front end.

Any other input? Anyone else use the Beck-Arnley?
 
Hey @Boeingpilot - did some more research, and have some updates for you.

I ordered one of the Beck Arnley aft arms to compare it to OEM, and noticed a different logo marking on the side of it. Turns out, Beck Arnley has stopped manufacturing parts on their own, and just white labels 3rd party parts.

So, in this case, the Beck Arnley part is literally a SIDEM product in a BA box. Still has the SIDEM logo and part number etched in it.

So, rather than spending $375 on the Beck, you can buy the SIDEM directly for $189.


FWIW, the OEM part is made by CTR (and is stamped as such on the part, next to the Tesla logo), a South Korean brand. It's made from 6110A aluminum in the T6 temper, also stamped on the part.
 
Last edited:
We have been hearing a creak in our right front suspension the last week. I just got an estimate back from a local independent shop that adding Teslas to their specialties. They found play in the right front lower rearward control arm ball joint. The total cost is almost $1800. They replace the control arm ball joints in pairs so they'll do both front ones, and a alignment is required so that's all included in the price. I asked if they buy these parts from Tesla or go aftermarket & they said in this case they buy the parts directly from Tesla. The owner of the shop is a long-time Tesla owner.
 
We have been hearing a creak in our right front suspension the last week. I just got an estimate back from a local independent shop that adding Teslas to their specialties. They found play in the right front lower rearward control arm ball joint. The total cost is almost $1800. They replace the control arm ball joints in pairs so they'll do both front ones, and a alignment is required so that's all included in the price. I asked if they buy these parts from Tesla or go aftermarket & they said in this case they buy the parts directly from Tesla. The owner of the shop is a long-time Tesla owner.

If you're in any way mechanically inclined, you can save about $1200 on this job.

You just need two of these: Sidem Belgium Front Left or Right Lower Rearward Control Arm For Tesla S X | eBay

And the inner mounting hardware from the Service Center, about $25 total:
1006484-00-A x 2
2007107 x 2
2007106 x 2

Mark the position of the camber adjustment lobe on the existing inner bolt so you'll be able to get it fairly closely aligned when you put the new ones in.

Remove the outer and strut mount nuts, loosen and cut the inner bolt (not enough clearance to remove it on its own b/c battery).

Replace with the new part, use the new nut, washer and bolt on the inner mount (put the bolt in backward so you don't have this issue again), tighten it to line up the marks you made initially, and then go get a $150 alignment.

Job done for $550.

(FYI, Sidem is the manufacturer of the part that Beck & Arnley white labels. So they're exactly the same, just lower cost direct from the manufacturer)
 
I went to carid website (and eBay) to buy all my suspension replacement parts about 11 months ago, and I replaced everything, including rotors and pads and wheel bearings/hub assembly. What I found:
-as stated, some of the parts I bought were identical to the Tesla part, without the T logo and without the part number sticker. Pleasantly surprised to save hundreds for the same thing.
-cutting bolts up front sounded scary but was a breeze. Cutting the rear toe arm bolt is more difficult, less room, but it’s a smaller bolt.
-my car is lowered a bit and I have max camber up front, so swapping LCA in front didn’t change my front camber but by +.2 each side.
-I had an alignment done right away, but needed another within a few months. Maybe parts settle?
-I ignorantly did not torque bolts down with weight of my car subjected to it, and today I’m going to go out there and handle that chore.

I spent a total of $1200 on all of that stuff, and about 12 hours time remove and replace and tinkering with it. It was somewhat enjoyable.
 

Attachments

  • 74513959-16E2-4764-98D5-2F30B4E40BE2.jpeg
    74513959-16E2-4764-98D5-2F30B4E40BE2.jpeg
    372.6 KB · Views: 420
  • 86201B92-3E35-4D29-A7D9-0137DF5E1976.jpeg
    86201B92-3E35-4D29-A7D9-0137DF5E1976.jpeg
    18.2 KB · Views: 140
  • BF4B620E-9B51-4582-823B-6034708BEF62.jpeg
    BF4B620E-9B51-4582-823B-6034708BEF62.jpeg
    315.1 KB · Views: 129
  • F406FE5B-57E6-4CD1-AA59-A9005344682C.jpeg
    F406FE5B-57E6-4CD1-AA59-A9005344682C.jpeg
    593.2 KB · Views: 174
  • 2BC18759-8D23-4CB1-B72A-3379F342791C.jpeg
    2BC18759-8D23-4CB1-B72A-3379F342791C.jpeg
    531.6 KB · Views: 162
  • Informative
Reactions: cleverscreenam
I went to carid website (and eBay) to buy all my suspension replacement parts about 11 months ago, and I replaced everything, including rotors and pads and wheel bearings/hub assembly. What I found:
-as stated, some of the parts I bought were identical to the Tesla part, without the T logo and without the part number sticker. Pleasantly surprised to save hundreds for the same thing.
-cutting bolts up front sounded scary but was a breeze. Cutting the rear toe arm bolt is more difficult, less room, but it’s a smaller bolt.
-my car is lowered a bit and I have max camber up front, so swapping LCA in front didn’t change my front camber but by +.2 each side.
-I had an alignment done right away, but needed another within a few months. Maybe parts settle?
-I ignorantly did not torque bolts down with weight of my car subjected to it, and today I’m going to go out there and handle that chore.

I spent a total of $1200 on all of that stuff, and about 12 hours time remove and replace and tinkering with it. It was somewhat enjoyable.

Wheel bearings are a satisfying swap. My car was noticeably quieter over bumps after that change.

I got lucky, there was juuuuust enough clearance to get my rear inner toe bolts out without cutting them. But it took some wiggling.
 
  • Like
Reactions: BostonBurley
If you're in any way mechanically inclined, you can save about $1200 on this job.

You just need two of these: Sidem Belgium Front Left or Right Lower Rearward Control Arm For Tesla S X | eBay

And the inner mounting hardware from the Service Center, about $25 total:
1006484-00-A x 2
2007107 x 2
2007106 x 2

Mark the position of the camber adjustment lobe on the existing inner bolt so you'll be able to get it fairly closely aligned when you put the new ones in.

Remove the outer and strut mount nuts, loosen and cut the inner bolt (not enough clearance to remove it on its own b/c battery).

Replace with the new part, use the new nut, washer and bolt on the inner mount (put the bolt in backward so you don't have this issue again), tighten it to line up the marks you made initially, and then go get a $150 alignment.

Job done for $550.

(FYI, Sidem is the manufacturer of the part that Beck & Arnley white labels. So they're exactly the same, just lower cost direct from the manufacturer)
I wish TeslaMotorsClub had a feature to save posts forever for reference, like your own personal Wiki. Then members could create an exact and concise How To for every repair without Tesla Service Centers.👍
 
  • Like
Reactions: Cheburashka
I wish TeslaMotorsClub had a feature to save posts forever for reference, like your own personal Wiki. Then members could create an exact and concise How To for every repair without Tesla Service Centers.👍
You’re about to be a happy camper. I was!


Includes:​


  • Service Manual, Parts Manual, and Body Repair

  • Tooling Catalog and Wiring Diagrams

  • Service Bulletins

  • Labor Codes and Times

Pricing Details:​


AnnuallyComplimentary

I dig around in it before I go perform a repair and already I’ve found many helpful tidbits.
 

Attachments

  • 5D1FD825-F082-4BBF-838D-36F87E5B85C7.png
    5D1FD825-F082-4BBF-838D-36F87E5B85C7.png
    216.3 KB · Views: 126
  • Informative
Reactions: cleverscreenam
I went to carid website (and eBay) to buy all my suspension replacement parts about 11 months ago, and I replaced everything, including rotors and pads and wheel bearings/hub assembly. What I found:
-as stated, some of the parts I bought were identical to the Tesla part, without the T logo and without the part number sticker. Pleasantly surprised to save hundreds for the same thing.
-cutting bolts up front sounded scary but was a breeze. Cutting the rear toe arm bolt is more difficult, less room, but it’s a smaller bolt.
-my car is lowered a bit and I have max camber up front, so swapping LCA in front didn’t change my front camber but by +.2 each side.
-I had an alignment done right away, but needed another within a few months. Maybe parts settle?
-I ignorantly did not torque bolts down with weight of my car subjected to it, and today I’m going to go out there and handle that chore.

I spent a total of $1200 on all of that stuff, and about 12 hours time remove and replace and tinkering with it. It was somewhat enjoyable.

how did you go about torqueing the bolts at ride height? I just replaced my front aft arms and noticed a new noise. I did torque the bolts when car was up on a jack, but thinking I may need to actually torque them while the car is on the ground. I have air suspension so perhaps I could put it in jack mode and max height and slip under there to torque the two bolts?
 
how did you go about torqueing the bolts at ride height? I just replaced my front aft arms and noticed a new noise. I did torque the bolts when car was up on a jack, but thinking I may need to actually torque them while the car is on the ground. I have air suspension so perhaps I could put it in jack mode and max height and slip under there to torque the two bolts?

If you have two jacks (or one jack and a jack stand), support the car at the jack point, and out the other jack under the knuckle. Lift it up until there’s about 15” between the center of the hub and the wheel arch, then tighten everything down.
 
  • Helpful
Reactions: cleverscreenam
If you have two jacks (or one jack and a jack stand), support the car at the jack point, and out the other jack under the knuckle. Lift it up until there’s about 15” between the center of the hub and the wheel arch, then tighten everything down.
I assume you mean with the wheel still touching the ground? use the jack to support the car (not necessarily lifting it) and then a jack stand to support under the car (knuckle) for safety. Then slide under it and torque the ball joint and then where the front aft car attaches to the air suspension?
 
No, he means the wheels are still off the car this whole time. You use a jack in the normal jackpad spot to lift the car, remove the wheel, and continue holding the car in the air. Then you use a second jack underneath the knuckle and jack that spot up, as well, until about 15" between the center of the hub and the wheel arch.

Exactly like website N2itive.me installation instructions=
"Not preloading the Tesla suspension is why your bushings are failing early. Preloading is demonstrated on our website under the installation tab. There is a video on that webpage showing how to do this. The wheels are actually off for preloading. You need to put a jack underneath the lower control arm with control arm bolts a little more than hand tight. Then jack up the lower control arm to simulate where the wheel would normally sit if the car were on the ground. Then everything gets torqued down."
I have not seen that website before but that makes sense. I wish there were a graphic to depict what this looks like ((hub to a spot on the wheel arch). I did pulled the wheel, used a bottle jack to jack up the arm (after loosening the air shock bolt and the ball joint bolt but NOT the subframe bolt as that seems to be the main alignment point: could be wrong here, hope not), jacked it up several inches and then re-torque those two locations. Couldn't use a torque wrench as the rotor starting spinning and the bottle jack started moving around so I used my M18 torque wrench to zap the ball joint nut. Took it for a test spin and appears ok, but will tell more about alignment on highway.
 
Last edited:
here it a photo of it at standard drive height. After reading the N2itive website, perhaps I should readjust to the low setting since i have it set to that on highway driving speeds. Would it get an alignment on low height vs standard height? the N2itivie info seems to show that the camber is adjusted between the different ride heights.
 

Attachments

  • PXL_20221015_225506368.jpg
    PXL_20221015_225506368.jpg
    621.7 KB · Views: 87
Last edited:
I've heard it on these forums several times to get your alignment done on the height that you most frequently drive on, for most people that's Low... that's where everyone should be because any raising increases wear and shuddering on the front drive shafts of AWD Teslas... which that can be fixed with N2itive lowering links.
Wow that sentence looks horrible, oh well.