Sparkeur
Member
I have opened my 'frunk' about ten times since I got my car 2 years ago. Every time however, I found it quite easy to see inside. I need to know, what am I missing...?


You can install our site as a web app on your iOS device by utilizing the Add to Home Screen feature in Safari. Please see this thread for more details on this.
Note: This feature may not be available in some browsers.
They grey wire from the oem harness about 3” before the frunk button plug.So did you tap in to the gray wire from the Tesla OEM harness to the frunk button or on the EV offer harness that is connected in between? Or does it really not matter? Thanks for figuring this out!
It’s usually fine during the day, but I use my frunk a lot and at night in the work carpark it can be tough to see inside. This really is a great addition for minimal cost. I found the factory lighting (trunk/puddle/frunk) pretty woeful without upgrades.I have opened my 'frunk' about ten times since I got my car 2 years ago. Every time however, I found it quite easy to see inside. I need to know, what am I missing...?
I have opened my 'frunk' about ten times since I got my car 2 years ago. Every time however, I found it quite easy to see inside. I need to know, what am I missing...?
Asking hopefully not a dumb question - did you use a few feet of low gauge wire, pig tail it into the frunk light negative, then connect the other end to the engine body to ground it? Just want to make sure I need to get more wire as I don't see how to ground the frunk light strip directly given it's minimal wire lengths. Thanks!They grey wire from the oem harness about 3” before the frunk button plug.
Thanks so much - really appreciate it!I’ll take a snap for you when I get home….
But yes, I did add some wire as I added a plug. Will make sense with a pic.


You are awesome - thank you so much for this!Sorry this ended up VERY long and the pics may not be as helpful as hoped, but I’ll explain and hopefully add some clarity. It’s quite literally 4 wires and a simple task, this makes it sound much more difficult than it is.
I removed the frunk to do this, you could omit this but I couldn’t find a reasonable earth point on the frunk catch area and chose to use the factory earth on the right hand shock tower area. I had previously used this point for the power frunk as well.
With the frunk removed, add an earth with new wire from the shock tower or another spot if you prefer and run that wire along the factory harness and back to the frunk catch area. I zipped tied it.
I added a plug to mine between the the new LED and the frunk button, the reason I did this was because the LED becomes part of the frunk, if you need to remove the frunk for any reason you’d have to remove the LED with it and that would be annoying. If you omit the plug, it’s completely fine but you have to take the led out as it becomes hardwired to the car and would require a much bigger drill hole for the wiring in your frunk.
So now install LED into frunk rubber, wiring requires a drill 5/32 (4mm) hole to run the red/black from the frunk rubber lip to underneath and into the frunk catch area. This can be hidden at the very front of the frunk and is hidden from view as the LED actually covers it. If you don’t add a plug, this would need to be much bigger hole to feed the LED through if you were removing/installing the frunk. You can reinstall the frunk in the car now.
Now to your questions, I added the male end of the plug to the red/black wires of the LED (now underneath the frunk in the catch location) there was enough wiring included to do this. This side is all done.
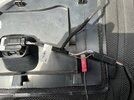
Peel back the conduit on the factory frunk pushbutton plug and you’ll find purple/brown/grey wires.
I stripped back the grey wire and soldered on a new length of red wire to the female end of the plug that lines up to the red male.
The brown wire is the negative, but this won’t work and shouldn’t be used as it causes the problems described above. Sooo instead, attach the earth you ran at the start of the install to the negative side of the female plug.
Join the plugs together and voila, the light should be on. Neaten up wires by tucking back into frunk catch area and test it all out.
If there’s any doubt, the light will switch off with the frunk pushbutton after about 10 mins.
If that isn’t clear enough, I can take the frunk out for you.
View attachment 829677
View attachment 829680
View attachment 829681
They grey wire from the oem harness about 3” before the frunk button plug.
You say once you make the connection with the T tap on the grey wire, the LED stops working. (And the frunk button light)
How are you earthing the LED before you tap the grey wire?
You say once you make the connection with the T tap on the grey wire, the LED stops working. (And the frunk button light)
How are you earthing the LED before you tap the grey wire?
no need to earth, just tap and it will light up, if both LED and frunk light not working. You could have tripped the e-fuse. Just wait an hr or so, it will resume, make sure + and - didn't touch
On my car (2021 update) the grey wire is the positive and the brown or pink colour is the negative. That would explain the e fuse going as you are basically grounding that circuit.
I see earlier on you were asking me where I tapped the grey wire, but this was for the positive for the LED strip. The negative is the brown/pinkish color, and it’s the one that causes the problems, so is no longer connected to my LED. The separate earth you have already run connects directly to the LED strip negative so you don’t interfere with the factory brown/pink wire.
Edited for clarity!
Yes, spot on!So now I am seeing what you are saying. I will disconnect the LED negative from the Hansshow harness and attach the LED negative to the ground that I ran. That would preserve the Frunk button’s negative and give an alternate path for the LED negative.