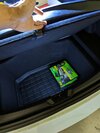
EO auto frunk plus the Hansshow frunk light. Can't say for certain they were tested together but I'd assume if you have the Hansshow auto frunk and the Hansshow frunk light it should work together. For my set up, EO auto frunk, and a low-draw SMD LED strip about 20cm long, directly connects to the frunk button wires (orange and grey), has been working well over a month now. Frunk button lights up, frunk button closes, and LED strip stays on for as long as the button light does (i've left a camera inside the frunk and lights out after 9ish minutes). Going back to a reply I did a month ago (on this thread), it is a matter of how much the extra LED is drawing (be it an SMD strip, light bar, or COB) and how the Tesla computer detects it being abnormal. Auto frunks typically draw power directly from the 12V terminal - but when you start tapping into existing wires to draw power, eg. the frunk button, the computer would check the draw from that point and may trip a fuse or stop one functionality or another.