which one is the primary and which one is secondary latch? So the latch that the hansshow cable pull is ok, it releases properly. Then the next safety latch (I think that’s the second one and it’s release by Tesla itself) is releasing too late (or the strut motor start lifting the hood too earl) so the frunk hood hook is pushing up that latch, causing it to be stuck. Then the hood won’t open.The possibility here is the cable from the suction motor to the secondary latch hasn't been adjusted properly and has some slack in it. I assume your suction motor having just installed it is the small one with two cables coming from it - one cable goes to the secondary latch and the other cable is the emergency release.
When you installed the secondary latch cable, did you cut a Chanell in the insulation that surrounds the lock, so the cable runs flush? The little metal part that hooks onto the latch in lock - the bit you fit prior to putting the new spring onto - make sure that's seated properly and then loosen the two nuts on the cable - pull the cable tight ish - (no free play) then lock the nuts up.
It sounds like the motor is pulling the cable - the struts are energised by the suction motor - but because of slack it's not pulling quite enough to release the latch and because the cable has been pulled by the suction motor it then engages the struts to power up. Should be a really simple fix - it's a common mistake to make.
One last thing to check - ensure the little rubber bungs either side of the bonnet have been screwed fully in - they could be holding the bonnet a little high and making the closing a bit too tight - so the bonnet is always under pressure - and perhaps the latch is a bit too stiff for the suction motor to pull it.
Do all final adjustments to closing after your bonnet opens and closes properly.
If the two bungs are screwed all the way in, then release the two bolts that hold the lock - lift it a little and re-tighten - doesn't matter at this stage how high you lift the lock - providing the lock is central to the catch on the bonnet it will eliminate all possibility of bad initial adjustment - once its working you can do the final adjustments to your satisfaction.


Welcome to Tesla Motors Club
Discuss Tesla's Model S, Model 3, Model X, Model Y, Cybertruck, Roadster and More.
Register
Install the app
How to install the app on iOS
You can install our site as a web app on your iOS device by utilizing the Add to Home Screen feature in Safari. Please see this thread for more details on this.
Note: This feature may not be available in some browsers.
-
Want to remove ads? Register an account and login to see fewer ads, and become a Supporting Member to remove almost all ads.
You are using an out of date browser. It may not display this or other websites correctly.
You should upgrade or use an alternative browser.
You should upgrade or use an alternative browser.
Hansshow latest Frunk kit 17-20 M3
- Thread starter GlynG
- Start date
As you look at the car from the front - the latch on the right-hand side is the one I call the primary as this is the latch the older style power kits had a cable connected to as the emergency release - so if all power failed when you pull it the bonnet releases and allows the bonnet to lift an inch or two - you can then get your fingers in the gap and push the secondary lever to fully release the bonnet and lift it up.
The secondary latch is the one the cable from the suction motor connects to. (and on the left)
Can you confirm you have the latest suction motor - there is a picture of this motor a little earlier in this thread - it's the one that has two cables coming from it.
Can you confirm which lock you have? - One type is the lock with a round spring - the type you have to remove the bonnet lock completely to fit the new spring. The other type is the lock where its a long thin spring which is fitted by only releasing one of the two securing bolts - and the lock doesn't need to be removed.
I don't know the reason why - but Hannshow makes a point - with a warning - prior to installation the emergency release cable must not be pulled, as i say i don't know the result if that was pulled prior to install.
Double check the electrical connector to the release solenoid has been connected to the solenoid on the left hand side - as you look at the car from the front - this latest kit is different to previous versions which had a connector to both solenoids and the instructions don't clarify which solenoid should be connected as the cable is long enough to connect to either side and they are the same type of connector - I guessed the one on the left and everything worked correctly.
Have you checked the release cable isnt kinked or trapped from the suction motor to the lock which may be jamming it - I fitted the suction motor just below the lock and slightly to the left of the lock so the cable had a nice rolling radius and couldn't get kinked
You are right in that the primary latch remains under the control of the Tesla - but the signal to activate is coming from the suction motor (If you look at the electrical connector to the suction motor I think it was 6 electrical pins and my logic deduces they would be two pins to activate the suction motor, 2 pins to activate the secondary release solenoid and two pins to activate the primary release solenoid - so there is a possibility a faulty suction motor is failing to make the electrical connection to the primary latch - but as the secondary cable is being pulled by the suction motor and internally all the parts are moving to where they should be to make that electrical connection. (hope all that makes sense)
I'm assuming you can get access and be able to open the bonnet as you have checked the cable for slack and the lock for adjustment. You could try - unbolt the metal latch loop fitted to the bonnet - so it can't engage and see if the struts power the bonnet up and down.
It would also be useful if you could put a phone or video recorder inside the bonnet filming the lock actions as you activate it - this would absolutely confirm what the error is.

I have a video, but can't attach it here for some reason.As you look at the car from the front - the latch on the right-hand side is the one I call the primary as this is the latch the older style power kits had a cable connected to as the emergency release - so if all power failed when you pull it the bonnet releases and allows the bonnet to lift an inch or two - you can then get your fingers in the gap and push the secondary lever to fully release the bonnet and lift it up.
The secondary latch is the one the cable from the suction motor connects to. (and on the left)
Can you confirm you have the latest suction motor - there is a picture of this motor a little earlier in this thread - it's the one that has two cables coming from it.
Can you confirm which lock you have? - One type is the lock with a round spring - the type you have to remove the bonnet lock completely to fit the new spring. The other type is the lock where its a long thin spring which is fitted by only releasing one of the two securing bolts - and the lock doesn't need to be removed.
I don't know the reason why - but Hannshow makes a point - with a warning - prior to installation the emergency release cable must not be pulled, as i say i don't know the result if that was pulled prior to install.
Double check the electrical connector to the release solenoid has been connected to the solenoid on the left hand side - as you look at the car from the front - this latest kit is different to previous versions which had a connector to both solenoids and the instructions don't clarify which solenoid should be connected as the cable is long enough to connect to either side and they are the same type of connector - I guessed the one on the left and everything worked correctly.
Have you checked the release cable isn't kinked or trapped from the suction motor to the lock which may be jamming it - I fitted the suction motor just below the lock and slightly to the left of the lock so the cable had a nice rolling radius and couldn't get kinked
You are right in that the primary latch remains under the control of the Tesla - but the signal to activate is coming from the suction motor (If you look at the electrical connector to the suction motor I think it was 6 electrical pins and my logic deduces they would be two pins to activate the suction motor, 2 pins to activate the secondary release solenoid and two pins to activate the primary release solenoid - so there is a possibility a faulty suction motor is failing to make the electrical connection to the primary latch - but as the secondary cable is being pulled by the suction motor and internally all the parts are moving to where they should be to make that electrical connection. (hope all that makes sense)
I'm assuming you can get access and be able to open the bonnet as you have checked the cable for slack and the lock for adjustment. You could try - unbolt the metal latch loop fitted to the bonnet - so it can't engage and see if the struts power the bonnet up and down.
It would also be useful if you could put a phone or video recorder inside the bonnet filming the lock actions as you activate it - this would absolutely confirm what the error is.
The picture is the suction motor that I got.
I have the 2 bolt latch assembly.
The video actually shows that everything works well excetp the secondary latch is blocking the hood from going up.
here's the link to onedrive
Attachments
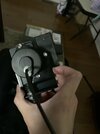
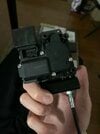
The suction motor is indeed the one I've been referring to.
Is this your video? - It looks to be working properly as the bonnet is rising and both actuators are doing what they should do, so i suspect this may not be your car.
As the signal to the latch solenoid is triggered by the suction motor If yours isn't retracting, I would suspect your suction motor has an internal fault if there wasn't any issue with the solenoid prior to fitting the kit, and you have checked the connector is pushed all the way into the sockets - I say sockets because the wiring has a Y loom, the plug that used to go into the solenoid now goes into the long bit of the Hannshow Y loom and the new plug from the hansshow kit plugs into the solenoid (have you checked this?)
Maybe time to talk to Hannshow - they tend to respond better via Whatsapp, I found them trying to be helpful but their advice just didnt make sense - plus they ask for totally stupid and unrelated information rather than accept the problem is with their kit.
When i fitted the boot kit the graphics on the screen and the app were out of sync with what was happening - I contacted Hannshow who asked for lots of checks to be done, pictures and video - They acted like I was the first person that had ever reported something like this, It was all working though, And then i found a guy who had the same issue and had been speaking to Hannshow about it, Hannshow knew it was a software issue, had produced the fix and sent it to him to update the control box - whilst still asking me to take a video of the issue - The other chap sent me the two files and i updated my control box - and its been flawless ever since - I guess dealing with Hannshow you need more patience than i have.
Yes that’s my car in the video. The problem is when the hood is trying to open.
When the hood is getting pushed up by the strut, the secondary latch is blocking it until a bit later. The tension builds up on the hood until the secondary latch releases, then it spring open with quite a bit of force. This wears out the secondary latch motor, bends the hood and also it makes a really loud clunk.
From what I’m noticing it looks like the hansshow controller takes the signal to the Tesla primary latch motor to start the strut. It decides if it should go up or down based on the micro switch status. (There’s a status plug for the hood locked vs hood up signal)
It’s highly odd that I get the wrong software since everyone probably has the same software and mine is V4.3 , which is old and software should be pretty stable.
I’m starting to think that maybe they mixed up the wires that take signal from the primary latch motor. That latch motor pulls the cable the releases it. Like the strut takes that latch motor pulling instead of releasing as the signal to start the strut, the strut would have started maybe 0.3second early. I think I’m going to do some probing to test it out.
Yea the suction motor has 6 pins. So it’s not just a motor. You think it sends out signals? Like everything works perfectly except that the strut starts pushing too early. A fault would probably have cut the process short and the frunk would be paused so where in the process tho.
Yup I checked the wires. There’s a lock on those plug and if it’s not pushed in all the way the lock won’t click.
Talking to hansshow is soooooooo annoying. And yea they ask unrelated questions. I don’t know what’s wrong with hansshow. I’m not even sure if the person I’m talking on WhatsApp knows the system at all.
It’s got the hansshow guy on WhatsApp while he’s online. Had a 2 hours chat and I started using google translate to talk to him. Finally got him to understand what I’m saying. He recommended some adjustment, which I highly doubt would work. But told me to let him know if it doesn’t, he’ll pass me to R&D department to investigate. Feeling hopeful and I think the latch motor polarity may really be the issue.
Well, I'm so pleased Hannshow are now looking into it and I agree they are annoying - It does seem to be the case the person you speak to simply decides which "expert" he needs to refer you to - it's probably the same person but gives the impression they have lots of departments and experts.It’s got the hansshow guy on WhatsApp while he’s online. Had a 2 hours chat and I started using google translate to talk to him. Finally got him to understand what I’m saying. He recommended some adjustment, which I highly doubt would work. But told me to let him know if it doesn’t, he’ll pass me to R&D department to investigate. Feeling hopeful and I think the latch motor polarity may really be the issue.
I understand a bit better now exactly what the issue is - and as its the lateness of the latch releasing - rather than failing to release at all - could you try adjusting the cable of the latch a bit tighter - even to the point its pulling the latch a little open when it's at rest - this would mean that once power is sent to the solenoid the latch will already be part the way to opening and perhaps this will be enough so that when opening it all just works with super fine clearance.
You say the struts power up too early - it could be the solenoid is being energised a little too late - could it not?
It does sound like your very close to getting it right.
The earlier versions of the kit were a lot different - the suction motor for instance only had one cable to release the lock latch, the emergency release was a separate part and there were just two wires. I had to think about the logic of the new 6 wire motor before i fitted it and could only conclude that two wires activate the suction motor, and the other 4 pins are making up the circuit to send a power signal to two other parts - and they could only be the solenoids.
Therefore - in the event of a full electrical failure of the suction motor you will find the emergency release will not release your bonnet because it needs the Tesla solenoids to operate. I couldn't get my theory confirmed by Hannshow - so it's just my theory but I used to be a vehicle mechanic (donkeys years ago - an apprenticeship), I do build electrical and electronic circuits and always been into engineering so I'm sure I'm on the money.
Because of my concerns I've also added another emergency release, mechanically connected which i know 100% will release the bonnet no matter what happens. All i bought was a cycle brake cable, I fabricated a small metal bracket to fit to the lock on the primary latch side (I actually copied the same part that Hannshow used to supply with their earlier kits) - this bracket holds the outer cable of the brake cable and I soldered on a nipple to the end of the inner cable which attaches to the same point the primary actuator cable fixes to the lock latch. I then cut a small channel in the insulation around the lock so the cable laid flat and routed that cable around the chassis with cable ties, so it pokes out through an already made hole in the suspension turret on the RHS of the car as you look at the car from the front. So, I now have an emergency release cable I can access behind the wheel of the car and reach towards the suspension coil spring.
I must say, I'm really quite enjoying all this problem solving with your kit - though I bet it's a little frustrating for you, but one thing for sure - you will be learning so much more about how this kit works than if you installed and it all worked straight out the box - handy for when the kit ages and perhaps develops faults.
This is so true. I had problems with their small rear screen and they asked me completely irrelevant things. This screen gets a canbus signal under the center console and it is the only place that you can use the supplied connector. They asked me where I tapped the connection and to take a picture. I told them there is no other place and would rather not take apart things to take a picture of the obvious and they agreed. But even so, why would "an engineer" ask such an irrelevant question. Sometimes it seems easier to comply with their silly requests rather than question it to get things moving along. Annoying nonetheless.plus they ask for totally stupid and unrelated information rather than accept the problem is with their kit.
Please take a couple of pics. This sounds like a great idea!I've also added another emergency release
The latest latch suction motor from hansshow with the emergency release integrated seems to “decouple” the cable from the pulley inside the latch motor assembly. I tried it even without power (I just unplugged that part) and it’s able to let go of the pull cable. Then with the suction motor not pulling down the latches, the frunk can open as usual as Tesla designed it to. So I think the older latch emergency release is probably going to work. Not sure about the new latch in model y though. But yea I have a huge concern on locked in frunk. It’s pretty cool that you can fabricate your own bracket. Wish I can do that.
The 6 pin hansshow latch motor has something to do with the “touch screen close “ feature. Cause when I disconnect it for testing, the “touch screen close” feature isn’t there. Maybe the 6 pins are for +/- power, signal to pull, signal to release, and position of the latch motor.
I think I got hansshow convinced that it’s the secondary latch timing that’s off. He asked me to shift the latch assembly to the right of the car. Essentially giving it a few more split second for the secondary latch to release. I’m not sure if there’s enough extra time tho. I got him convinced on the Tesla release latch motor polarity part but he told me don’t touch it yet he wanted the r&d to look into it first. Soo I don’t know. I’m probably going to prove the signals on Monday and try the fix out if everything adds up.
I've watched your video quite a few times now, I do see why Hannshow say to move the latch assembly - looking closely the steel bonnet catch isn't central to the lock when it engages - from the video its right over to the right hand side, If you loosen the two bolts that hold the lock and from the front of the car move the entire lock about 5mm to the left that will leave the bonnet catch a little further towards the end of the secondary latch - and may just give you a fraction of a second gap before the bonnet starts to rise. To be honest, the secondary catch is quite long, and your bonnet catch is right over - so If all else fails personally I would take out the lock and file the underside of that secondary latch maybe 5 mm along its entire length, plus another 5mm off the end of it. It will still be able to do its job in preventing a bonnet fly up if ever the primary locking system failed and that would give you an ample gap for the secondary latch to fully withdraw before the struts start the push.The latest latch suction motor from hansshow with the emergency release integrated seems to “decouple” the cable from the pulley inside the latch motor assembly. I tried it even without power (I just unplugged that part) and it’s able to let go of the pull cable. Then with the suction motor not pulling down the latches, the frunk can open as usual as Tesla designed it to. So I think the older latch emergency release is probably going to work. Not sure about the new latch in model y though. But yea I have a huge concern on locked in frunk. It’s pretty cool that you can fabricate your own bracket. Wish I can do that.
The 6 pin hansshow latch motor has something to do with the “touch screen close “ feature. Cause when I disconnect it for testing, the “touch screen close” feature isn’t there. Maybe the 6 pins are for +/- power, signal to pull, signal to release, and position of the latch motor.
I think I got hansshow convinced that it’s the secondary latch timing that’s off. He asked me to shift the latch assembly to the right of the car. Essentially giving it a few more split second for the secondary latch to release. I’m not sure if there’s enough extra time tho. I got him convinced on the Tesla release latch motor polarity part but he told me don’t touch it yet he wanted the r&d to look into it first. Soo I don’t know. I’m probably going to prove the signals on Monday and try the fix out if everything adds up.
I can't figure out any way a polarity issue could be doing what your experiencing, I could be wrong but pondering the question just doesn't produce an answer to me.
Thats for the info re the original emergency release cable decoupling the cable inside the suction motor - which again confirm to me that in the event of a power failure with either the actuating solenoids of the Tesla or an internal electrical fault of the suction motor you wouldn't be able to gain access to the frunk - which in fairness is how Tesla have made their cars anyway. Porsche for instance all have a mechanically connected cable to the bonnet locks of their cars. Tesla say - In the event of a complete failure of the 12v battery then using the two wires inside the towing eye and connecting a 12 battery it will release the bonnet catches - however, that may not work when we have intercepted the electrical cables to go via the Hannshow control module - I just don't know and Hannshow don't say either, plus failure of the actuating solenoids on the Tesla still wouldn't open the bonnet with a battery connected via the towing eye - so a mechanical connection improves the car beyond its original design.
As for the bracket I fabricated - If you can't do that then just ask Hannshow to sell you their bracket and release cable they used to supply will all pre V4.3 kits - it shouldn't be more than a few dollars (In your money) and it's a simple job, just remove one bolt from the lock primary side, slide the bracket in and put the bolt back in - so no movement of the lock position as you fit it and then attach the cable and route it to your towing eye - so now you would have two emergency release cables there.
Digging this up. What is this bracket you speak of that you fabricated, is that to mount the suction motor?
I had a replacement suction motor supplied by EVOffer after my one failed after 2 years. Opening and closing the bonnet worked fine, it just didn't pull it shut. I fitted the replacement one today (seriously underestimated how long it would take me and ran out of light).
The suction motor I got looks much like the one @Icenks has - I presume it's a pretty generic part as it is clearly wasn't originally designed to fit on a Tesla.
Where are people mounting this suction motor? EVOffer install instructions suggest just sticking it (with double sided tape) down by the bottom of the frunk. This seems pretty crap to me, and from the looks of the previous suction motor - and the fact that there was standing water in this area - I'm not convinced it's a particularly safe place to put it. Are people cable tieing this somewhere?
Also - the double nut bit where you can manually adjust how much of the thread is either side of the two nuts. What does this actually do? I tried adjusting it in different directions and as far as I could tell it made no difference to whether the bonnet latched or not? (it worked in all cases).
Interested in some feedback on how others have done it.
@Durzel . The suction motor picture posted by @Icenks was supplied with my kit and at the time it was the first time i had seen this type of motor, all videos on Youtube had the other large type suction motor that was fitted to the chassis member on the left side of the frunk (left side as looking into the frunk from front of car) It used to be secured with double sided tape and nylon ties - and was the type i was expecting to see.
The new suction motor is a completely different shape, much smaller but had two cables attached - 1 cable to the lock and the other is the emergency cable. This new motor has 6 electrical pins - and i just couldn't work out how pulling the cable could possibly release the bonnet lock as the two Tesla solenoids that control the primary and secondary release levers couldn't be activated by this emergency cable.
All previous kits included a metal bracket that bolted to the lock on the primary side - the emergency cable was attached to this bracket and the end nipple was slid underneath the original Tesla solenoid release cable where it attaches to the lock - so looking at the lock on the primary side there were now two cables visible.
I didn't bother trying to order one of Hansshows previous brackets as its a simple job to make one with 2mm steel - -so i just copied a picture of the bracket and fabricated my own - then bought a cycle brake cable to use as the emergency wire pull - which I've routed from the lock - along the right side chassis (viewed from the front of the car) and poked the end of the inner cable (with a hoop end on it) through a pre drilled hole in the suspension turret - so manually i can release the primary lever by feeling behind the nearside wheel and coil spring - give it a tug and the bonnet pops up a few inches - enough to get my fingers in to push back the secondary latch and lift the bonnet.
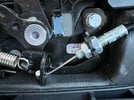
As for the fitting of this new suction motor i found a welded nut on a cross bar section just below the bonnet lock and slightly to the left of it - and a bit recessed - i made another bracket maybe 125mm in length and 25mm wide with 2mm steel - Drilled a hole in the 25mm width and could bolt it to the pre-existing nut on the body - then ground down the opposite end of the 25mm steel slim enough to fit inside the metal part of the suction motor - the bit that looks like a U shape (pic 1 - the bit where the cable exits the side of the motor with the two adjuster nuts attached) - drilled two 3mm holes through the new bracket and then through the metal "U" bit on the suction motor - and just pop riveted the two together, then bolted it in.
My suction motor is now firmly bolted into place - no tape no ties and its not sitting on top of the plastic air intake shroud, its position is great and provides a nice loose arc to the release cable - which was fed through to the tow eye - when the tub goes back in nothing fouls - lots of room around it.
I didn't adjust either of the two nuts on the cable at the suction motor end - the other end of that cable is what connects to the secondary latch on the bonnet lock and that had enough adjustment to be able to take out all the slack when the cable was at its most extended position - when the bonnet is unlatched. I assume the two nuts at the other end provide a little more adjustment if the lock end isn't sufficient - but mine was fine
The new suction motor is a completely different shape, much smaller but had two cables attached - 1 cable to the lock and the other is the emergency cable. This new motor has 6 electrical pins - and i just couldn't work out how pulling the cable could possibly release the bonnet lock as the two Tesla solenoids that control the primary and secondary release levers couldn't be activated by this emergency cable.
All previous kits included a metal bracket that bolted to the lock on the primary side - the emergency cable was attached to this bracket and the end nipple was slid underneath the original Tesla solenoid release cable where it attaches to the lock - so looking at the lock on the primary side there were now two cables visible.
I didn't bother trying to order one of Hansshows previous brackets as its a simple job to make one with 2mm steel - -so i just copied a picture of the bracket and fabricated my own - then bought a cycle brake cable to use as the emergency wire pull - which I've routed from the lock - along the right side chassis (viewed from the front of the car) and poked the end of the inner cable (with a hoop end on it) through a pre drilled hole in the suspension turret - so manually i can release the primary lever by feeling behind the nearside wheel and coil spring - give it a tug and the bonnet pops up a few inches - enough to get my fingers in to push back the secondary latch and lift the bonnet.
As for the fitting of this new suction motor i found a welded nut on a cross bar section just below the bonnet lock and slightly to the left of it - and a bit recessed - i made another bracket maybe 125mm in length and 25mm wide with 2mm steel - Drilled a hole in the 25mm width and could bolt it to the pre-existing nut on the body - then ground down the opposite end of the 25mm steel slim enough to fit inside the metal part of the suction motor - the bit that looks like a U shape (pic 1 - the bit where the cable exits the side of the motor with the two adjuster nuts attached) - drilled two 3mm holes through the new bracket and then through the metal "U" bit on the suction motor - and just pop riveted the two together, then bolted it in.
My suction motor is now firmly bolted into place - no tape no ties and its not sitting on top of the plastic air intake shroud, its position is great and provides a nice loose arc to the release cable - which was fed through to the tow eye - when the tub goes back in nothing fouls - lots of room around it.
I didn't adjust either of the two nuts on the cable at the suction motor end - the other end of that cable is what connects to the secondary latch on the bonnet lock and that had enough adjustment to be able to take out all the slack when the cable was at its most extended position - when the bonnet is unlatched. I assume the two nuts at the other end provide a little more adjustment if the lock end isn't sufficient - but mine was fine
Thanks for the comprehensive reply.
I’m still struggling to visualise what you’ve done, but it’s helpful, thanks.
The suction motor I got from EVOffer has a yellow emergency pull cable that you’re supposed to thread out of the towing eye. Perhaps mine is slightly different, I’ll try and get some photos.
As mentioned the last motor I had was fitted via a bunch of layered double sided tape, and attached to the plastic tray at the bottom of the frunk. It appears that this area accumulates water so has the potential to expose this motor to it if I try and mount it in the same position.
I don’t have the skills to fabricate a bracket myself though, or to drill through the motor metal either (guaranteed I’d mess this up).
OK, Im a bit sh1t with paint on the computer and just freehand drew this - the blue bit represents the 2mm metal bracket i made and fixed to the suction motor - bolt at one end to secure to the car - there is a sort of "X" section bracing just underneath the lock with a welded on nut - so just a bolt needed.
As the pic shows i just ground down the width of the bracket so it was thin enough to slide into the U section on the suction motor - two drill holes of 3mm and secured together with two pop rivets - then bolted the whole thing in

As the pic shows i just ground down the width of the bracket so it was thin enough to slide into the U section on the suction motor - two drill holes of 3mm and secured together with two pop rivets - then bolted the whole thing in
I fitted my replacement latch motor a few days ago, but given I've had one latch motor fail after around 1.5 years I want to avoid overstressing the part.
The EVOffer install suggests leaving 3-4 threads showing on the bit adjacent to the wire that gets pulled. I played about with the nuts in different positions but as far as I could make out it didn't really seem to make any difference to the bonnet latching and being pulled down successfully.
I'm not getting much help out of EVOffer at the moment unfortunately, Ray has gone radio silent. I asked them about this but they weren't really very clear.
If there are more threads showing on the side adjacent to the wire - does that translate to more or less effort pulling down the bonnet (if that makes sense) ?
Attachments
Robbertos
Member
Hi all. Today I installed the hansshow electric frunk. Everything works fine but I try to adjust the speed. When I push and hold the reset button I wait till I hear (for example) 4 beeps. Then I release the reset button and push it again to confirm speed. I hear 2 beeps but the speed is not changing. Do someone have a solution?
Its quite a while since i installed mine - so i haven't adjusted the speed since install, however, I cant remember having to press the button again once the number of beeps (for the selected speed) is attained. I'm pretty sure you hold the button and release at the number of beeps - and that's it - no further push.Hi all. Today I installed the hansshow electric frunk. Everything works fine but I try to adjust the speed. When I push and hold the reset button I wait till I hear (for example) 4 beeps. Then I release the reset button and push it again to confirm speed. I hear 2 beeps but the speed is not changing. Do someone have a solution?
However there could be firmware revisions that may need the additional push now - but give it a try.
Robbertos
Member
That was the solution! Thank youIts quite a while since i installed mine - so i haven't adjusted the speed since install, however, I cant remember having to press the button again once the number of beeps (for the selected speed) is attained. I'm pretty sure you hold the button and release at the number of beeps - and that's it - no further push.
However there could be firmware revisions that may need the additional push now - but give it a try.
Your welcome Robbertos.That was the solution! Thank you
Similar threads
- Replies
- 210
- Views
- 14K
- Question
- Replies
- 8
- Views
- 709
- Replies
- 14
- Views
- 3K
- Replies
- 4
- Views
- 912
- Replies
- 0
- Views
- 1K