


Welcome to Tesla Motors Club
Discuss Tesla's Model S, Model 3, Model X, Model Y, Cybertruck, Roadster and More.
Register
Install the app
How to install the app on iOS
You can install our site as a web app on your iOS device by utilizing the Add to Home Screen feature in Safari. Please see this thread for more details on this.
Note: This feature may not be available in some browsers.
-
Want to remove ads? Register an account and login to see fewer ads, and become a Supporting Member to remove almost all ads.
You are using an out of date browser. It may not display this or other websites correctly.
You should upgrade or use an alternative browser.
You should upgrade or use an alternative browser.
HANSSHOW Trunk Liftgate v3 install
- Thread starter dendenyc
- Start date
simbafish
Member
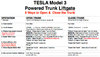
I hesitated installing the foot sensor because it required removing the bumper, but glad I did (in the end, had to remove the bumper anyway to run the strut power cables). I find the foot sensor is now the method I'll probably use the most. Most other methods have a time delay - Siri with Apple Watch took 7-10 seconds to respond, using iPhone app requires unlocking the phone, verification you really want to open the trunk and then several second delay. Foot sensor is Hands Free and Instant. I compiled a chart of possibilities that I am aware of and have tried. Would appreciate additions and corrections.
Attachments
coffeesipper3
Member
I thought it was the wire harness....the newer ones have connections by the rear speakers to avoid fishing up the trunk.How do you identify v2 vs v3? What are the differences? Thanks
coffeesipper3
Member
Thx! Agreed! The foot sensor is better than some oem implementations.I hesitated installing the foot sensor because it required removing the bumper, but glad I did (in the end, had to remove the bumper anyway to run the strut power cables). I find the foot sensor is now the method I'll probably use the most. Most other methods have a time delay - Siri with Apple Watch took 7-10 seconds to respond, using iPhone app requires unlocking the phone, verification you really want to open the trunk and then several second delay. Foot sensor is Hands Free and Instant. I compiled a chart of possibilities that I am aware of and have tried. Would appreciate additions and corrections.
coffeesipper3
Member
Seller contacted back and mentioned I was sent v3 with diy install harness which requires fishing the close button as well as the wires piggybacking existing trunk cablesI thought it was the wire harness....the newer ones have connections by the rear speakers to avoid fishing up the trunk.
simbafish
Member
I installed the tailgate button on the right side panel, an option given in the Hansshow printed instructions. So I did not have to remove its connector and fish the wire up thru the black tubing on the right side. I chose this side location, not because it was easier but for practicality. Being born several years priior to WWII, I expect sometime in the (near) future I might not be able to raise my arm; so a side control made more sense.
From the time I ordered the trunk kit from Hansshow until I received it by DHL was 12 days. Pretty good service. I believe the wiring harnesses indicate I received V3. The control box was installed on the black plastic sheet on the right side - my M3 has only 8 speakers (I believe) so no speaker or power amp at this location. Control box oriented for easy access to power plug and Card Slot. Wires were cleaned up/bundled after photo taken.


From the time I ordered the trunk kit from Hansshow until I received it by DHL was 12 days. Pretty good service. I believe the wiring harnesses indicate I received V3. The control box was installed on the black plastic sheet on the right side - my M3 has only 8 speakers (I believe) so no speaker or power amp at this location. Control box oriented for easy access to power plug and Card Slot. Wires were cleaned up/bundled after photo taken.

AWESOME!!! Great way to simplify the install!!! I will be doing that on my Tesla Offer trunk!I installed the tailgate button on the right side panel, an option given in the Hansshow printed instructions. So I did not have to remove its connector and fish the wire up thru the black tubing on the right side. I chose this side location, not because it was easier but for practicality. Being born several years priior to WWII, I expect sometime in the (near) future I might not be able to raise my arm; so a side control made more sense.
coffeesipper3
Member
I installed the tailgate button on the right side panel, an option given in the Hansshow printed instructions. So I did not have to remove its connector and fish the wire up thru the black tubing on the right side. I chose this side location, not because it was easier but for practicality. Being born several years priior to WWII, I expect sometime in the (near) future I might not be able to raise my arm; so a side control made more sense.
From the time I ordered the trunk kit from Hansshow until I received it by DHL was 12 days. Pretty good service. I believe the wiring harnesses indicate I received V3. The control box was installed on the black plastic sheet on the right side - my M3 has only 8 speakers (I believe) so no speaker or power amp at this location. Control box oriented for easy access to power plug and Card Slot. Wires were cleaned up/bundled after photo taken.View attachment 549131View attachment 549132 View attachment 549133View attachment 549134
I think this might be a better install than having the button on the trunk. It is too high for some people to reach comfortably. Looks good too.
simbafish
Member
I put the tailgate button up as high as I could without interfering with structures behind the panel. I too was concerned about something hitting the button, but I think where it is should be safe from being accidentally hit and out of the way.
Luudcrs
Member
I hesitated installing the foot sensor because it required removing the bumper, but glad I did (in the end, had to remove the bumper anyway to run the strut power cables). I find the foot sensor is now the method I'll probably use the most. Most other methods have a time delay - Siri with Apple Watch took 7-10 seconds to respond, using iPhone app requires unlocking the phone, verification you really want to open the trunk and then several second delay. Foot sensor is Hands Free and Instant. I compiled a chart of possibilities that I am aware of and have tried. Would appreciate additions and corrections.
How was the foot sensor install compared to the rest? I've had mine installed over 6 months now and love it, but I passed on the foot sensor back then. I've found myself with both hands full on too many occasions so looking to add it now. I ran the wiring through the bumper so have no problems removing it again. Also, are there different versions of the foot sensor or just one universal one? Thanks!
HP Autosport
Former Vendor
Has anyone else done the trunk install recently? I did the Hansshow "frunk" the other night and that was super easy until actually getting it to close. Haha. It took about 30 to 40 minutes to finally get it just right, but it's done, and it's awesome! As for the trunk, I'm sitting on it, ready to start the install. I've seen a bunch of different install videos on YouTube but I just wanted to ask anyone else if they've done the install recently, how it went, and what tips/tricks they can offer. Thanks in advance!
We install Hansshow auto frunk and trunk at our shop. PM us if you have any questions.
HP Autosport
Former Vendor
what's different between v3 and previous ones? feature/wiring etc..
i've watched several youtube videos on this and i felt 3 items that are not so clear or could be better..
- power tap from front.. some video's suggested drilling on firewall and tap on battery and some suggested tap on driver side somewhere
- running strut wire either through tail light hole or bumper
- how to remove/install bumper properly
We go directly to the 12V for the power source.
Do NOT run the power lift wiring harness through the taillight opening(it is easier and saves time but not the right way to do it). You will have water intrusion issues at some point.
You can use fish tape to route the power lift wiring through. It will take some patience though.
simbafish
Member
Installing the Foot Sensor is very easy. Since you already had removed the bumper, you know how easy that is - only 8 bolts, 6 clips and two Torx screws. Just remove the bumper again, install the foot sensor at the bottom, and run the cable through the right hand pass-thru (where you probably passed the cable from the right strut) to the control module. Rather than using the screws and plastic bar supplied by Hansshow, I used black bolts (not noticeable from the outside bottom of bumper) and lock nuts to install. I didn't want to take any chance of it coming lose. As far as I know, there is only one type of foot sensor. And for me, the foot sensor the BEST option for opening the trunk. I then close it with the tailgate button which I mounted on the right side panel.How was the foot sensor install compared to the rest? I've had mine installed over 6 months now and love it, but I passed on the foot sensor back then. I've found myself with both hands full on too many occasions so looking to add it now. I ran the wiring through the bumper so have no problems removing it again. Also, are there different versions of the foot sensor or just one universal one? Thanks!
univ0298
Member
Installing the Foot Sensor is very easy. Since you already had removed the bumper, you know how easy that is - only 8 bolts, 6 clips and two Torx screws. Just remove the bumper again, install the foot sensor at the bottom, and run the cable through the right hand pass-thru (where you probably passed the cable from the right strut) to the control module. Rather than using the screws and plastic bar supplied by Hansshow, I used black bolts (not noticeable from the outside bottom of bumper) and lock nuts to install. I didn't want to take any chance of it coming lose. As far as I know, there is only one type of foot sensor. And for me, the foot sensor the BEST option for opening the trunk. I then close it with the tailgate button which I mounted on the right side panel.
I hear that the foot sensor isn’t that useful because when you walk up to your car it doesn’t work, unless you’ve somehow unlocked the car first. What’s your experience? Thanks
simbafish
Member
For me the foot sensor works Perfectly but you must have your smartphone in your pocket. And that's the way it should be, with the smartphone (iPhone) in your pocket, the M3 recognizes you (security check) and then opens the trunk instantly. This precludes anyone from just walking up to your car and giving a kick under the bumper to open.
univ0298
Member
Sounds great! But does not sound like what many others have described it to be. Can’t seem to get a consistent answer on this.For me the foot sensor works Perfectly but you must have your smartphone in your pocket. And that's the way it should be, with the smartphone (iPhone) in your pocket, the M3 recognizes you (security check) and then opens the trunk instantly. This precludes anyone from just walking up to your car and giving a kick under the bumper to open.
Similar threads
- Replies
- 19
- Views
- 1K
- Replies
- 20
- Views
- 2K
- Replies
- 7
- Views
- 3K
- Replies
- 11
- Views
- 869