Welcome to Tesla Motors Club
Discuss Tesla's Model S, Model 3, Model X, Model Y, Cybertruck, Roadster and More.
Register

Help adding stock subwoofer to 2016 X

This site may earn commission on affiliate links.
Hi everyone,

Looking for some help from anyone who may have knowledge of car audio or X wiring. I’ve been looking to add an aftermarket subwoofer to a 2016 X that did not get the ultra high fidelity audio. I noted on eBay I can get OEM subwoofer and amps for about $100-$150 each.

Any idea how hard it would be to wire these up? I know back then Tesla often laid wires for everything to improve production speed—not sure how I can check if anyone has guidance or knows for sure? Is it hard to pop panels out in the various areas the parts should be? Looking at the parts catalog it seemed like the sub is in far back panel on rear passenger side and amp may be up by drivers side?

or is this all a bad idea and if looking for cheap way to add some low end (not looking for everyone in my street to hear it) are those underseat subs that have amp built in reasonable?

thanks!!
 
I'm not sure how you'd add the stock amp if it didn't come with it, but maybe it is possible. I can get you the vehicle wiring diagram when I get home.

I attempted to add an aftermarket amp/sub to my car about a month ago. Couldn't get a good signal for my Line Output Converter (LOC), so I got annoyed and put everything back together.

Also be aware that it is a PITA to get the trim pieces in the front driver's area on and off.

thanks for the reply! I have seen the stock amp on eBay too for about $150-$200, so thought maybe it would be trying to figure out how to do the wiring correctly and how to mount the pieces... but I wasn’t sure how difficult that would be.
 
There are a few videos from guys in California who do stereos on MS and MX models. They have vids showing how to disassemble a dash and such. You should find the vids that were linked to on this site and consider trying to contact them to do this job for you.

Thanks! Looking around I'm thinking you might be referring to Light Harmonic. Great idea to get in touch with them, I'll do that!
 
If all you want is to add a sub, I would not recommend trying to retrofit the Tesla premium amp. I would instead use a small mono sub amp with speaker level input or a line out converter and use the front door woofer signal. If the amp is not too powerful you might be able to power it from an existing accessory circuit. If you want something more powerful, the installation is more difficult. There are a few threads on the S and 3 forums that might help.
 
If all you want is to add a sub, I would not recommend trying to retrofit the Tesla premium amp. I would instead use a small mono sub amp with speaker level input or a line out converter and use the front door woofer signal. If the amp is not too powerful you might be able to power it from an existing accessory circuit. If you want something more powerful, the installation is more difficult. There are a few threads on the S and 3 forums that might help.
I tried using the front door woofers as a signal to the LOC, but apparently it wasn't strong enough. I'm planning to re-engage eventually, but this was very frustrating.
 
Audiocontrol LC6i, Focal speakers. I tried tapping into the woofers in the front door using the harness in the footwells. No luck with either one. May have been an operator error, I'm planning to re-attack next month.

That’s a nice 6 channel LOC. Were you planning on adding more than a subwoofer? What amp or amps were you going to use? Which Focal speakers do you have?
 
That’s a nice 6 channel LOC. Were you planning on adding more than a subwoofer? What amp or amps were you going to use? Which Focal speakers do you have?
I was only planning to add an amp for the sub (Alpine PDX V9; Focal 165 AS components; JL 10W6v2). I didn't want to replace the stock mid-bass and pillar tweeter, but I may have to ultimately do so (front stage).
 
I was only planning to add an amp for the sub (Alpine PDX V9; Focal 165 AS components; JL 10W6v2). I didn't want to replace the stock mid-bass and pillar tweeter, but I may have to ultimately do so (front stage).

The amp will handle 5 channels and the sub channel has 2 different types of filters and an optional remote level control. The amp and LOC are overkill for just a sub, but could be used to drive other speakers, as well, if you want. Did you run the cable and source the power for the amp from the 12v battery? Looks like the amp has 2 40 amp fuses. For the sub, you should be able just to tie into the right side front door woofer speaker wires and connect to the LOC. Make sure you have the correct wires either by looking at a wiring diagram or by removing the door speaker and looking at the wires. Then use cables from the LOC to provide a converted line in signal to the sub channel on the amp. Be careful on the sub filters on the amp to make sure they are set correctly based on the supplied signal frequency range and the frequencies you want to supply to the sub. The remote level control is another thing you will want to make sure is not causing an issue for you if turned all the way down. I would wire the sub in parallel to provide a 2 ohm signal and drive both voice coils (positive wired to positive, and negative wired to negative on the voice coils). Those are my thoughts - hopefully they are helpful to you or perhaps might spark some new ideas about how best to proceed.
 
If all you want is to add a sub, I would not recommend trying to retrofit the Tesla premium amp. I would instead use a small mono sub amp with speaker level input or a line out converter and use the front door woofer signal. If the amp is not too powerful you might be able to power it from an existing accessory circuit. If you want something more powerful, the installation is more difficult. There are a few threads on the S and 3 forums that might help.

Thank you! I think I have to agree now. So if just looking for some added low end, that it would be fairly reasonable DIY to add something like the JBL BassPro SL (BassPro SL | Powered, 8" (200mm) car audio under seat woofer system) or Rockville underwear sub w amp (https://www.amazon.com/dp/B06XTGYZFM/ref=cm_sw_r_apa_i_eUMSEbMDS88PT) would only require tapping into high level wiring from 1 door?
 
The amp will handle 5 channels and the sub channel has 2 different types of filters and an optional remote level control. The amp and LOC are overkill for just a sub, but could be used to drive other speakers, as well, if you want. Did you run the cable and source the power for the amp from the 12v battery? Looks like the amp has 2 40 amp fuses. For the sub, you should be able just to tie into the right side front door woofer speaker wires and connect to the LOC. Make sure you have the correct wires either by looking at a wiring diagram or by removing the door speaker and looking at the wires. Then use cables from the LOC to provide a converted line in signal to the sub channel on the amp. Be careful on the sub filters on the amp to make sure they are set correctly based on the supplied signal frequency range and the frequencies you want to supply to the sub. The remote level control is another thing you will want to make sure is not causing an issue for you if turned all the way down. I would wire the sub in parallel to provide a 2 ohm signal and drive both voice coils (positive wired to positive, and negative wired to negative on the voice coils). Those are my thoughts - hopefully they are helpful to you or perhaps might spark some new ideas about how best to proceed.
I'm pretty familiar with doing installs, I've been running systems in my cars for the past 20 years. I have 2 LOCs, a cheap one and the LC6i. The cheap one requires a left and right connection in order to send a signal to the RCAs. For some reason, I wasn't getting a signal at all from the harness in the foot wells. I had no desire to remove the door speakers, which was why I was just going to run the amp/sub combo (still using the Alpine). Since it looks as if I'm going to have to tap into the actual speaker wires in the door, I might as well replace the speakers and tweeters anyway.

Yes, I have the amp fully hooked up already, but there's no source at the moment to send an audio signal right now. I'm planning to re-engage early next month. I spent quite a few hours trying to find a way through the firewall only to realize that going through the door was the easiest option from the frunk area.
 
Thank you! I think I have to agree now. So if just looking for some added low end, that it would be fairly reasonable DIY to add something like the JBL BassPro SL (BassPro SL | Powered, 8" (200mm) car audio under seat woofer system) or Rockville underwear sub w amp (https://www.amazon.com/dp/B06XTGYZFM/ref=cm_sw_r_apa_i_eUMSEbMDS88PT) would only require tapping into high level wiring from 1 door?
Stay away from the Rockville option, that's low quality products intended for the younger/meager budget crowds (i.e. high school). The JBL system isn't bad at all. 125W going to an 8" sub. Due to its size, the bass won't have your mirrors vibrating, but it will be an upgrade to your stock system.
 
Stay away from the Rockville option, that's low quality products intended for the younger/meager budget crowds (i.e. high school). The JBL system isn't bad at all. 125W going to an 8" sub. Due to its size, the bass won't have your mirrors vibrating, but it will be an upgrade to your stock system.

thanks! Def appreciate the feedback. I think will go with JBL
 
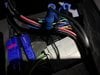
Wanted to thank everyone for their help and pass on my experience. I put in an underseat subwoofer, the Infinity Basslink SM, which is apparently the same thing as the JBL BassPro SL just rebranded and silver and cheaper.

I reviewed wiring diagrams I found online for the Model X (googled for the service manual), this post Does anyone have a Model X MCU2 Wiring Diagram?, and compared also to the YouTube video from Light Harmonics (thanks @TOBASH ) so I knew I was looking for a place to tap the green/green-white wires that go to the right front passenger door woofer. The video where they opened the model X door helped me confirm these were the wires I wanted and happened to find in my 2016 X.

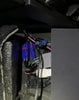
The easiest place I found to get to this was the passenger side kick well where the cables are routing out the car body and into the door. The full wiring seemed accessible under the MCU if you pop out out the cubby underneath it, but the passenger kick well was not hard to get to either. I had to take off trim under the glove box, then take off the door floor trim on the passenger door so you can get to a torx screw holding the kick well trim, gently open that enough to the side that you can pull back the carpet in that area and the wires were then easily exposed as they went into and out of the connectors the wires all plugged into.

It was a bit of a leap of faith here but I found green/green-white wire pair that were well exposed without me opening anything further like wire sheathing, so I put in a posi-tap on both, connected my speaker wire and tucked it under all the trim I pulled off and put everything back together. There is a lot of room for the posi-tap. Those were expensive but I don't see any other easy way to tap these wires--positaps made it easy to secure the wires I wanted to tap into and actually get into them, without exposing more of the trim. I then connected the speaker wire to the sub--it wants both Left and Right source, so I used this once source for both.

I am running power off the 12V outlet using a 12V plug that I've wired to the underseat sub. I'm definitely aware this is not recommended for real amplifiers, but this speaker's specs say it has a max current draw of only 12A. In my testing with a multimeter at the higher volumes it was pulling 7A, so a decent margin under the 10A continuous load (15A peak) Tesla says the 12v outlet can do. I am replacing the amp's 20a fuse with a 10a fuse for extra protection. As 2 other power source options, I'm thinking of wiring it to the spare 12v power circuit I read about in another post (although this has same limits as 12v outlet) but not sure how to actually tap these power wires as they seem plugged into a harness. Is going to the fuse box using add-a-fuse like they did in Teslatap's site any safer? My concern with add-a-fuse was that the wires coming from the add-a-fuse were all 16g or thinner. The 12v outlet plug I'm using has 14g wires so that made me feel a little better...

So I know this is total diy and a few steps here are probably not the best options (using one high level source as the single source when my amp is looking for left and right sources, and using the 12v outlet as power instead of wiring directly to the battery with a fuse), but given it's a low powered sub, so far I still feel it's safe. The whole process only took an hour and half. Sound-wise for $150 I'm thrilled and makes me miss the sound quality I have in the 3 a lot less. It definitely helps fill in the lower end, and as a middle aged dad with young kids I'm not looking for anything more than that!

Edit: will upload pics soon in case it helps
 
Last edited:
I am running power off the 12V outlet using a 12V plug that I've wired to the underseat sub. I'm definitely aware this is not recommended for real amplifiers, but this speaker's specs say it has a max current draw of only 12A. In my testing with a multimeter at the higher volumes it was pulling 7A, so a decent margin under the 10A continuous load (15A peak) Tesla says the 12v outlet can do. I am replacing the amp's 20a fuse with a 10a fuse for extra protection. As 2 other power source options, I'm thinking of wiring it to the spare 12v power circuit I read about in another post (although this has same limits as 12v outlet) but not sure how to actually tap these power wires as they seem plugged into a harness. Is going to the fuse box using add-a-fuse like they did in Teslatap's site any safer? My concern with add-a-fuse was that the wires coming from the add-a-fuse were all 16g or thinner. The 12v outlet plug I'm using has 14g wires so that made me feel a little better...

Next to the accelerator peddle behind the panel you will find a fuse box, you can easily run power to your amp there without sharing your 12V 15A outlet. Not sure the max you can run there, but that box is connected to the battery via 125A cabin fuse box fuse. Keep in mind your still sharing with all the other accessories in that box, however you also are using the current power line you have tapped into. You are accessing a live circuit there, so I suggest you remove the frunk and disconnect the battery for safety.
 
  • Like
Reactions: Terthen
Next to the accelerator peddle behind the panel you will find a fuse box, you can easily run power to your amp there without sharing your 12V 15A outlet. Not sure the max you can run there, but that box is connected to the battery via 125A cabin fuse box fuse. Keep in mind your still sharing with all the other accessories in that box, however you also are using the current power line you have tapped into. You are accessing a live circuit there, so I suggest you remove the frunk and disconnect the battery for safety.

Thank you—especially for the safety warning!!
 
Pictures of the right kick panel and posi-tapping the wires going to the right front door woofer

Note: the black wires are just my test wires and I promise i used higher gauge and cleaner insertion for the real wires to the subwoofer
 

Attachments

  • BF79F71D-186C-492B-ACF6-BE41B04B1843.jpeg
    BF79F71D-186C-492B-ACF6-BE41B04B1843.jpeg
    316.5 KB · Views: 323
  • 8F2973FF-8A09-490A-9C8C-5F373867F829.jpeg
    8F2973FF-8A09-490A-9C8C-5F373867F829.jpeg
    409.8 KB · Views: 172
  • C8AFF970-EC13-4677-B4DC-C0D7C1175C13.jpeg
    C8AFF970-EC13-4677-B4DC-C0D7C1175C13.jpeg
    257.1 KB · Views: 182