Welcome to Tesla Motors Club
Discuss Tesla's Model S, Model 3, Model X, Model Y, Cybertruck, Roadster and More.
Register

Help: I Can't Connect the Connector Under the Glove Box.

This site may earn commission on affiliate links.
I used a couple of heat shrink solder butts and a heat gun to tidy things up on the “car end”. I notice I do have the speaker wires reversed which drives my OCD nuts and I’ll probably resolder at some point, but I’m pretty happy with the fix now, and never have to bother with that flimsy connector again.

6EFFF1F4-6DD9-4695-9EDD-6F1101900617.jpeg48A4718C-099E-4A0E-A03F-3090B7E9246D.jpeg
 
I replaced filters for the first time today. I tried to disconnect this plug, the connector came off but the wires stayed connected. I couldn't take off the wires (without too much pressure which I didn't try) and couldn't even put the plug back in. So I ended up replacing the filter without disconnecting this panel completely.

For those who want to test if this speaker works, you don't really have to reset the screen while driving. All you need to do is putting the car on autopilot while stationary. Normally, you will hear the two beeps that autopilot cannot be enabled because the care is not moving. You can just reset the screen and then put on autopilot and you will hear the same two beeps but from that speaker (with a slightly different tone)

On an unrelated note, I disconnected the light on the same panel and when I put the plug back in, the light didn't come on. I don't remember if that worked before but I saw that light on from a couple of youtube videos on replacing the cabin air filter. Unplugging the light was very easy, not sure what happened to it...
 
well I just broke mine as well while doing in cabin filter change. Does anyone know the one sold on ECS tuning you just plug the wire right into the slot?
Any one have a guided walk through?

Below are pics of my broken ones. I manage to get the other half of the broken plug out of the speaker hole. But need a solution to reconnect the wire back into the speaker..
 

Attachments

  • tempImagenypYAL.png
    tempImagenypYAL.png
    3 MB · Views: 264
  • tempImagehju3oi.png
    tempImagehju3oi.png
    3.1 MB · Views: 238
  • tempImage9iWRUk.png
    tempImage9iWRUk.png
    2.5 MB · Views: 262
I just got the parts from Pg3. Cut the wires, stripped the wires and put it into the new black sleeves after crimp. Reset the car and tried putting into AP while resetting I don't hear any sound :(

It sounds like I didn't fix it as I suppose to hear something right?
 
I just got the parts from Pg3. Cut the wires, stripped the wires and put it into the new black sleeves after crimp. Reset the car and tried putting into AP while resetting I don't hear any sound :(

It sounds like I didn't fix it as I suppose to hear something right?

You need to engage AP, then reset the screen while on AP, then don’t hold the wheel until AP starts nagging you until you will hear the speaker beep asking you to take over. Needless to say do this on an empty road.
 
So glad I found this thread and that I'm not the only one that broke the connector too. From some of the photos posted, mine broke the exact same way. I guess it's a really flimsy part. Waiting for the replacement from ECS tuning, I just taped the expose wires with electric tape before fixing it again. Also changing the HVAC filter is a pain in the ass. Have to do some weird contortionist poses every time!!
 
Nice one, thanks for that link. Worth the $10 for everything all ready to go. Instead of the snap connectors, I think a better choice for him would be the Wago connectors, because they are easy to take on/off.


You know you've got a design flaw when someone puts together a kit to fix all the failing connectors.
Thank you for the tip on the Wago connector. Can you clarify for me if before using it I need to remove the black piece of plastic (which I assume is one section of the original connector) from the base of the speaker? I imagine the answer is yes that needs to be removed but I have not yet figured out how to get it to come loose. Any tips? Just squeeze it with pliers and toggle it back and forth?
 

Attachments

  • Screen Shot 2022-07-27 at 6.07.08 PM.png
    Screen Shot 2022-07-27 at 6.07.08 PM.png
    972 KB · Views: 194
Thank you for the tip on the Wago connector. Can you clarify for me if before using it I need to remove the black piece of plastic (which I assume is one section of the original connector) from the base of the speaker? I imagine the answer is yes that needs to be removed but I have not yet figured out how to get it to come loose. Any tips? Just squeeze it with pliers and toggle it back and forth?

Mine was firmly wedged in there, and the plastic is part of the speaker housing, so I just jammed the broken plastic back into the socket and glued it permanently into place. Then I tested the speaker wires to be sure that I still had a good connection.

From that point, I just treated it as two bare wires, and used wire nuts to reconnect to the original wires I had cut. The Wago connectors seem fine, but after looking at them, they were bigger than I wanted in that spot (2 of them), and I decided to just use wire nuts, wrapped in friction tape. I wanted either Wago or wire nuts because I want the option of being able to easily disconnect it in the future too.


Another option is to solder directly to the speaker terminals that are exposed further down, and cut the wires off altogether.
 
That helps, thanks for the follow-up.
Adding in pictures from my setup in case it helps someone else. I first removed the broken lower portion of the original connector from the speaker housing with a small drill, that revealed the two-pin connector for the speaker. I discovered that I could then re-use the top section of the original broken plastic connector to connect two new wires to the speaker. Wago connectors on the other end of those wires make it easy to disconnect the speaker from the car.
 

Attachments

  • IMG_6106.JPG
    IMG_6106.JPG
    568.8 KB · Views: 184
  • IMG_6104.JPG
    IMG_6104.JPG
    450.1 KB · Views: 161
  • IMG_6101.JPG
    IMG_6101.JPG
    400.7 KB · Views: 188
This is a very helpful topic. Knowing the issue, being careful it still broke (probably from changing filter every 6 months instead of 2 years). Fortunately thanks to the diligence of all on here I already had the clutch plug and the pins on the shelf. Extracting the broken plug wasn't too bad. I used the hole in the side of the speaker plug to press in while wiggling what I could and got the broken piece just high enough to grab it with needle nose pliers. Had to cut the wires to remove the damaged pins. After stripping the wires and removing some black insulation the crimping part is tricky. It wasn't as perfect as I would like it but it held and tested OK. Test by driving, autopilot on, scroll wheel reset and when screen black trip autopilot to disconnect. A chime emitted from under the glove box. In the future I will add the quick disconnect above. That should have been factory installed.
 
I ended up using many good ideas from this thread. At first, I did the pin repair with a new plug but very tiny to see and crimp properly. The site above has pre made pugs with wiring. You could use the button splicers no wire stripping needed, but I went further.

IMG_1683.JPG


I made 2 harnesses. One for the emergency speaker, and one for the footwell light. Both with quick disconnect plugs. The courtesy light adapters on the left were from RPMTesla.com. The quick disconnects from amazon. I used end splicers, crimping then finishing with a heat gun.

IMG_1691.JPG


Above was finished by wrapping in electrical tape to stiffen the harness. So for the courtesy light, no cutting of the car harness just plug in the harness and the other end to the light.

IMG_1692.JPG


Next, did similar for the emergency speaker except for the end I used splicers to connect to the cars harness. Button splicers could also be used.
 
For anyone where this hasn't occurred to you as a possibility yet, my solution to this obnoxious problem was to just remove the speaker from the panel while leaving it plugged in. It was held by 2 easy to remove screws and then I tied it up and out of the way.

I thought about adding a 2 conductor electrical plug in line, but I couldn't think of a good place to get one and didn't want to wait on ordering one. Makes me miss Radio Shack.

To get out the equally obnoxious filter cover screw on my 2020 model that has the screw on the top, I used a mini ratchet wrench while laying in yoga position upside down under the dash with a light strapped to my head.

I can't remember where I got my filters from, but for cleaner I used was Klima Cleaner Pro. At least for now, the stank is gone. Hopefully it lasts for a least a season.
 
Last edited:
  • Like
Reactions: SalisburySam
Ran into this same problem last weekend while trying to fix the stinking AC problem.
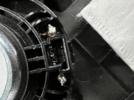
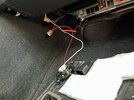
That connector just broke with very little pressure and it would not come out of the housing no matter how i tried.

Was a pain to get the broken half out of the speaker housing.

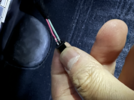
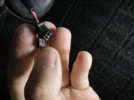
For now, i used two separate header pin kind of connectors and spliced the other end of these with the wires in the car. (see attachment for example of what i am talking about!)

Its hard / almost impossible to find those exact original connectors. After searching the whole internet., could only find 1 site which was willing to take my order (for the Mercedes part number posted on this thread!).

Interestingly that part is called a 'clutch'. (https: slash slash www dot ecstuning dot com/b-genuine-mercedes-benz-parts/clutch/0255452726/) - Will take a while to ship - but will report once i get them (if i get them!)

In the mean time, to test my current in-line splice solution with the header pins, I put the car on autopilot and rebooted it (while driving) and did not touch the steering..., and let the car beep (while the display was rebooting). I cloud hear the beeps come via this speaker (its not the normal frequency/tone beeps that you otherwise hear, its a bit different.).

--- btw, this test was done in a street with no traffic - in a safe condition.


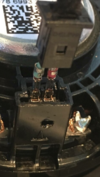
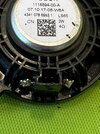
Also, the 'white' wire from the car harness goes to the left pin when the speaker is mounted on the car. (i.e, driver side in the US/left hand driving models).
Just wanted to note here: there is no need to disconnect this wire. The LED Is very easy to disconnect then the entire part can easily stay out of the way. Of course I watched the same YouTube video showing how to disconnect this as the test of us probably and it wasn't until after I broke mine that I find that I could replace the filters while still connected, and fixing the wire was more hassle than disconnecting. I've disconnected hundreds of this style connector and this sucked simply because of placement, these are usually found on computer and electronics mother boards not under the glovebox in a foot well will poor visibility and hard to get both hands in places.