Looking good Page makers! Isn't it amazing how such a small change can make such a big difference for your interior.Here you go


Welcome to Tesla Motors Club
Discuss Tesla's Model S, Model 3, Model X, Model Y, Cybertruck, Roadster and More.
Register
Install the app
How to install the app on iOS
You can install our site as a web app on your iOS device by utilizing the Add to Home Screen feature in Safari. Please see this thread for more details on this.
Note: This feature may not be available in some browsers.
-
Want to remove ads? Register an account and login to see fewer ads, and become a Supporting Member to remove almost all ads.
You are using an out of date browser. It may not display this or other websites correctly.
You should upgrade or use an alternative browser.
You should upgrade or use an alternative browser.
Pagemakers
Active Member

Muzzman1
Active Member
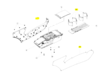
Thanks for posting the schematic! Yes they do have the console sliding lid in carbon fiber and they will sell it to you.Just in case, here's a diagram of the Gen 1 center console. One rep that someone else talked to informed the guy that they didn't sell parts for it, which is false.
Last edited:
Was at Rocklin today and tried to order 1058088-11-A but they said it's no longer available. They said all recent Model S are shipping with the black soft touch sliding lid, and the part isn't interchangeable with the Model X console. Anyone had success ordering one in the last few days? Which service center?
Last edited:
Try the Burbank SC.Was at Rocklin today and tried to order 1058088-11-A but they said it's no longer available. They said all recent Model S are shipping with the black soft touch sliding lid, and the part isn't interchangeable with the Model X console. Anyone had success ordering one in the last few days? Which service center?
Tech_Guy
ALWAYS IN LUDICROUS MODE! P90D>P100D Upgrade
Got mine today, it was an easy swap that I did it myself.
Here’s the missing picture of what’s under the lid panel.

First thing I did was pull the front of the console side panel to release the 2 clips in the drivers footwell makeing room to remove the tray lid.
Now that we can see how the lid tabs latch to the tray I would suggest you try to slide the lower tray back as you pull the lid forward. That will release the 6 clips and you can lift the old lid off.
Then reverse the steps for install by lining up the lid tabs with the sliding tray holes and placing the lid on the lower tray.
Then pull the lower tray forward as you push the lid back to engage the clips. Finally just press the side panel clips back into place in the footwell.
Here’s the missing picture of what’s under the lid panel.
First thing I did was pull the front of the console side panel to release the 2 clips in the drivers footwell makeing room to remove the tray lid.
Now that we can see how the lid tabs latch to the tray I would suggest you try to slide the lower tray back as you pull the lid forward. That will release the 6 clips and you can lift the old lid off.
Then reverse the steps for install by lining up the lid tabs with the sliding tray holes and placing the lid on the lower tray.
Then pull the lower tray forward as you push the lid back to engage the clips. Finally just press the side panel clips back into place in the footwell.
Last edited:
Got mine today, it was an easy swap that I did it myself.
Here’s the missing picture of what’s under the lid panel.
View attachment 291762
First thing I did was pull the front of the console side panel to release the 2 clips in the drivers footwell makeing room to remove the tray lid.
Now that we can see how the lid tabs latch to the tray I would suggest you try to slide the lower tray back as you pull the lid forward. That will release the 6 clips and you can lift the old lid off.
Then reverse the steps for install by lining up the lid tabs with the sliding tray holes and placing the lid on the lower tray.
Then pull the lower tray forward as you push the lid back to engage the clips. Finally just press the side panel clips back into place in the footwell.
My man... Thanks for posting the photo
Finally got mine! A buddy of a buddy happens to live right near the Burbank SC and helped me get one (they don't take payment over phone for some reason). Took me about 5 minutes to install. Very easy. Additional pics...
"Unboxing"


Before

Slide your front seats as far back as possible, then pull the side panels of the console apart until the console lid cover is fully exposed


The console lid cover easily slides off its base. As others have said, pull back on the console lid cover while you push forward to console lid base. Then reverse the above steps to install the new lid cover.


After

"Unboxing"
Before
Slide your front seats as far back as possible, then pull the side panels of the console apart until the console lid cover is fully exposed
The console lid cover easily slides off its base. As others have said, pull back on the console lid cover while you push forward to console lid base. Then reverse the above steps to install the new lid cover.
After
jelloslug
Active Member
Does anyone here that is replacing their lid want to sell me their old one?
Sure. I can sell mine. You have the current generation center console? This piece won't fit the original Tesla drop in console.
jelloslug
Active Member
Yes, I have the current generation center console.Sure. I can sell mine. You have the current generation center console? This piece won't fit the original Tesla drop in console.
Yes, I have the current generation center console.
Ok cool, PM me and we can work something out.
jelloslug
Active Member
Just sent you a PMOk cool, PM me and we can work something out.
This carbon door replacement fits on the upgraded center console on Tesla's accessories shop right now, correct? If so, I'm adding it now, thank you for this thread!
Yes. Exactly.
Great job... Thanks for sharing the "How To" photos. I thinks it's the easiest and best looking upgrade you can do to your car. Has anyone changed out to one of the other options? ie. Figured Ash wood, dark ash. If so please post photos.Finally got mine! A buddy of a buddy happens to live right near the Burbank SC and helped me get one (they don't take payment over phone for some reason). Took me about 5 minutes to install. Very easy. Additional pics...
"Unboxing"
View attachment 293704 View attachment 293703 View attachment 293702
Before
View attachment 293701
Slide your front seats as far back as possible, then pull the side panels of the console apart until the console lid cover is fully exposed
View attachment 293700 View attachment 293699
The console lid cover easily slides off its base. As others have said, pull back on the console lid cover while you push forward to console lid base. Then reverse the above steps to install the new lid cover.
View attachment 293698 View attachment 293697
After
View attachment 293696
vraev
Member
I didn’t upgrade mine, but got my standard piano black cover replaced as it got super scratched. Lesson learnt: Don’t place a phone/power pack (Anker powercore 26000 is made with a metal casing) on it. The SC replaced it for me. I personally don’t like the carbon fibre since it would look out of place with my piano black interior.Great job... Thanks for sharing the "How To" photos. I thinks it's the easiest and best looking upgrade you can do to your car. Has anyone changed out to one of the other options? ie. Figured Ash wood, dark ash. If so please post photos.
Similar threads
- Replies
- 5
- Views
- 2K
- Replies
- 15
- Views
- 6K
- Replies
- 6
- Views
- 2K