Welcome to Tesla Motors Club
Discuss Tesla's Model S, Model 3, Model X, Model Y, Cybertruck, Roadster and More.
Register

Install DR650GW-2ch in 90D

This site may earn commission on affiliate links.
IMG_243001.jpg
So, this write up is for those who asked to see how I did it, tapping into the speaker grate for power.
Pic #1: Opened grate, showing unused plug. It was tapped down with a piece of blue transparent cellophane tape. You can see the small frayed area on the label where it was taped.
IMG_243001.jpg

Pic 2:
Case fan extension cord with the female end cut. Note it's 3-pinned When plugged into the connector, the BLACK wire will need to be lined up with the BLACK wire on the connector.
IMG_243102.jpg


Pic 3:
Cut DR650GW-2ch power cord
IMG_243203.jpg


Do not connect the ends until the power cord is inserted into the cavity behind the grate. Then. splice the ends together, black to black, yellow to red. Middle wire of extension cord is not used, but I kept it for tensile strength.
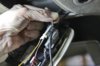
Pic 4:
Use pry tool to slightly enlarge the gap between the windshield and headliner. A piece of coat hanger wire is inserted to probe and establish the passage for the power cord to be inserted into the space behind the speaker grill
IMG_243304.jpg


Pic 5:
Power chord successfully inserted. Now join its ends to the extension cord's Plugs are connected and secured by a small zip tie.
IMG_243506.jpg


Pic 6:
DR650GW front camera attached to windshield
IMG_243708.jpg


Pic7:
Use pry tool to tug co-axil cord along seam between headliner and windshield. Cable should "slip" behind headliner easily.
IMG_243809.jpg


Pic 8:
Loosen the bolt (I believe it was a 7 mm) to loosen the A-pillar to insertion the cord into the seem between roof & A-pillar.
IMG_244415.jpg


Pic 9:
Once the cord is hidden in the "vertical" seam, it can then be directed to head to the back of the car, and is tucked in the weather stripping.
IMG_244516.jpg


Once the coaxil cord reaches the horizontal seam at the top of the B-pillar, repeat the process of tucking it into the seam and proceed towards the back. Pry tools are extremely helpful.
 

Attachments

  • IMG_243506.jpg
    IMG_243506.jpg
    247 KB · Views: 59
Where did you get the nice pry tools? Other instructions I gave read show the rear camera cord being routed down low, by removing the door sills. Is there a reason you went high? I'd be interested in hearing the pros and cons. I installed my front DR650, but never the rear, or power cable. Nice writeup!
 
Where did you get the nice pry tools? Other instructions I gave read show the rear camera cord being routed down low, by removing the door sills. Is there a reason you went high? I'd be interested in hearing the pros and cons. I installed my front DR650, but never the rear, or power cable. Nice writeup!

Got a set of the pry tools from eBay. Costs only a few bucks.
I went high because it allows me to tug the cord in the weather stripping. Since it's rubber, I won't have to worry about rattling. Secondly, the rear camera is attached high on the inside hatch. So it's a short distance from its emergence from the weather stripping at the trunk edge.
 
Where is the bolt? Do you mind taking a picture of where it is? Thanks for the great write up!

@ Wesley: The bolt is under the small piece of slightly oblong cover on the A-pillar. Lift the cover off & you'll see it.
Photo10.jpg


@Mr. Elby: Thanks, Stefan! Stay warm :)

@keydiver: Another reason for going high that I forgot to mention is that there's no need to pull and lift up trims. Less work! Below is a photo of co-axial cord position in the back. I traced the course of the cable with color line. The black segment is where it comes into the trunk from the passenger cabin, then loops to go under the weather strip, goes all across to the driver side to hide the excess cable, doubles back and emerge at the center of the car to turn up to plug in to the rear camer. This is the only part that I'm not terribly happly to show so much naked cable.
Photo11.jpg
 
  • Helpful
Reactions: wesley888
Great job! I had prodashcam install mine. He tapped power from the passenger side fuse box. As for the rear camera, one of the holes used to hold up the trim was where he snaked the wiring through.

2016 Tesla Model S 90D

That is how he did mine too. I get a little squeak from the back hatch where there should be another tap. He also installed power magic pro and it kept shutting off so I removed it myself and that didn't fix the problem. I then noticed the ground was very loose on the bolt and I added a piece to it and tightened it up. A little disappointed I had to do so much to correct a bad install that I paid good money for.
 
  • Like
Reactions: wesley888
I wasn't happy with the exposure of so much naked cable below the rear camera. plus emboldened by @The Flying Hippy's inspiration, I revised the back wiring, using the conduit to get from the car to the trunk hatch. A small amount of wire is still exposed because after I came out of the conduit, there was nowhere to tunnel to the hatch.

1. Tools used. The flexible grasper is absolutely needed.
IMG_2456.JPG


2. Rubber grommet removed exposing tunnel above headliner. Flex grasper used to probe for exit point.
1.Thru passage.jpg


3. Tip of flex grasper emerges from above rear seat, passenger side. Weather stripping has to be removed and peeking above the alcantara headliner to retrieve the flex grasper tip.
2.Emerge.jpg


4. Cable taped to tip to draw thru the passage
3.taped to snake.jpg


5. Repeat to bring cable thru rubber conduit.
4.Thru conduit.jpg


6. It was at this step that I couldn't find anywhere to tunnel to the hatch, so I had to settle bringing the cable up to the hatch, exposed. The horizontal piece of trim was removed so as to better tape down and secure the cable behind it.
5.hide under trim.jpg


Finished.jpg


NOTE: You may noticed that I removed the right vertical piece of trim from the hatch. DO NOT EVER DO THAT!!!! First it was unnecessary, next it was a bear with a capital B to re-install.

Good luck to those of you who wants to attempt this.
 
  • Informative
Reactions: wesley888
Nice write-up. 2 comments from someone who has installed 2 of these in our Ses (see below):

1) The power cable for my Blackvues came with both the cigarette lighter plug with internal fuse, and a 2nd in-line fuse on the cable. Not sure about the new cameras. I would have fused the connection if at all possible.

2) Yes, it is a bit more work, but there is a trick to fish the coax cable inside the right hand rail of the rear liftgate to the grab handle (which pops out), and then fish back up to the area under the removable plastic trim. Search these forums for more info.
 
OK folks, I have a question. I followed jjchan's recommendations regarding tapping into the plug in the headliner. As it turns out, this seems to provide power for only about 25 or 30 seconds and then it cuts off. I was initially thinking maybe the camera was messed up but when I used the cigarette lighter adapter the camera functioned perfectly. I noticed that the rest of these installations seem to have used other locations for power. What I'd like to know, is how jjchan has been able to make this work for him. My car is only three weeks old so maybe there is a difference in this wiring. I called Tesla to ask what this plug was for and the service rep was very cagey with her responses, basically saying that the connector had no function at this time and that she could not recommend that anything be electrically attached to the car – that it might "void the warranty."
I was trying to avoid having to snake a wire down the A pillar to an as yet unknown location.
Since it looks like that's what I'll have to do, could someone provide the location of the proper fuse box and the fuse numbers you used (especially the switched one)? (in order to save me a lot of VOR probing) Thank you!!!
 
@tajitoy:

I'm sorry to hear the plug behind your speaker grate is not working as it should. I can't explain why mine supplies juice constantly and yours don't. My MS is recent production also, less than a month old, so it's doubtful that Tesla would have changed the wiring. I'm not surprised the service rep was cagy. They really are in a difficult position when asked to advise on unauthorized mods. I can't claim credit for finding the plug as a power source. I initially found it at

Dash Cam | TeslaTap

I have not, however, read about the plug's behavior like you described. As for tapping into the fuse box (which was what I did with my previous P85), I have not been able to find a credible diagram of the new fuse-box. I'm concerned that I'd inadvertently tap into a vital part of the car. Also, would need to identify a constant power source. The OBDII is a viable alternative, but like I said previously that would have the power cable coming from the left side of the dashcam and requires extra maneuver to turn the wiring around. All of these 2 other methods are doable, but I decided to take the easy way out. If somehow your plug is behaving differently, you may have to consider the alternatives. Good luck.