


Welcome to Tesla Motors Club
Discuss Tesla's Model S, Model 3, Model X, Model Y, Cybertruck, Roadster and More.
Register
Install the app
How to install the app on iOS
You can install our site as a web app on your iOS device by utilizing the Add to Home Screen feature in Safari. Please see this thread for more details on this.
Note: This feature may not be available in some browsers.
-
Want to remove ads? Register an account and login to see fewer ads, and become a Supporting Member to remove almost all ads.
You are using an out of date browser. It may not display this or other websites correctly.
You should upgrade or use an alternative browser.
You should upgrade or use an alternative browser.
Installed! Austin MY C Pillars for Parcel Shelf
- Thread starter DealMasterMike
- Start date
Pictures are in reverse order.
Star
was it hard getting that bolt off?Pictures are in reverse order.
Start in the back and work your way forward.
I can answer any questions
labmixz
Member
It quiets the overall cabin a lot.For those that have the parcel shelf, does it reduce the crashing noise of the rear end when going over bumps?

Tried pulling it down after listening the trim on the bottom and side near the windows everything was loose but can’t get that trim piece out of the plastic tophaving a big problem getting the head liner loose at this part
leecox
Member
Watch the headliner removal video. Just did it a few minutes ago. It pops down if you giggle the part around.Tried pulling it down after listening the trim on the bottom and side near the windows everything was loose but can’t get that trim piece out of the plastic top
I was jiggling and it’s like stuck on it won’t even budgeWatch the headliner removal video. Just did it a few minutes ago. It pops down if you giggle the part around.
Do I have to get the head liner trim loose? I feel this shouldn’t be as difficult as I’m having
Last edited:
leecox
Member
Pull down lightly on the headliner and twist the part up towards the back of the car. Through the open hatch.I was jiggling and it’s like stuck on it won’t even budge
leecox
Member
I just finished up my install after picking up the parts this afternoon. I can confirm the revised part numbers listed above still work with the old base trim.I once asked the same question.
Took me a little while because I thought I had locktite when I didn’t. Drivers side took 3 times longer than the passenger side. I did move the foam over to the new pieces.
A couple of tips:
1. The white barrel clips are the same on the old and new trim and the base trim. If you mess one or two up lining up the parts, just rob them from the old upper trim.
2. Take out the base trim. It’s not hard to reposition it and put it back in. You’ll need to remove all the floor access panels. The side floor trim prices and the side cubby floor pieces come out too. Then remove the tailgate floor panel with the trunk striker. Takes five minutes to pop it all out. It give direct access to the seat belt bolt without having to work around the trim.
3. The other reason to remove the base trim is to collect the white panel clips that fall out when you break the two pieces of trim apart. I was able to get all of them (6 in total, 2 on one side and 4 on the other) and put them back in place after they fell out.
Otherwise, very straightforward panel replacement and Teslas aren’t too different from other car interiors I’ve worked on. A few weird choices of where they reinforced a panel and then didn’t…
Wife likes it. I didn’t notice a huge difference in road noise, it’s a little lower sounding. The radio however is VERY different now. Much better and richer sound.
The lower c pillar, how do you get this loose?Finished! The install task was 3 out 5 if you like playing with Legos and you have the right tools. I'm going at this blind just by videos and what people have said on the thread. I completed the project in about 2.5 to 3 hrs. The biggest part for me was the lower C pillar and lower seat cover thing.
I started with the left driver side. Figured this had the charger and 12v attachment so it took a little more finesse. What everyone said about the lower C pillar is true it's a pain, but once it's removed the access to the seat belt bolt is super easy (socket extension is needed 6in min. 10in is good) Note make sure you remember the orientation of the seat belt, it's keyed so it can only go one way but make sure you tuck it under the carpet then place the plastic over the carpet or else it makes a rubbing noise added to your other creaking noise in the car.
Install tips:
Watch the video of the guy tinting the roof, and read the install for the CCS adapter to remove the lower C pillar.
1. Lower C pillar in the front by the seats will have 2 metal clips with locator pins. These are a pain to remove. Tug enough around them and you can pull the one on top. The lower one is very hard, just place your hand close to the pin and hulk it and the sucker will pop out. The rest is held on by the upper c pillar.
2. Trick for upper c pillar separation to prevent the clips from falling. Slide you hand in between the separation and when you get close to a clip push in the top c pillar and swiftly pull on the bottom c pillar.
3. Once the lower C pillar is free you can remove the seat belt bolt. The bolt does have Loctite. You will feel the resistance when unbolting. Make sure you add Loctite again before installing.
4. Take a pic of the seatbelt placement so you remember how to reinstall.
5. Removing the upper c pillar use swift tugs to free the plastic clips-, I took pictures of each pin location. same for the passenger side.
6. Where the c pillar meets the roof liner by the trunk hold the liner and tug the c pillar.
7. Wiggle you way out of the rear door roof liner.
8. Freedom!! well almost remove the seatbelt guide, dont break it you need it.
Remember it's always easier uninstalling
Picture time. I took pictures of where the plastic white pin connectors will mount to the frame. So when you install the new c pillar you can place your palm at these locations and pop them in.
I made a video of the passenger side install, I should have it up shortly.
Thanks for the help everyone!

GBMaryland
Member
Mobile service came today and installed the upper to trim pieces and the parcel shelf itself.
I had called them and asked them to replace the lower trim pieces for me and they brought those pieces… When he got here he was able to get the glue off from the aftermarket trunk cover and asked me if I wanted him to install the top two trim pieces and the parcel shelf.
Gotta love the mobile guys because they’re willing to do a lot more than the service center will
I went thru the exact same thing w the Rockville locationMobile service came today and installed the upper to trim pieces and the parcel shelf itself.
I had called them and asked them to replace the lower trim pieces for me and they brought those pieces… When he got here he was able to get the glue off from the aftermarket trunk cover and asked me if I wanted him to install the top two trim pieces and the parcel shelf.
Gotta love the mobile guys because they’re willing to do a lot more than the service center will
Attachments
labmixz
Member
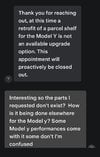
If you mentioned the word "retrofit" in your initial message, then that's your issue. You need to clearly state you want these three parts, which are not VIN locked. That's it, any more information and they'll probably say no.I went thru the exact same thing w the Rockville location
GBMaryland
Member
In my case…
I gave the SC the specific the part numbers I wanted and then told them that if they felt like installing them for me great, otherwise I just wanted the parts.
afterwards they seem to have decided to cover their asses by telling me they don’t the install, as opposed to being honest with me in the ticket and saying we didn’t order the parts that you requested. All while attempting to cover that up…. Which they \then got called on when I showed up and told them I wanted the parts.
After sitting there for a half an hour waiting for them to bring my parts out, they came out and told me they didn’t have the parts because they never ordered them. Again, they would never have told me that because they flat out lied in an attempt to cover up their screwup.
It’s the dishonesty that bothers me…
…followed closely by the wasting of four hours of my time with the back-and-forth of the service center and everything else to happen that day.
Not loving the Rockville Maryland service center…
Like others have mentioned just supply the part numbers in the app, I had mobile even drop the parts off, the less they know the better. Just verify on your invoice the got the correct parts, the bolt people mentioned replacing are totally re-usable so don't bother ordering those just put a little loctite on them when reinstallingIn my case…
I gave the SC the specific the part numbers I wanted and then told them that if they felt like installing them for me great, otherwise I just wanted the parts.
afterwards they seem to have decided to cover their asses by telling me they don’t the install, as opposed to being honest with me in the ticket and saying we didn’t order the parts that you requested. All while attempting to cover that up…. Which they \then got called on when I showed up and told them I wanted the parts.
After sitting there for a half an hour waiting for them to bring my parts out, they came out and told me they didn’t have the parts because they never ordered them. Again, they would never have told me that because they flat out lied in an attempt to cover up their screwup.
It’s the dishonesty that bothers me…
…followed closely by the wasting of four hours of my time with the back-and-forth of the service center and everything else to happen that day.
Not loving the Rockville Maryland service center…
I never mentioned retrofit. I copied another guys message word for word w the part numbers & 2 days later they sent me the generic “your service is scheduled” then not even 5 mins later sent me the message aboveIf you mentioned the word "retrofit" in your initial message, then that's your issue. You need to clearly state you want these three parts, which are not VIN locked. That's it, any more information and they'll probably say no.
mgylung
Member
Just for information, I tried getting my SC/mobile service (in Canada) to install the parts (1661180-00-A, 1661181-00-A and 1641293-00-D) but they refused because it wasn't an 'approved Tesla retrofit'. So, I just installed it myself. Took a couple of hours, but the parts do work with the older style lower trim (without the full carpet). You definitely need to remove the lower trim to access the seatbelt bolt as others have mentioned. Sound doesn't seem too different to me but I still have to do more testing.
Also, the parts said Tesla TX (which I assume is from Giga Texas), but nevertheless worked with my Fremont built MYP.
Also, the parts said Tesla TX (which I assume is from Giga Texas), but nevertheless worked with my Fremont built MYP.
Last edited:
Similar threads
- Replies
- 2
- Views
- 846
- Replies
- 0
- Views
- 566
- Replies
- 5
- Views
- 582
- Replies
- 2
- Views
- 359