


Welcome to Tesla Motors Club
Discuss Tesla's Model S, Model 3, Model X, Model Y, Cybertruck, Roadster and More.
Register
Install the app
How to install the app on iOS
You can install our site as a web app on your iOS device by utilizing the Add to Home Screen feature in Safari. Please see this thread for more details on this.
Note: This feature may not be available in some browsers.
-
Want to remove ads? Register an account and login to see fewer ads, and become a Supporting Member to remove almost all ads.
You are using an out of date browser. It may not display this or other websites correctly.
You should upgrade or use an alternative browser.
You should upgrade or use an alternative browser.
Installing a Tekonsha Prodigy P2 Brake Controller in a Model X
- Thread starter adelman
- Start date
-
- Tags
- Driving Dynamics Model X
I cannot comment on the brightness of the P2 display, but I can tell you that the P3 display does not bother me or my wife. Of course it is mounted below and to the left of the steering wheel, way out of our field of vision when driving. However, I can easily see it by looking down between the spokes of the steering wheel.Can anybody comment on the brightness of the P2 vs. the P3? We have a P2 in our current tow vehicle (it stays connected all the time) and the bright blue LED light bothers my wife so she put a couple of layers of painters tape over it. Is the P3 just as bright?
I love the information on this forum! I've already read through the excellent instructions from adelman and ordered a P2. While waiting on the delivery I noticed a wireless version, the Tekonsha RF. Any reason nobody is using this instead and not worrying about drilling or disassembling your MX? (And I mean this as a genuine question. Brake controllers are new to me.)
I love the information on this forum! I've already read through the excellent instructions from adelman and ordered a P2. While waiting on the delivery I noticed a wireless version, the Tekonsha RF. Any reason nobody is using this instead and not worrying about drilling or disassembling your MX? (And I mean this as a genuine question. Brake controllers are new to me.)
Wireless controllers only make sense when you have a lot of vehicles pulling the same trailer, or if your vehicle is not prewired (and wiring is difficult). The X is prewired; go with the P2 or P3.
While your waiting for your P2 to come in, read my instructions and order the proper step-splices from Digikey.

Zippy_EV
Member
I was thinking of installing a Prodigy P3 in the center console. (I don't tow very often and don't want the controller in a knee banging location.) I'd like to attach it to something that connects to the console the same way that the cupholders insert into the console grooves. This should have great accessibility and stability while still being easily removable.
Has anyone done this already? I'd love to see photos and any tips.
I might ask a woodworking friend to help - or it should be pretty simple to 3-D print something useful. a 3D print might allow the mount to be tilted towards the back of the X.
Thanks in advance
Has anyone done this already? I'd love to see photos and any tips.
I might ask a woodworking friend to help - or it should be pretty simple to 3-D print something useful. a 3D print might allow the mount to be tilted towards the back of the X.
Thanks in advance
I was thinking of installing a Prodigy P3 in the center console. (I don't tow very often and don't want the controller in a knee banging location.) I'd like to attach it to something that connects to the console the same way that the cupholders insert into the console grooves. This should have great accessibility and stability while still being easily removable.
Has anyone done this already? I'd love to see photos and any tips.
I might ask a woodworking friend to help - or it should be pretty simple to 3-D print something useful. a 3D print might allow the mount to be tilted towards the back of the X.
Thanks in advance
It is critical that the trailer brake controller be firmly affixed to the car, as it needs to be able to correctly sense the deceleration. There is also a requirement that it be mounted facing the direction of travel; for the P2 it is +/- 20˚ in roll from level and +/- 20˚ from facing forward.
That said, I've never had a problem with bumping the controller where I recommended mounting it; you knees are well above that point. I've also never kicked it getting in or out; this actually seems more likely.
Be aware that trailer brake controllers have a lever to manually actuate the brakes. You'll want to mount it in a position where you can reach it when driving. You'll use this lever every time you connect a trailer or change the load on a trailer to calibrate the braking force for the situation. Eg, find the maximum braking voltage that can be sent to the trailer without skidding the wheels. This would be very difficult if you can't easily throw the lever while driving and looking at the trailer in the left rearview mirror. Also, some states require that the driver be able to actuate the trailer brakes; I'm not sure if this means "separately" than using the vehicle brake pedal.
TexasTeslaRacing
Member
We installed the Prodigy RF wireless controller because it very user friendly and we didn’t want any under dash mounting. Works great. Although using the MX to tow anything above 2,000 lbs severely slashes the range in half.
We tow a 4,000 travel trailer and regularly see 800+/wh mi at 60mph. We also added a weight distribution hitch.
We tow a 4,000 travel trailer and regularly see 800+/wh mi at 60mph. We also added a weight distribution hitch.
Attachments
Please keep your eye on the fitment of the Bosal removable receiver into the car. Mine and @JimVandegriff both got loose from fatigue when towing with weight distribution.We installed the Prodigy RF wireless controller because it very user friendly and we didn’t want any under dash mounting. Works great. Although using the MX to tow anything above 2,000 lbs severely slashes the range in half.
We tow a 4,000 travel trailer and regularly see 800+/wh mi at 60mph. We also added a weight distribution hitch.
Thanks for your post. Could you please post your towing energy usage data in this thread? Model X Travel Trailer Consumption AnalysisWe tow a 4,000 travel trailer and regularly see 800+/wh mi at 60mph.
Photos of the type of trailer you tow would be helpful. Thanks!
Also, as @ohmman suggested, review this thread Bosal Hitch Adapter Loosening
I was interested to read your post about that product because I wasn’t aware of it (I installed a Tekonsha P3 controller in my X following the very helpful instructions in this thread).We installed the Prodigy RF wireless controller because it very user friendly and we didn’t want any under dash mounting. Works great.
Would you be able to start a new thread in this forum and post about how you installed that Prodigy RF wireless controller?
I read about the product at Tekonsha Prodigy RF Wireless Trailer Brake Controller - 1 to 3 Axles - Proportional Tekonsha Brake C
I won’t be switching to it, as my installation is working well, but would like to learn about your wireless controller installation. Thanks.
Zippy_EV
Member
It is critical that the trailer brake controller be firmly affixed to the car, as it needs to be able to correctly sense the deceleration. There is also a requirement that it be mounted facing the direction of travel; for the P2 it is +/- 20˚ in roll from level and +/- 20˚ from facing forward.
That said, I've never had a problem with bumping the controller where I recommended mounting it; you knees are well above that point. I've also never kicked it getting in or out; this actually seems more likely.
Be aware that trailer brake controllers have a lever to manually actuate the brakes. You'll want to mount it in a position where you can reach it when driving. You'll use this lever every time you connect a trailer or change the load on a trailer to calibrate the braking force for the situation. Eg, find the maximum braking voltage that can be sent to the trailer without skidding the wheels. This would be very difficult if you can't easily throw the lever while driving and looking at the trailer in the left rearview mirror. Also, some states require that the driver be able to actuate the trailer brakes; I'm not sure if this means "separately" than using the vehicle brake pedal.
Great points. I'll be sure I can reach the manual actuator from the normal position as well as easily view the controller display. The Prodigy P3 seemed ideal compared to the P2 as the P3 can be mounted in any orientation as the center line of the controller is parallel to the line through the center of the vehicle. Here's an image from the P3 installation manual if that didn't make sense.
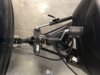
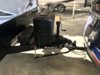
I thought I'd show an example of my brake controller install from a prior vehicle (Toyota Sequoia) I loved how one could take out a sliding drawer and install the controller there. A picture is worth 1000 words:
The trailer I will most likely pull is an aluminum car hauler. The Prodigy RF does look nice but I'd like to keep my options open for towing any trailer (despite the fact I have no plans to tow lots of different trailers.)
Last edited:
TaylorJD
Member
We installed the Prodigy RF wireless controller because it very user friendly and we didn’t want any under dash mounting. Works great. Although using the MX to tow anything above 2,000 lbs severely slashes the range in half.
We tow a 4,000 travel trailer and regularly see 800+/wh mi at 60mph. We also added a weight distribution hitch.
I installed the Prodigy RF wireless controller too, well more like I said set me up and that is what the dealer install. I also "see 800+/wh mi at 60mph", at least during the cold weather. I have not yet tried it in warm weather. I am towing between 3,100 and 3,800 lbs.
Attachments

I am considering purchasing the Little Guy Max or Mini Max. Can you provide any additional info wh/mi. Do you have the 90 or 100?I installed the Prodigy RF wireless controller too, well more like I said set me up and that is what the dealer install. I also "see 800+/wh mi at 60mph", at least during the cold weather. I have not yet tried it in warm weather. I am towing between 3,100 and 3,800 lbs.
Thanks...Mel
Awesome instructions!
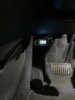
I have a rhd and it’s pretty much the same install instructions. Except I decided to mount it to the left towards the centre console rather than to the right towards the door. I also drilled a small hole behind the unit to route the cable.
This is not near my legs or knees and cannot see how I could hit it getting in or out. Also easy to see and reach the manual brake lever.
One question. How long does the p3 stay on after you turn the car off? I think it’s on a constant power connection.
Thanks for the help!!!
Attachments
Last edited:
Atlantian
Member
I used the instructions to install a Prodigy P3 brake controller except I used the following wire connectors:
Wire Connector Stripping Free For Straight Joint Splice Connector 14-11awg to 16-14awg without male/female terminals (Pack of 12)
https://www.amazon.com/gp/product/B0795NZ58N/
Wire Connector Stripping Free With 2 Pin 16-14AWG without male/female terminals(Pack of 12)
https://www.amazon.com/gp/product/B0795L9RGX/
I used the instructions to install a Prodigy P3 brake controller except I used the following wire connectors:
Wire Connector Stripping Free For Straight Joint Splice Connector 14-11awg to 16-14awg without male/female terminals (Pack of 12)
https://www.amazon.com/gp/product/B0795NZ58N/
Wire Connector Stripping Free With 2 Pin 16-14AWG without male/female terminals(Pack of 12)
https://www.amazon.com/gp/product/B0795L9RGX/
I would not rely on insulation-displacement connectors for the brake controller output lines. A two-axle trailer can draw 15-16A of current on this line, and a three axle trailer can easily exceed 20A. The Tesla part of the harness uses the equivalent of 16 AWG wire, and depending on the type of wire and application, most engineers would consider 16 AWG wire good for 10A. Note that the Tekonsha end of the harness comes with 12 AWG (two sizes bigger) for this wire.
Note that the Tesla harness uses a 14 AWG wire for the 12V power, yet most of the current that comes down the 12V power supply wire then goes out the 16 AWG wire to the brakes!
Insulation displacement connectors can't guarantee you a connection involving the full cross-section of the wire, and believe me, on this connection every bit of it is needed. There is already a problem in Tesla's choice of wire size; you're just risking making a little problem worse. There is a reason I specified a quality crimp connector in the manual.
Great points. I'll be sure I can reach the manual actuator from the normal position as well as easily view the controller display. The Prodigy P3 seemed ideal compared to the P2 as the P3 can be mounted in any orientation as the center line of the controller is parallel to the line through the center of the vehicle. [...]
The P2 and P3 are functionally identical. The P3 has a better screen and enhanced diagnostics. Both units can be mounted at any angle (the P2 manual shows the same picture as the P3 manual!).
I am using the P3 for new installations because it only costs a few dollars more, but there is really no reason to replace a perfectly good P2 with one.
jrsxxxjrs
Member
Question : Does a brake controller (like the P3) require all 7 pins of the Model X trailer connector?
In other words, is it a given that if you are using a 7-pin to 4-pin trailer electrical adapter, that you cannot control the trailer brakes over the 4-pins?
In other words, is it a given that if you are using a 7-pin to 4-pin trailer electrical adapter, that you cannot control the trailer brakes over the 4-pins?
AlanSqB
Dog Chauffeur
4-pin connectors only carry turn signals and brake lights. R-L-B-G. 5-pin connectors add in reverse lights for trailers with surge brakes.
If you need electric brake control and you are using a brake controller, you must use a 7-pin harness. The extra two pins are 12v supply and brake control.
If you need electric brake control and you are using a brake controller, you must use a 7-pin harness. The extra two pins are 12v supply and brake control.
Update 2020: I just moved my P2 from my 2016 Model X to my new 2020 Model X and the installation is identical. Also, since I could bring the already-built harness over with me, it was even a bit easier.
Similar threads
- Replies
- 2
- Views
- 212
- Replies
- 24
- Views
- 2K
- Replies
- 19
- Views
- 1K
- Replies
- 2
- Views
- 199