


Welcome to Tesla Motors Club
Discuss Tesla's Model S, Model 3, Model X, Model Y, Cybertruck, Roadster and More.
Register
Install the app
How to install the app on iOS
You can install our site as a web app on your iOS device by utilizing the Add to Home Screen feature in Safari. Please see this thread for more details on this.
Note: This feature may not be available in some browsers.
-
Want to remove ads? Register an account and login to see fewer ads, and become a Supporting Member to remove almost all ads.
You are using an out of date browser. It may not display this or other websites correctly.
You should upgrade or use an alternative browser.
You should upgrade or use an alternative browser.
Installing the official Tesla model 3 roof rack
- Thread starter cantdecide
- Start date
NeverFollow
Active Member
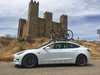
Look great, I also always remove the front wheels. For a long trip, removing the saddles could improve the range.Over 12,000 km and no issues. Don't notice a huge hit to range or performance. Makes the car useful.

But I hit the branch of a tree at night in the parking lot of an hotel, and badely damaged the roof of my previous car.
I got the Model 3 roof rack but I will be hesitant to put my bikes above the glass roof.
I am considering putting a tow hitch and a bike holder instead.I would like to find a back rack allowing to remove the front wheel,
thus avoiding to have the bike wider than the car. I saw such bike rack but it must have been discontinued.
If you know such bike rack solution, I would be very interested.
Last edited:
640k
Member
what's the clearance of that thing? can you measure from top of saddle to floor?Over 12,000 km and no issues. Don't notice a huge hit to range or performance. Makes the car useful.
Watts_Up
Well-Known Member
I believe that you need to turn the top bolt in a position where the key can be locked.I installed the roof rack, but can't seem to turn the key to lock it. Did anyone else run into this issue?
The bolt should be in position like on the picture below: :
Note: Be very cautious about the location where you insert the braces below the roof glass.
- The front brace should be almost above the edge of front of the glass.
- The rear brace should be like one inch before the edge of the glass.
- The rear brace should be like one inch before the edge of the glass.
I would recommend to turn the to screw with your hand as hard as you can and then check the roof rack
to see if it doesn't move and if you don't feel any tiny motion on the glass to be certain that each brace is
correctly inserted under the hook and doesn't touch the glass. Otherwise there is a risk to crack the glass.
Then you can use the tool to tighten the bolt. There is a torque recommendation, that you can find in this thread.
But in my case, I just turn the hexagonal tool by holding the small end of the tool, this should be enough.
Holding the tool using the long side allows having more torque but some people tried so hard
that they damaged the hook under the glass or broke the braces.

FrunkLover
Member
Hi all - likely moving to a M3 after three years of MS ownership. Wondering if somebody can point me to the dimensions of the OEM M3 rack? Particularly the width. I am trying to see if I'd be able to resize my existing Thule bars to fit the M3, that is if I can get my hand on those little J hooks (big if)...
Thule Aeroblade Edge Flush XL (front) and Thule Aeroblade Edge Flush LG (back) is what I have now, the width is flexible, but may not be flexible enough to resize to the M3.
Any thoughts welcome!
Thule Aeroblade Edge Flush XL (front) and Thule Aeroblade Edge Flush LG (back) is what I have now, the width is flexible, but may not be flexible enough to resize to the M3.
Any thoughts welcome!
Watts_Up
Well-Known Member
I would recommend using the specially designed braces for the Model 3 and Y.Hi all - likely moving to a M3 after three years of MS ownership. Wondering if somebody can point me to the dimensions of the OEM M3 rack? Particularly the width. I am trying to see if I'd be able to resize my existing Thule bars to fit the M3, that is if I can get my hand on those little J hooks (big if)...
Thule Aeroblade Edge Flush XL (front) and Thule Aeroblade Edge Flush LG (back) is what I have now, the width is flexible, but may not be flexible enough to resize to the M3.
Any thoughts welcome!
I you don't want to use the custom Tesla braces, you will have to remove the chrome trim.
See roof rack mounting at 4:20
Model Y E29: Down to the Naked Body-in-White (BIW) - Oil Canning, Roof Racks, More Insulation
Hi all - likely moving to a M3 after three years of MS ownership. Wondering if somebody can point me to the dimensions of the OEM M3 rack? Particularly the width. I am trying to see if I'd be able to resize my existing Thule bars to fit the M3, that is if I can get my hand on those little J hooks (big if)...
Thule Aeroblade Edge Flush XL (front) and Thule Aeroblade Edge Flush LG (back) is what I have now, the width is flexible, but may not be flexible enough to resize to the M3.
Any thoughts welcome!
Please let us know your impressions of the pros and cons of the M3 vs. the MS if you make the move.
FrunkLover
Member
I you don't want to use the custom Tesla braces, you will have to remove the chrome trim.
My proposal is using the J hooks that go under the glass, then attaching my existing Thule bars to the threaded part that sticks up. (With the S with the Pano roof, you pop open the little glass doors and it's one, long threaded piece that attaches to the feet of the bars. The only difference from what I can tell is the threaded piece appears to have a wider diameter and is shorter for the M3.)
Not really optimistic this will work, but figured I'd ask folks who own what the width is to start.
Watts_Up
Well-Known Member
And why not getting the MY instead of the M3, especially when you get used of the practicality of the MS hatchback door.Please let us know your impressions of the pros and cons of the M3 vs. the MS if you make the move.
FrunkLover
Member
And why not getting the MY instead of the M3, especially when you get used of the practicality of the MS hatchback door.
Cost, range, performance, and availability of the Y in July when my current lease expires. I'm not optimistic Tesla will be able to ramp up production of Ys and get them to the East Coast by then given this pandemic -- but I may be surprised.
I think overall I'd prefer the Y for its space, heat pump for the winter driving I do, and glass roof. But I also am not a fan of the Gemini Wheels, which from what I can tell are the only all-season tires available right now.
Do NOT hand crank as hard as you can. Even holding the small end. 5-6nm (recommended pressure in the manual) is nothing.I would recommend to turn the to screw with your hand as hard as you can and then check the roof rackto see if it doesn't move and if you don't feel any tiny motion on the glass to be certain that each brace is
correctly inserted under the hook and doesn't touch the glass. Otherwise there is a risk to crack the glass.
Then you can use the tool to tighten the bolt. There is a torque recommendation, that you can find in this thread.
But in my case, I just turn the hexagonal tool by holding the small end of the tool, this should be enough.
Holding the tool using the long side allows having more torque but some people tried so hard
that they damaged the hook under the glass or broke the braces.
Drop by any car repair center and ask if you can borrow a torque wrench for 5 minutes.
Or buy a cheap one of you, like me, plan to take them on and off several times.
Did they revise the manual recently? Now the recommended torque is 2.5-3.5 Nm.Do NOT hand crank as hard as you can. Even holding the small end. 5-6nm (recommended pressure in the manual) is nothing.
Drop by any car repair center and ask if you can borrow a torque wrench for 5 minutes.
Or buy a cheap one of you, like me, plan to take them on and off several times.
https://www.tesla.com/sites/default/files/downloads/model-3-roof-rack-owners-manual-en-us.pdf
It used to be 5-6Nm, guess they figured out that was a problem or they've modified the constructionDid they revise the manual recently? Now the recommended torque is 2.5-3.5 Nm.
https://www.tesla.com/sites/default/files/downloads/model-3-roof-rack-owners-manual-en-us.pdf
Jeremy.j.hall
Member
Interesting - I bought my M3 rack less then a month ago and the book states 5-6Nm - This feels like a bit too much, and the bolts are almost completely through the wingnuts by this toque - meaning the allen key stared slipping - I think I'll downgrade to 3Nm!It used to be 5-6Nm, guess they figured out that was a problem or they've modified the construction
Feels sturdy.
Does anyone else get a worrying noise when tightening the bolts? Glass is fine, but there is some clicking / creaking which has me constantly checking for cracks... Must relax!
KootsChewt
Member
I don't think there are any other options... maybe someone could come up with the clamp style, but that would look pretty ugly and those types always have the chance of ruining the paint.Is the original roof rack still the way to go? Or are there better ones out there?
morphine
Member
Hi all, just recieved my original Tesla roofrack. I was a little apprehensive after reading this thread, but I got started anyway. I tightened the bolts manually and did the final turn with the supplied tool. Unfortunately I also heard a slight crackling and was therefore afraid that I had broken the glass or broken the clip. Everything disconnected and there seems to be nothing to see. I now turn the bolts so far that I can't go any further manually and then turn back so that it is straight.
Is there anything else I should pay attention to or should I be concerned?
What I also see in this thread that the clips are black, but mine are aluminum color (so maybe an updated version?).
Below are photos of the box/clips (with no visible damager after installing) and result.


Is there anything else I should pay attention to or should I be concerned?
What I also see in this thread that the clips are black, but mine are aluminum color (so maybe an updated version?).
Below are photos of the box/clips (with no visible damager after installing) and result.
i installed mine twice. first with the defective j-clips in about feb 2019. that time I used a torque wrench and tried to achieve the 9 or whatever it was but there were noises so i think i got only to 5 and stopped. 2 of those clips broke without being obvious until I got the new ones later in 2019 and switched them.... then saw the broken ones. i hand tightened the new ones because there were lots of posts about that being adequate and safer. the rack has handled two kayaks without falling off for at least 2 years since then. now I have a 10 cm crack visible only from inside just above the mirror in the centre glass panel. it's getting looked at by Tesla next week. Maybe they will know if the rack has anything to do with that. I guess I will see also if the current clips are okay. I have been reluctant to remove the rack because ( probably) the most risk is with putting it on more often than needed. good luck.
Anyone managed to get the sticky pads on without them looking bad?
No matter how much I tried on a (very clean car) I got bubbles and fingerprints under them. When I take the bars off they look awful.
Should I have used a soap solution or something?
No matter how much I tried on a (very clean car) I got bubbles and fingerprints under them. When I take the bars off they look awful.
Should I have used a soap solution or something?
Similar threads
- Replies
- 2
- Views
- 261
- Replies
- 2
- Views
- 1K
- Replies
- 2
- Views
- 392