Hi all,
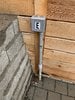
Looking to purchase a new townhome. The parking lot comes with an electrical box with a 50A hookup. Right now the box just has a face plate covering it up, but I presume the intention is for owners to install a NEMA 14-50 outlet on it. See attached picture for the box.
My question is - does this look suitable to mount a Gen 2/3 Wall Connector on the front of? Wasn't totally clear from the install manual if that's possible. Or would I be better off hiring an electrician and getting them to modify the cable run and remove the box completely to replace with the wall connector? (trying to avoid if possible because electricians charge an arm and a leg in Seattle for EV-type work!).
Obviously option 3 is installing an outlet there instead and using the plug-in wall connector or mobile connector, but would like as clean a job as possible.
Thanks!
Rik
p.s. I know the photos show two different boxes. The one marked "E" is the one in my assigned space - we just opened up another one before by accident.