A couple of weeks ago my P85 refused to charge at home right before leaving for vacation. Interestingly supercharging still worked. After a day, Tesla said that it was not recognizing the 1KHz square wave coming back from the wall charger and they suggested replacing the master charger with a new one, over $2600. I went on eBay and bought a used charger and swapped it in and after a software upgrade, it started working fine. The hardest part was removing the rear seats. The side bolsters won't come out of my car and the service manual is less than helpful. In any event, I finally got it done.
My car has dual chargers. The master charger is the one on the left if you're facing the back of the car. To remove it, you first need to disconnect the 12V battery and remove the HV loop connector in the frunk.
Next, pull up the rear seat cushion. It should pull up and out though you might have to pry.
If you can, remove the side bolsters. I couldn't get mine to budge at all which made this next step a lot more difficult.
If you look at the hinge of the rear seats there's a white clip. Pry the clip towards the seats but be careful or it can break. It also depends on the position of the seat angle if you can pry it out or not. It holds a couple of pins in place. Once it's pried out, you should be able to lift the clip out of a slot, even with the bolster in place. Do the wide seat first. There's a large pin in the wide seat that pokes through the center hinges into the narrow seat. I left the seatbelt in place.
Next is the black cage under the seat. It just unbolts and slides out.
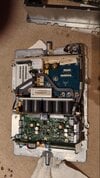
Carefully remove the cover of the center box with the big wires going into it and be careful to not touch anything inside. If you have them, wear high-voltage gloves. Use a good, high-quality volt meter that can actually handle high voltage and measure everything inside to make sure there is no voltage anywhere. I use a Fluke meter.
Remove the bolts holding the thick cables in place. The cables will pull out fairly easily after that.
There are several connectors going into the master charger, one on the left side and several inside the smaller box. You might need to carefully pry the outside one a bit after you pull out the white clip. The others should have a tab you press to slide them out.
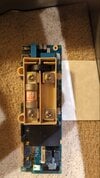
Next, there are four bolts holding the charger in place. Remove those. The clips attached to the wires and hoses do not need to be cut. They'll pull off. Don't cut them (like I did one of them).
Make sure you have some hose plugs and some towels ready because things are about to get messy. Use some pliers to remove the clips on the coolant hoses. There's one on each side. Quickly plug the hose and the charger and be prepared to wipe up coolant. I didn't lose a lot and did not need to add more to my car.
There's also a ground cable attached to the charger. Unbolt that. Once everything is disconnected, the charger will lift out of place. It's heavy.
To reassemble, do things in the opposite order.
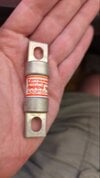
I opened up the old charger and found out that Tesla was mistaken about what the problem was. One of the two 50A fuses had blown and I'm 99% sure it's due to old age. I replaced both fuses with the exact same model and I'm 99% certain my old charger is now as good as new, though I don't want to go through swapping it back. I may just sell it like the one I bought.
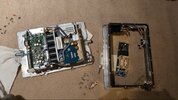
To check and replace the fuses, undo all the Torx screws on the sides and top, then there are a few Torx screws that hold in some wires that need to be undone and the side casting will lift off. A few connectors also need to be removed. It's pretty obvious which ones.
Next, there's a board with a cardboard insulator on it. Remove the Torx screws holding it in place and remove a couple of connectors. There are also a couple of nylon standoffs holding the board. Squeezing them with some long-nosed pliers will pop it off.
To get to the fuses, you will need to remove one side of the cardboard insulator. Press the tab in the middle of the rivet and the smooth head will pop out, allowing you to remove them. Don't force it or you'll break it. Replacements can be found on Digikey, just get the 3mm ones that are around 6mm long.
Once the cardboard is free the fuses can be measured with an ohm meter. The fuse in question can be obtained from Mersen A50P50-4
The sticker on the front says there are no user-serviceable parts. I beg to differ, though replacing the fuses is not as easy as it could be.
If anyone does replace the fuses, I suggest replacing both of them. Fuses tend to age, especially if they're always pushed to 80%. I typically charge at 40A (though I can also charge at 80A).
BTW, if anyone in the SF Bay Area needs a replacement charger, mine should be as good as new.
I spent around $400 for a replacement charger for my car. Knowing what I now know, I would have just replaced the fuses in my existing charger for $80. It's a lot cheaper than replacing the unit with a new one for over $2600 + labor.
BTW, the symptom was that after plugging in the car detected the charger and attempted to charge four times before the charge port turned red. I could hear things clicking as the Tesla wall charger enabled itself.
Note that if you replace your charger with a different unit then you will need to force a software update.
My car has dual chargers. The master charger is the one on the left if you're facing the back of the car. To remove it, you first need to disconnect the 12V battery and remove the HV loop connector in the frunk.
Next, pull up the rear seat cushion. It should pull up and out though you might have to pry.
If you can, remove the side bolsters. I couldn't get mine to budge at all which made this next step a lot more difficult.
If you look at the hinge of the rear seats there's a white clip. Pry the clip towards the seats but be careful or it can break. It also depends on the position of the seat angle if you can pry it out or not. It holds a couple of pins in place. Once it's pried out, you should be able to lift the clip out of a slot, even with the bolster in place. Do the wide seat first. There's a large pin in the wide seat that pokes through the center hinges into the narrow seat. I left the seatbelt in place.
Next is the black cage under the seat. It just unbolts and slides out.
Carefully remove the cover of the center box with the big wires going into it and be careful to not touch anything inside. If you have them, wear high-voltage gloves. Use a good, high-quality volt meter that can actually handle high voltage and measure everything inside to make sure there is no voltage anywhere. I use a Fluke meter.
Remove the bolts holding the thick cables in place. The cables will pull out fairly easily after that.
There are several connectors going into the master charger, one on the left side and several inside the smaller box. You might need to carefully pry the outside one a bit after you pull out the white clip. The others should have a tab you press to slide them out.
Next, there are four bolts holding the charger in place. Remove those. The clips attached to the wires and hoses do not need to be cut. They'll pull off. Don't cut them (like I did one of them).
Make sure you have some hose plugs and some towels ready because things are about to get messy. Use some pliers to remove the clips on the coolant hoses. There's one on each side. Quickly plug the hose and the charger and be prepared to wipe up coolant. I didn't lose a lot and did not need to add more to my car.
There's also a ground cable attached to the charger. Unbolt that. Once everything is disconnected, the charger will lift out of place. It's heavy.
To reassemble, do things in the opposite order.
I opened up the old charger and found out that Tesla was mistaken about what the problem was. One of the two 50A fuses had blown and I'm 99% sure it's due to old age. I replaced both fuses with the exact same model and I'm 99% certain my old charger is now as good as new, though I don't want to go through swapping it back. I may just sell it like the one I bought.
To check and replace the fuses, undo all the Torx screws on the sides and top, then there are a few Torx screws that hold in some wires that need to be undone and the side casting will lift off. A few connectors also need to be removed. It's pretty obvious which ones.
Next, there's a board with a cardboard insulator on it. Remove the Torx screws holding it in place and remove a couple of connectors. There are also a couple of nylon standoffs holding the board. Squeezing them with some long-nosed pliers will pop it off.
To get to the fuses, you will need to remove one side of the cardboard insulator. Press the tab in the middle of the rivet and the smooth head will pop out, allowing you to remove them. Don't force it or you'll break it. Replacements can be found on Digikey, just get the 3mm ones that are around 6mm long.
Once the cardboard is free the fuses can be measured with an ohm meter. The fuse in question can be obtained from Mersen A50P50-4
The sticker on the front says there are no user-serviceable parts. I beg to differ, though replacing the fuses is not as easy as it could be.
If anyone does replace the fuses, I suggest replacing both of them. Fuses tend to age, especially if they're always pushed to 80%. I typically charge at 40A (though I can also charge at 80A).
BTW, if anyone in the SF Bay Area needs a replacement charger, mine should be as good as new.
I spent around $400 for a replacement charger for my car. Knowing what I now know, I would have just replaced the fuses in my existing charger for $80. It's a lot cheaper than replacing the unit with a new one for over $2600 + labor.
BTW, the symptom was that after plugging in the car detected the charger and attempted to charge four times before the charge port turned red. I could hear things clicking as the Tesla wall charger enabled itself.
Note that if you replace your charger with a different unit then you will need to force a software update.