Welcome to Tesla Motors Club
Discuss Tesla's Model S, Model 3, Model X, Model Y, Cybertruck, Roadster and More.
Register

Loud burst of air, now left side suspension bottomed out, diagnostic help

This site may earn commission on affiliate links.
I took my car in for service yesterday to have any codes in the SAS ecu cleared. A service manager whom I’ve known for many years happened to come out and check out my car. He said that codes aren’t stored in SAS unless the air suspension failed and wouldn’t work anymore after the red icon on the dash, error codes in notifications, the necessity to replace or repair something in order for it to operate, that sort of thing. It prevents you from operating the vehicle until it’s fixed and the code removed.
So he said clearing codes won’t actually do anything for me.
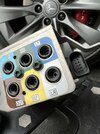
He did sit in the car and mess with the screen, he got under the hood where everything is removed and he could see clearly. He told me there’s a leak somewhere without a doubt, and that having it up on an alignment rack is the ideal way to spray the lines with soapy water.

With that in mind, I ended up swapping one of my front struts to a rebuilt oem strut, and another one arrives tomorrow and I’ll do the same at that time.
After the new strut install the car actually aired up much closer to level on both sides, for the first time in several weeks. Maybe some coincidence there, but after installing the other strut tomorrow, I’m going to reconnect the rear fittings and try again. If still no luck, I’ll figure out how to spray down the lines while the compressor runs.
 
Have you tried to drive the car and adjust the suspension while its in drive? Also have you done a brake pedal reboot? Also did you use any grease on the drill and tap while you were working to keep metal shards out of the strut area? Because if you didn't then some metal shavings could've punctured it.

I ask because i had a strut go wonky on me and after driving it like 10 feet in my driveway after rebooting it pumped itself up and no issues since.
On mine i had to pull off the whole strut to get my drivers side CV axle pulled out, the car was on jack mode and it looked fine after reassembly but as soon as i hit the button to take it off jack mode it went psssssssss!!!! loud as **** and that one strut dropped all the way down and i naturally did the oh *sugar* oh *sugar* oh *sugar* dance. then i just rebooted and backed it slowly down the driveway and it filled back up no problem.
 
Installed the second front strut today using thread tape anywhere I’m supposed to, and went back to the other front strut from yesterday to install thread tape there as well, using new check valves.
After applying thread tape on front struts I lowered the jack nearly 100% and turned off jack mode to have it air up so I can check for leaks. It won’t air up either front strut at all. Just the rear. Left and right rear are identical heights, front is on the floor.
Are the check valves I replaced the wrong kind? Or more likely, is there a practical way to get the compressor to fill up front bags?
 
Don’t use thread tape of any kind. You don’t want any pieces getting into the air lines. That’s why the Voss connectors are pre-installed on the valve block so that you just insert the line and pull back a little to seat it firmly into the collar inside the connector. That doesn’t explain why they’re not airing up, though.
Did the reserve tank fill up? Post a pic of the valve block you installed. Is the red SAS icon error present on the instrument cluster?
 
The car leveled out after several soft resets and power off’s. Sort of. It’s still lower on left than right. Also, on all four corners when I was measuring with digital calipers, the measurement decreased steadily, ~1mm every five minutes. Every corner! My theory is that the valve block is leaking air back into the compressor, maybe. If I remove the purple line from the valve block, spray it with soapy water, there shouldn’t be any air escaping, correct?

Here’s the caliper setup that’s attached to the rim and the fender, slowly decreasing.

Slow leak on every corner
Correct. Well, hopefully you meant remove the purple line at the compressor vs the block otherwise you’re spraying water into the block itself. The valve block stays in a closed state for all lines until it needs to open up fronts/rears to raise or opens up the black line to vent/lower.
If you used thread tape, I assume you reused the Voss connectors on each of the lines? Did you check that each collar at the tip of the lines was still in tact? With all corners slowly leaking now, the entire block should show some bubbles if it’s leaking. Can you post a pic of the block?
I believe it’s possible all corners have been leaking this way for a while. I have a spare valve block (both oem, but used).

My other concern might be explained easily, but compressor runs and runs sometimes and there’s no detectable leak at any height setting, and then it’ll purge through the vent line and continue to quietly empty air for several seconds. Yes, I have video
 

Attachments

  • BACB24C7-0665-47BC-B61E-ED23759F8338.jpeg
    BACB24C7-0665-47BC-B61E-ED23759F8338.jpeg
    521.2 KB · Views: 63
Last edited:
I believe it’s possible all corners have been leaking this way for a while. I have a spare valve block (both oem, but used).

My other concern might be explained easily, but compressor runs and runs sometimes and there’s no detectable leak at any height setting, and then it’ll purge through the vent line and continue to quietly empty air for several seconds. Yes, I have video
I had your second issue after my last compressor/block swap. Compressor would eventually therm trip and stop to cool down. I had to drive around a bit before it actually filled the tank, raise the car, and stop running the compressor. That’s when the SC had to clear codes and perform a calibration.
 
  • Like
Reactions: BostonBurley
I had your second issue after my last compressor/block swap. Compressor would eventually therm trip and stop to cool down. I had to drive around a bit before it actually filled the tank, raise the car, and stop running the compressor. That’s when the SC had to clear codes and perform a calibration.
I came out today and raised it up and it wasn’t on for very long, so I measured each wheel with the caliper again and they are all four maintaining height perfectly. I have one more fitting that needs thread tape and then I’ll spray test the compressor line. 218k miles combined with the other air suspension issues that cause the compressor to run… fingers crossed it just starts to work.

Good news is the rattle and knock of my other thread is gone after Suncore struts we’re removed. I would avoid Suncore front struts until they change their design.
 
Good to hear! However, I highly recommend you not use thread tape. Asking for trouble as when the tape breaks down/off, you run the risk of clogging the line. That’s why Voss connectors are used. It’s a two-piece design - a collar and the fitting itself.
I’m a perfectionist and thread tape was applied very nicely. A lot of fittings, like VOSS style, come with thread tape pre-installed. Even then they suggest adding 1-2 wraps of thread tape. The local air bag shop sells it. Shelf life on my shower head is about 20 years but I’ll see how it goes here. I’ve been steered to using it and believing in it compared to nothing at all. Just my experience thus far.
 
Correct. Well, hopefully you meant remove the purple line at the compressor vs the block otherwise you’re spraying water into the block itself. The valve block stays in a closed state for all lines until it needs to open up fronts/rears to raise or opens up the black line to vent/lower.
If you used thread tape, I assume you reused the Voss connectors on each of the lines? Did you check that each collar at the tip of the lines was still in tact? With all corners slowly leaking now, the entire block should show some bubbles if it’s leaking. Can you post a pic of the block?
So the compressor valve inlet is a one way valve? Just confirming bc I can’t find that information elsewhere.
 
The car is holding air and drivable I presume, but I need to level the suspension manually using the lowering links that took forever to initially level perfectly! My primary concern is just that the compressor runs for 30+ seconds and then purges, and also sounds like it’s under less load at times. It does raise the car as usual, it’s just that once it raised it keeps trying to do something and I don’t know what.
 
Anyone know the thread size for the oem valve box? I bought some new fittings with 1/8” npt and they go in a full turn and quickly tighten, unlike what’s on the car which seemed to snug all the way in.
It appears 1/8th” thread perhaps is what I need, but I can’t find fittings for non npt 1/8th…
 
Anyone know the thread size for the oem valve box? I bought some new fittings with 1/8” npt and they go in a full turn and quickly tighten, unlike what’s on the car which seemed to snug all the way in.
It appears 1/8th” thread perhaps is what I need, but I can’t find fittings for non npt 1/8th…
From epc to get the Tesla PN and then cross referencing, looks like thread size is M8?

VOSS quick connect system 203 / VOSS quick connection 203 / M8 / 4mm terminal