Welcome to Tesla Motors Club
Discuss Tesla's Model S, Model 3, Model X, Model Y, Cybertruck, Roadster and More.
Register

Master Thread: Definitive 14-50 NEMA Outlet Guide

This site may earn commission on affiliate links.
Love some thoughts on this (and yes my electrician is headed over tmrrw)

Had this installed today
1629896903808.png

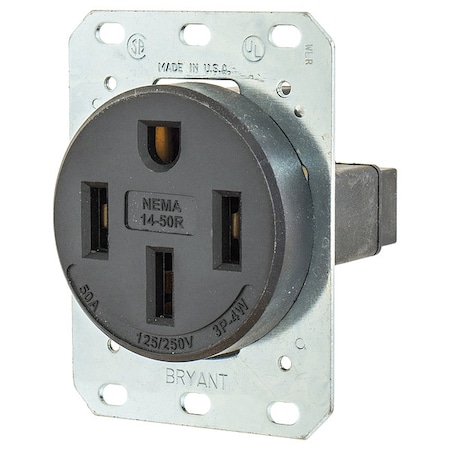
Had this 14-50 outlet installed at our house last month by a local electrical company (who was both recomended by Tesla as well as some locals I know), prior to getting the car. The home's previous owner was an electrician, and there was a junction box leading to an available 40a double pole breaker, meant for an EV charger. The outlet above is 2 ft around the corner from said box.

The 40a breaker is not new, our house has two panels, and the EV charger is on the older (original) panel, which also feeds the newer 100a panel.

Within the first week I had the car charging up from about half full - after 2 hours of charging ar 32A, the breaker tripped and charging stopped.

Electrician advised to lower to 30a in the car, and see if that fixes it. Said my breaker may be old.

Fast forward a month, no issues charging since, but last night same thing happened, breaker tripped after 2 hrs. After I reset the breaker, it charged up for another 45m until it was full.

Electrician this morning says:

"I wonder if it is what you suspected with that old style breaker being worn out. [and we can replace it in the older 200a panel]. The other thing we could do is flip that wire over to the 100 A panel and put a new 40A breaker in that panel. Let me know if this is something you want done and I will get a breaker on order."

Anyone else having this issue? Electrician is a "Tesla certified" who has done a number of installs in the area and seems good. He is going to take a look, but I want to see if anyone had a similar issue.
 
Within the first week I had the car charging up from about half full - after 2 hours of charging ar 32A, the breaker tripped and charging stopped.

Electrician advised to lower to 30a in the car, and see if that fixes it. Said my breaker may be old.
My suggestion is to replace the breaker. I once had a similar problem with a dryer. Two electricians swore up and down that the problem was the dryer. It was very old, and its matching washer gave up the ghost, so I replaced them both. The problem persisted. I replaced the breaker myself (it was quite easy, and cost about US$20 or $30, IIRC) and the problem went away. If you try this and it doesn't work, it's not all that much money wasted, and it's likely much cheaper than having an electrician come out to do anything at all.
 
  • Like
Reactions: KJD and canadaben
Yeah that's just a basic breaker. It's either overheating because of a bad connection (likely), or it's faulty (unlikely), or there are other things on that circuit that you are unaware of (very unlikely).

It might get so hot that it's noticeably troubling at the surface but most likely you'd need to turn off the 200A main on the right, remove the cover plate and touch the wires directly to confirm.
 
I have a question, im picking up my car next week and will be installing a NEMA 14-50 outlet this weekend. Does the car come with the NEMA 14-50 plug? I keep seeing conflicting info online. Thanks!
Not now. Until sometime in mid-2019, IIRC, Tesla did provide a NEMA 14-50 plug; but then they stopped doing so. You can buy one from Tesla for about $35, IIRC. (I just went looking to get a link, but I got an "access denied" error when trying to access Tesla's online shop. Maybe you'll have better luck.) Sometimes they're out of stock. If so, ask your Tesla store; they might have one locally. If that fails, try EVSEadapters.com; they sell their own compatible plug.
 
  • Like
Reactions: GrayFawkes
Not now. Until sometime in mid-2019, IIRC, Tesla did provide a NEMA 14-50 plug; but then they stopped doing so. You can buy one from Tesla for about $35, IIRC. (I just went looking to get a link, but I got an "access denied" error when trying to access Tesla's online shop. Maybe you'll have better luck.) Sometimes they're out of stock. If so, ask your Tesla store; they might have one locally. If that fails, try EVSEadapters.com; they sell their own compatible plug.
Perfect, Thanks!
 
Many many discussions on this topic, but I have been unable to determine some basics - sorry, but perhaps have just not read enough. What I have read is 'be sure to NOT get the Leviton 14-50. Instead Bryant or Hubbell. Does anyone know the difference between:

Other than price and all are 'not Leviton' I really can't tell which route to go. M3SR+ on order, getting EVSE set up but struggling to find best price/performance options.
Of course if there are better options (price/performance), I'm interested. Thanks for any help available.

I moved your post into the sticky thread on this topic. The first post includes a ton of information on specific outlets, etc.
 
  • Helpful
Reactions: Rocky_H
Go with the Bryant from Zoro, any of the "industrial grade" outlets are top notch.
And don't buy this sort of stuff from Amazon - their pricing is crazy.
Thanks for the very helpful advice. Totally clears up the issue of which 14-50 - I will go to zoro and get the Bryant. But...plates and boxes are also needed and confusing to me. I have read 'make sure the box is deep enough' and zoro.com seems to have plates/covers/boxes that apply, but (sorry) I would like it spelled out to make sure I am getting the right ones. So, I'll try to spell it out and see if someone can confirm. Thanks again for the help. Do I need all 3 of these and is the box big enough?
 
Yeah, there are two different box sizes: 4" and 4-3/4" and two different cover sizes: 2-1/8" and 2-1/2". And a thousand different ways to approximate those dimensions.
The box needs to be at least 30 cubic inches and the cover needs to be 2-1/2" for an industrial grade outlet like the Bryant.

You only need 2 of those 3 parts:
The first wall plate you linked is for an actual wall, use that if the box is going to be inside the wall and has a mud ring. The outlet mounts to the mud ring and the cover is just a cover, exactly like your 120V outlets.
The second part you linked is a cover that mounts to 4-3/4" boxes using 2 of the 4 oddly arranged screw holes, use that if the box is going to be outside the wall. In this case the outlet mounts to the cover and then the whole assembly is mounted to the box. It's a bit weird and for some reason only uses 2 of the 4 screws. That's just how it is.

At 42 cu. in. that setup will be plenty roomy. If you'd like to keep it minimal you can go down to a 4" box like this:
(also available in Tesla red)

With a cover plate like this:

And consider the 6-50R instead if you don't picture RV's ever blocking your driveway. It only requires 2 conductors instead of 3 and both the outlet and the UMC adapter are cheaper.
 
Last edited:
Yeah, there are two different box sizes: 4" and 4-3/4" and two different cover sizes: 2-1/8" and 2-1/2". And a thousand different ways to approximate those dimensions.
The box needs to be at least 30 cubic inches and the cover needs to be 2-1/2" for an industrial grade outlet like the Bryant.

You only need 2 of those 3 parts:
The first wall plate you linked is for an actual wall, use that if the box is going to be inside the wall and has a mud ring. The outlet mounts to the mud ring and the cover is just a cover, exactly like your 120V outlets.
The second part you linked is a cover that mounts to 4-3/4" boxes using 2 of the 4 oddly arranged screw holes, use that if the box is going to be outside the wall. In this case the outlet mounts to the cover and then the whole assembly is mounted to the box. It's a bit weird and for some reason only uses 2 of the 4 screws. That's just how it is.

At 42 cu. in. that setup will be plenty roomy. If you'd like to keep it minimal you can go down to a 4" box like this:
(also available in Tesla red)

With a cover plate like this:

And consider the 6-50R instead if you don't picture RV's ever blocking your driveway. It only requires 2 conductors instead of 3 and both the outlet and the UMC adapter are cheaper.
Wow, how helpful. Thanks so much. Great info. It sure seemed like only 2 of 3 parts were needed, but thanks for the mud ring info. I am running it through the wall (electric panel is on outside of garage wall and EVSE will be on inside, so very easy to just run it through the wall with the end product looking just like my flush to the wall mounted 120v outlets. I want plenty of room so no interest in 'going minimal'. In addition, I thought I knew what I wanted, so I already purchased Romex 6/3 so no savings to drop down to 2 wire. AND, thinking I knew what I was doing, bought Tesla's 14-50 adaptor as well (and, bought the Leviton 14-50 at Home Depot which I am now returning).

So, now still undecided about 14-50 or 6-50 (return my 14-50 adapter to Tesla and get the other one). But, likely it will just be easiest to just spend a little more although there will never be an RV outside. If I stick with 14-50 (certainly frustrating that zoro bothers to say 'frequently bought together' and then shows you the plug with 2 covers when you NEVER want both covers!), it seems like I want 4 things: plug, mud ring, box and wall cover. I have no reason for a 'minimal box' - the roomier the better.

Also it is frustrating that it is possible to post a wall plate with only the dimensions of the hole and ZERO outside dimensions! One of the reviews of the SS701 has a comment that the wall plate is 4.625 outside dimensions which sounds inadequate for a 4 11/16" box. I would like the extra room (bigger box - did not find a 4 3/4" but 4 11/16" is close enough) but don't want to buy a set of misfitting parts! I think I know my parts list if I go with the 4" box that you recommended:
Bryant 9450FR receptacle
Hubbell SS701 wall plate
4" box
4" mud ring

But, if I want the larger box (4 11/16"), I'm not finding a mud ring nor a wall plate that works - both the mud ring and wall plate seem suited for the 4" box and not finding either wall plate nor mud ring for 4 11/16" box.

As you can tell, I am floundering a bit as a raw newbie. No, I'm not trying a self install, but I am hoping to get all of the parts assembled and run the wire and have minimal electrician costs by having all the parts lined up for my specific application.

Lastly, if the wall plate doesn't work (not big enough), how crappy would it be to go with:
Bryant 9450FR plug

Throw some mud around and still do a flush mount? Or perhaps pull the box out a bit (1/8") and then mud around that?

Clearly the wall plate (with a flush mount) is the more finished look and it is only the garage, but a wall plate that doesn't cover the box is ridiculous. Thanks.
 
Yeah, they do a really poor job of dimensioning and describing electrical parts, much like plumbing and lumber.

The 4" mud ring you linked is actually for a 4-3/4" box as you can see from the dimensions. For a 4" box you'd use a ring like this which you can see has a much thinner perimeter flange. Note that mud rings come in different thicknesses to match your drywall. You probably have 5/8" drywall but here's a 1/2" mud ring in case your walls are thinner or you are unsure.

The standard in-wall installation would use a 4-3/4" box with mud covering the mud ring such that the final cover plate is resting on mud. You could do this but you'll need to tape the mud so it doesn't crack.

Or you can do it with a 4" box and not need to do any drywall work since the wall plate is big enough to cover a 4" box.

In either case it's not simple to do this all without drywall work:
- The 6/3 needs a cable clamp where it exits the main breaker box. You can legally use one of these snap-in plastic connectors to do it all from inside the panel as long as your panel has an available 3/4" knockout in a suitable location.
- The 4" box needs a cable connector too, but you can use a standard type here if preferred. Make sure it's the right size for your box knockouts.
- The main panel is mounted between studs so you'll have to do some very creative drilling unless your outlet is planned to be in the same wall cavity. Note that the space above the panel is crowded with wiring so it's not a great place to go poking around with a drywall saw. There's also at least one horizontal "fireblock" stud in there somewhere - probably right in your way.
- Code requires the 6/3 to be secured (e.g. stapled to the stud) within 12" of each box. Perhaps locating the boxes within 12" of each other is sufficient? Inspectors usually can't verify this anyway so it's not a big deal if this rule is ignored.
- These boxes aren't made to be mounted inside a cut hole like that so you'll have to be sure to cut the hole perfectly tangent to a stud and then drill some mounting holes in the box for screws to be driven in at an odd angle. Consider using an "old work" box that clamps to the drywall instead.

So at some point it may be simpler to just cut out a section of drywall and do it all from inside with a standard mounting flange-equipped 4-3/4" box and mud ring and everything, then put the drywall piece back in and do some spot tape/mud/texture/paint. Your electrician might do some of this for you.

And the simplest option may be to exit the rear of your main panel (it should have some knockouts on the back wall) and drill straight thru the drywall from there. Then surface-mount a 4" box over the drywall hole and connect them with a short conduit nipple so you can use THHN (or use cable clamps with NMB). Remove the face plate from your breaker box to see what options you may have. Note that Tesla and many other wall chargers have a rear-entry option so you could cleanly mount one in place of this 4" box instead.

Your "crappy" idea of using the 4-3/4" cover on an internal box is fine. But I'd mount the box flush with the wall and let the cover stick out since the cover needs to come off in order to service the outlet. It would look fine that way too - these outlets are pretty industrial looking anyway.
 
Last edited:
Yeah, they do a really poor job of dimensioning and describing electrical parts, much like plumbing and lumber.

The 4" mud ring you linked is actually for a 4-3/4" box as you can see from the dimensions. For a 4" box you'd use a ring like this which you can see has a much thinner perimeter flange. Note that mud rings come in different thicknesses to match your drywall. You probably have 5/8" drywall but here's a 1/2" mud ring in case your walls are thinner or you are unsure.

The standard in-wall installation would use a 4-3/4" box with mud covering the mud ring such that the final cover plate is resting on mud. You could do this but you'll need to tape the mud so it doesn't crack.

Or you can do it with a 4" box and not need to do any drywall work since the wall plate is big enough to cover a 4" box.

In either case it's not simple to do this all without drywall work:
- The 6/3 needs a cable clamp where it exits the main breaker box. You can legally use one of these snap-in plastic connectors to do it all from inside the panel as long as your panel has an available 3/4" knockout in a suitable location.
- The 4" box needs a cable connector too, but you can use a standard type here if preferred. Make sure it's the right size for your box knockouts.
- The main panel is mounted between studs so you'll have to do some very creative drilling unless your outlet is planned to be in the same wall cavity. Note that the space above the panel is crowded with wiring so it's not a great place to go poking around with a drywall saw. There's also at least one horizontal "fireblock" stud in there somewhere - probably right in your way.
- Code requires the 6/3 to be secured (e.g. stapled to the stud) within 12" of each box. Perhaps locating the boxes within 12" of each other is sufficient? Inspectors usually can't verify this anyway so it's not a big deal if this rule is ignored.
- These boxes aren't made to be mounted inside a cut hole like that so you'll have to be sure to cut the hole perfectly tangent to a stud and then drill some mounting holes in the box for screws to be driven in at an odd angle. Consider using an "old work" box that clamps to the drywall instead.

So at some point it may be simpler to just cut out a section of drywall and do it all from inside with a standard mounting flange-equipped 4-3/4" box and mud ring and everything, then put the drywall piece back in and do some spot tape/mud/texture/paint. Your electrician might do some of this for you.

And the simplest option may be to exit the rear of your main panel (it should have some knockouts on the back wall) and drill straight thru the drywall from there. Then surface-mount a 4" box over the drywall hole and connect them with a short conduit nipple so you can use THHN (or use cable clamps with NMB). Remove the face plate from your breaker box to see what options you may have. Note that Tesla and many other wall chargers have a rear-entry option so you could cleanly mount one in place of this 4" box instead.

Your "crappy" idea of using the 4-3/4" cover on an internal box is fine. But I'd mount the box flush with the wall and let the cover stick out since the cover needs to come off in order to service the outlet. It would look fine that way too - these outlets are pretty industrial looking anyway.
A huge thank you for your incredible quantity of information. I now have a plan. I so appreciate you taking the time to educate me.

FYI - the destination is 1 wall cavity over and about 6-7 feet up. The main panel is below garage floor level. I have my cable connectors for passing through each box. I will do drywall work. For sure, my drywall saw will not be where wires are, but thanks for pointing out the danger. Mud rings don't matter if there is no covering wall plate (and I want a larger box), so my plan is the 'crappy' plan that you closed with. Thanks again.