Welcome to Tesla Motors Club
Discuss Tesla's Model S, Model 3, Model X, Model Y, Cybertruck, Roadster and More.
Register

Model 3 AC Smell Update...

This site may earn commission on affiliate links.
All these AC Evaporator cleaners usually have a hose and nipple to squirt it up from underneath the car. Has anyone tried going that route versus squirting in through the filter area?
No, better to let gravity do the work for you. Foaming the coil from the top is ideal as the foam will travel down the coil and eventually run out the drain. You would likely never get foam to the top of the coil from the drain.
 
  • Like
Reactions: android04 and sa012
No AC issues in 33 months, but got some new filters anyway. Having said that, I had no idea how to remove that one orange power cable clipped to the plastic cover, but I was able to push the cover to the side, anyway to finish the install.
IMG_2296.jpeg
 
No AC issues in 33 months, but got some new filters anyway. Having said that, I had no idea how to remove that one orange power cable clipped to the plastic cover, but I was able to push the cover to the side, anyway to finish the install.
View attachment 705595
Same. Hard as I tried I couldn’t get those clips off for the life of me. I didn’t want to snap/break them. Pushed it to the side as well. Would have been nice out of the way and unclipped but nevertheless.

Ski
 
  • Funny
  • Like
Reactions: TSteve and KenC
I have the Vinegar smell when the AC starts up.
So I put in a service call on my M3 which I picked up in May of this year.
Told Tesla that I think because of newness of car, is should be under warranty.
I received a bill estimate of $152, so no-go on doing this under warranty.
I ordered the 2 filters from Tesla and the can of Kool-It, I have a set of torn wrenches so I will do it myself when the parts arrive and save $100.
 
Replaced my 3's filter with a cheap Amazon filters and Tesla OEM filter on the Y this summer, both stunk (has never been a summer that didn't end up stinking).

The 3 is starting to stink again, so as suggested the newer redesigned Tesla OEM filters may be better.

Since we only have a month or so left of hot humid weather I will probably wait until spring to replace the 3 filter with OEM.

If the Y filter stinks again I will try one of the aftermarket filters that have a plastic casing.
 
I addressed this yesterday on my 21. I could faintly smell it over the last week, it usually drive with windows down. Wife got in car yesterday and refused to drive in it again till smell was gone. So I had ordered a few filters and a can of evap spray from Amazon a few months back before the car came in. What a differance, car smells so fresh again. And side note. They have moved the cover bolt from the top to the bottom and re routed the orange power cable. Making the swap super easy.
IMG_20210906_133316.jpg
IMG_20210906_133316.jpgIMG_20210906_131536.jpg
 

Attachments

  • IMG_20210906_131450.jpg
    IMG_20210906_131450.jpg
    716.4 KB · Views: 95
  • IMG_20210906_130740.jpg
    IMG_20210906_130740.jpg
    588.5 KB · Views: 124
  • Informative
  • Like
Reactions: ss71 and KenC
I addressed this yesterday on my 21. I could faintly smell it over the last week, it usually drive with windows down. Wife got in car yesterday and refused to drive in it again till smell was gone. So I had ordered a few filters and a can of evap spray from Amazon a few months back before the car came in. What a differance, car smells so fresh again. And side note. They have moved the cover bolt from the top to the bottom and re routed the orange power cable. Making the swap super easy. View attachment 706298View attachment 706298View attachment 706299
Do you mean they have moved the T20 bolt to the bottom of the cover?
 
Today I bought the 2 filters at my local service center. They appear to look a little different than previous ones.
1. Only one tab which is mounted at top vs. 2 tabs
2. Filter is not yellow on one side but rather a similar black and white on both sides. There are arrows on the side of the filter showing mounting direction of course.
3. Just an observation, Tesla must be aware of the odor/smell issue, these seem to have more charcoal in them than the older style.
4. They seem rather substantial because they have firm sides all around.

I am going to install later and using the Kool-It evaporator coil spray. Will report back
 

Attachments

  • EB656FFA-86A1-4A20-90D2-9D28C20174A6.jpeg
    EB656FFA-86A1-4A20-90D2-9D28C20174A6.jpeg
    401.3 KB · Views: 108
  • E148AE16-B93F-4C76-84F8-755058729A7B.jpeg
    E148AE16-B93F-4C76-84F8-755058729A7B.jpeg
    398 KB · Views: 87
Today I bought the 2 filters at my local service center. They appear to look a little different than previous ones.
1. Only one tab which is mounted at top vs. 2 tabs
2. Filter is not yellow on one side but rather a similar black and white on both sides. There are arrows on the side of the filter showing mounting direction of course.
3. Just an observation, Tesla must be aware of the odor/smell issue, these seem to have more charcoal in them than the older style.
4. They seem rather substantial because they have firm sides all around.

I am going to install later and using the Kool-It evaporator coil spray. Will report back
I just ordered four of them and they look like yours. One tab and black coloring on both sides. 04/25/2021 build dates on the filters.
 
Today I bought the 2 filters at my local service center. They appear to look a little different than previous ones.
1. Only one tab which is mounted at top vs. 2 tabs
2. Filter is not yellow on one side but rather a similar black and white on both sides. There are arrows on the side of the filter showing mounting direction of course.
3. Just an observation, Tesla must be aware of the odor/smell issue, these seem to have more charcoal in them than the older style.
4. They seem rather substantial because they have firm sides all around.

I am going to install later and using the Kool-It evaporator coil spray. Will report back
Tesla recently updated the filters and the part number shows that they are a new revision. Hopefully they help with the stinky smell that some people have been getting.
 
I'm skeptical about all the focus on the filter material as a potential fix because when I removed the filters from my smelly car, the filters didn't smell at all. And air in the vents continued to smell after removing the filters (I left them out for a few days to see if the smell would diminish). So, at least in my case, the filters did not appear to be directly involved with the smell.
 
My June 22, 2021 build is starting to get smelly already. I’ve left it on auto during the entire ownership so far. I’ve driven about 4,000 miles. I wipe my upholstery down every wash, which is about every 3-4 weeks, so it’s not due to neglect or spills. I don’t think the new filters do much.
 
  • Informative
Reactions: jsmay311
As I stated in a earlier post, I would update on the matter.

So today I changed the 2 cabin filters and used Kool-It evaporator coil spray because after just 4 months I had that vinegar smell in the car when the AC started up. It did not matter whether the AC was on re-circ or not. So here are some observations, not in any particular order:

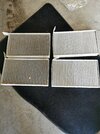
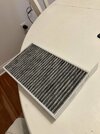
1. The Model 3 filters which I purchased (2 of them) from the service center look a little different. There is no more yellow on one side. I will post a picture, front and back of the new filters.
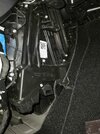
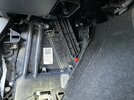
2. I viewed many YouTube videos how to do this and they were quite helpful, but none are up to date on the model year 2021. Tesla has hidden or moved the orange high voltage wires so you do not have to move them out of the way, they are just not there anymore. Second, the door screw is now at the bottom of the door, not the top, so it is easier to reach and unscrew with a Torx #20 screwdriver. I used the screwdriver most of the way and then the final turns by hand, did not want to drop the screw and not find it.
3. There is some discussion that the quantity of foam in the Kool-It can is not enough and you should buy 2 cans. I used one and was satisfied. So did it work and clean? I think so, my driveway had a pretty good size stream and puddle of water, but when the water started to dry I did notice some sludge or brown tint to the water so I think it did clean. The smell is gone and replace by a faint fragrance of the cleaner. The question will be if it lasts, can’t answer that now. I hope so.
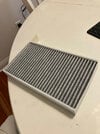
4. I live in the NYC area and my car is garaged each night and always in the garage when not in use during the day, but the filters were just loaded with debris and dust balls. I should note my car is only 4 months old! So when I looked at these filters, they really needed to be changed.
5. The whole job took about 1 hr start to finish. If I had to do it again it would probably be about 40-45 minutes. I did let the spray cleaner sit on the coils and do their job for 30 minutes. Then I put the cabin filter door back and ran the fan on low speed for about 5 minutes. The car has been used a few times today since this project and there is no smell of vinegar. Also the filters that were removed did not smell so definitely it was on the evaporator coils. Opened the filter door and inserted the new filters, they dropped in easily and seem to be snug.
6. When I went to remove the panel below the glove box instead of 4 pin type fasteners, there were only 3 fasteners. Either they are only using 3 or one was missing. There is a hole for the 4th one so I will be taking a trip to the nearby service center and asking them for a pin fastener. When removing them I used a straight edge screw driver on a few and just my nails on one, they were easy to remove. When re-inserting, I pushed the outer piece in first and then the middle piece, it was easier to insert this way. When I lowered the glove box piece, I did not have to remove the 2 wires, just slid the panel to the side and had plenty of room. It is a little tricky lining this piece back up, so be patient but the front grooves do slide under the main piece. It only goes on one way.
7. Putting the side passenger panel back was also easy. Make sure that all the clips are on the panel, 2 of my clips remained and I just pulled them off and re-inserted on the panel. It took a little doing to line it all up, but once lined up it snapped easily into place.

That’s it. Will the smell go away? Time will tell.

The first picture is one side of the new filter, the second picture is the flip side, third picture is the original dirty filter removed and the last picture of dust and debris in the old filter. Both old filters were dirty and filled with dust balls.
C48A8F8D-9F78-4899-94D4-1AB335C58B64.jpeg
70C4DEBF-7521-46C3-936B-05ABE0848EB0.jpeg
40224CA4-E36C-4B46-AB69-AC66E826CA0A.jpeg
5E24F8FD-5AB1-477D-9791-DAD510A8F55F.jpeg
 
Last edited: