As an update, I believe I have found the perfect light strip for my dashboard (to compliment the console light strips that I am currently using from SUMK). This light strip is from a seller on AliExpress. Link provided below. As mentioned in one of my previous posts, I did not use/install SUMK’s dashboard lights because it is a 2-piece design and simply looks bad.
Smarter Shopping, Better Living! Aliexpress.com

www.aliexpress.com
Below are some photos of this other/new light strip. It is a little thinner than the one from SUMK and a lot thinner than the light tubes supplied by most other manufacturers/light kits out there. As you can see, the design/shape of this light strip is also much different than the others… and that is a good thing especially for the dashboard.
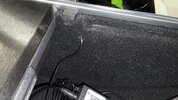
This light strip consists of two parts: 1) an inner tube which is about 1.5 mm in diameter, and 2) a thin flat acrylic strip
The inner tube is attached to the thin flat strip with a silver colored foil/tape. This tape covers the entire inner tube and most of the thin flat strip, except for the edges. So, when this light strip is install in your trim work, it is not the tube that is lit/seen. Instead, what is lit and seen is only the thin edges of this light strip, which I estimate to be about 1 mm in thickness. The second photo below is taken at an angle which shows the edge of the exposed strip. The benefit of this type of design is it produces a much cleaner and more defined light effect. A very ”refined” look, compared to the typical light tube that is used by everyone else.
View attachment 759583
View attachment 759587
In my opinion, this light strip is the perfect type to use for the dashboard. As you can see from the additional photos shown below, they look fantastic when on… and are so thin/discreet that they also look great during the day when off. For me, the larger 3 mm diameter round tubes that are used in all the other light kits, can look a little cheesy at times. By contrast, this one looks sleek under all conditions.
So, in summary, I have the SUMK light strips on my dashboard and the thin acrylic light strips from AliExpress on my dashboard.
Final note: For the dashboard, I have light emitters on both ends/sides of the dashboard, so the light output across the entire dashboard is more uniform/consistent.
ON:
View attachment 759602
OFF:
View attachment 759603
ON:
View attachment 759605
OFF:
View attachment 759611
ON:
View attachment 759615
OFF:
View attachment 759616
CONSOLE LIGHTS ON:
View attachment 759617
CONSOLE LIGHTS OFF:
View attachment 759618