


The Tesla Owners Club of Kansas City decided to hold a Model 3 day on 3/3/18 to celebrate some members having recently taken delivery of their new Model 3's and to give Jon Cummins at Detail Auto an opportunity to showcase some of the ways in which you can protect and enhance a Tesla Model 3. Jon graciously opened his shop to our members for almost 5 hours and supplied food, beverages and a wealth of information about XPEL paint protection film, window tint and ceramic coatings. This article will feature information on the event and the XPEL installation in particular.
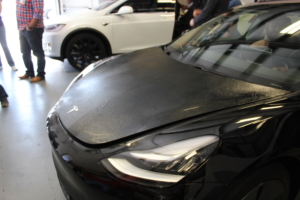
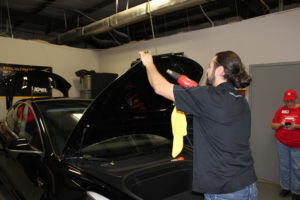
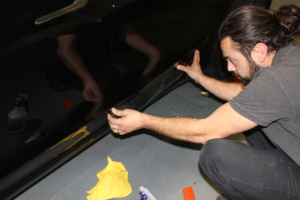
I brought my black Model 3 to Jon a couple of hours prior to the event so that he could prep it for the installation. Prep work included items such as degreasing the car, washing it thoroughly and where necessary performing minor buffing and paint correction work prior to the installation of the film. Here are a few pictures of the prep work:
[caption id="attachment_556" align="alignnone" width="300"]
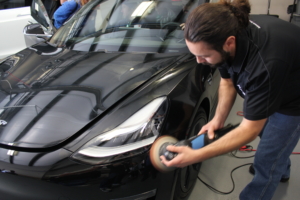 Light buffing work[/caption][caption id="attachment_557" align="alignnone" width="300"]
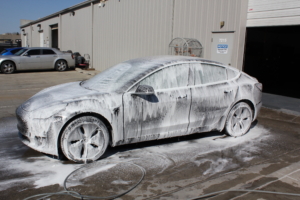 Thorough wash and cleaning first[/caption]
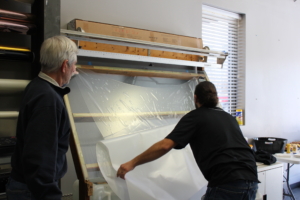
Once the car was cleaned up it was dried off and brought into the shop so that Jon could examine the paint and where necessary buff out any imperfections. Jon has a large plotter at his shop which is attached to a PC that contains patterns for all sorts of cars. Jon simply downloads the necessary pattern from XPEL and his plotter will cut the film to the exact dimensions necessary. By handling the patterns on the computer first, Jon can make the best use of the material available to him that comes on large rolls. Since the material can be expensive, Jon is able to keep waste to a minimum by arranging the pattern pieces on the computer first before cutting. The material that I chose for my car is the new XPEL Ultimate self-healing film. See XPEL ULTIMATE PLUS - XPEL Technologies Corporation for more details on the film and its amazing properties. At one point Jon even demonstrated on a sample piece of film that you can score it, heat it up with a hair dryer and the film will heal itself and remove the prior damage by flowing to fill itself in. The process takes a little longer in the sun, but the principle remains the same.
[caption id="attachment_558" align="alignnone" width="300"]
 Jon explains the plotter and material[/caption][caption id="attachment_559" align="alignnone" width="300"]
 Jon removing hood pattern[/caption]
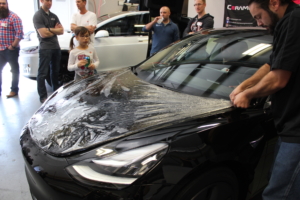
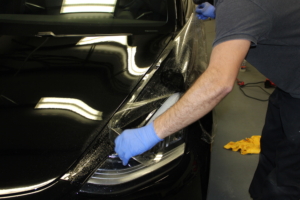
The first piece that Jon demonstrated installing on my Model 3 was the piece for the hood. XPEL offers a variety of patterns, for example fellow club member Ian decided to have 1/2 of his hood covered with XPEL whereas I chose to have the entire hood covered and the edges wrapped. My choice was more expensive but I mention the variations so that other owners know that they have a choice in terms of how much coverage they would like and what will fit their budgets. When Jon first applied the XPEL to the hood several members in attendance wondered out loud how it could possibly end up being invisible because bubbles and the material could easily be seen. Here are some pictures of that process:
[caption id="attachment_560" align="alignnone" width="300"]
 Jon wets the hood down first[/caption][caption id="attachment_561" align="alignnone" width="300"]
 Jon lays the XPEL down[/caption][caption id="attachment_562" align="alignnone" width="300"]
 Jon begins to smooth out the film[/caption]
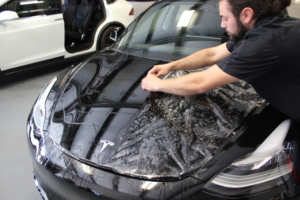
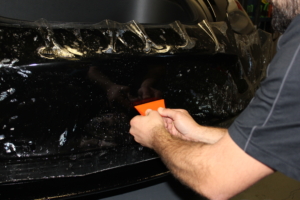
As you can see in the photos Jon is working the film from center to edge to slowly work the fluid under the film that activates the adhesive out from underneath. This is one of the places where experience really pays off, if you don't get it right you have to pull up the material and start over again. It is also preferable to have as little fluid still left under the film and a good installer knows the tricks of getting the film to lay down quickly before the adhesive really sets up. Once the main portion of the piece has been worked down then the edges are tended to. In my case the pattern was printed slightly larger to leave extra material available for wrapping the edges around wherever possible. I find this really helps hide the film and keeps any edges from being exposed to the elements. Here are some pictures of Jon wrapping the edges and using a heat gun to help the edges stay down along with a picture of the finished hood that shines every bit as well as the painted hood, but offering great protection:
[caption id="attachment_563" align="alignnone" width="300"]
 Finished hood[/caption][caption id="attachment_564" align="alignnone" width="300"]
 Jon laying down the edges[/caption]
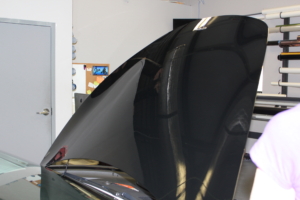
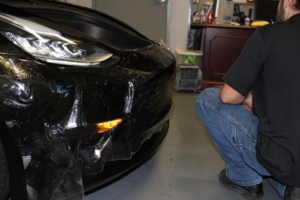
One of the other signs of a good installer is their ability to lay down complex shapes on compound curves and the Model 3 front bumper is an example of a pattern that takes a high degree of skill to install properly. This is not something you want to try at home! There are also some installers that prefer to use raw material from the roll and cut the material on the car to the exact dimensions in case the pattern varies slightly from the car or vice-versa. It takes a very skilled installer to that degree of custom work and not mess up the material or the car. I am happy to report that Jon can do either, install a complex pattern, or cut the material by hand and perform an entirely custom install. Here are some pictures of him working on the front bumper of the Model 3:
[caption id="attachment_565" align="alignnone" width="300"]
 laying the material on the bumper[/caption][caption id="attachment_566" align="alignnone" width="300"]
 material in place[/caption][caption id="attachment_567" align="alignnone" width="300"]
 working on alignment and removing the fluid[/caption][caption id="attachment_568" align="alignnone" width="300"]
 stretching multiple ways to make it fit[/caption][caption id="attachment_569" align="alignnone" width="300"]
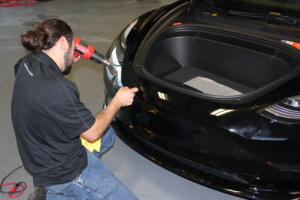 Using a heat gun to get the material to lay down[/caption]
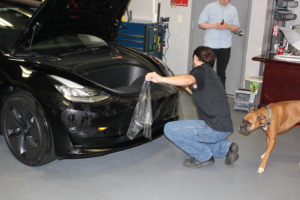
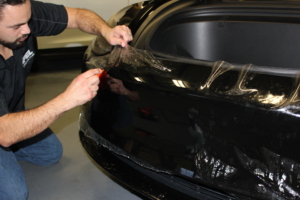
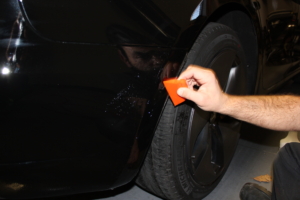
One of the things I like about XPEL is that they have coverage for nearly the entire painted surface of your car. I mentioned previously that I decided to do the entire hood, but I also decided to do some additional XPEL pieces in other areas of the car. I based my decision on having XPEL installed on prior cars as well as seeing what sort of damage is done to cars by every day driving and road debris. I ended up getting XPEL installed in the following areas: Entire hood, front bumper, both front fenders, both side mirrors, both side rocker panels, the lower portion of all doors, behind the rear wheels and the top of the bumper where the trunk opens. Here are some pictures of Jon installing some of those additional pieces for me:
[caption id="attachment_570" align="alignnone" width="300"]
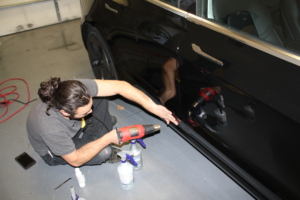 Lower rocker panel install[/caption][caption id="attachment_571" align="alignnone" width="300"]
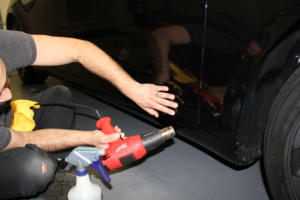 Rocker meets front fender[/caption][caption id="attachment_572" align="alignnone" width="300"]
 lower portion of the doors[/caption][caption id="attachment_573" align="alignnone" width="300"]
 Front fender install[/caption][caption id="attachment_574" align="alignnone" width="300"]
 fender close up[/caption][caption id="attachment_575" align="alignnone" width="300"]
 Behind the rear wheels[/caption]
My goal was basically to have every surface of the car that would commonly be impacted by road debris covered with XPEL and I believe that Jon achieved that goal with the primary kit and additional pieces that I had him add, all of which were available as patterns directly from XPEL. There was another member in attendance at the event with a white Model X that had every painted surface of the X covered in XPEL so it is possible to have complete coverage if that is what you are trying to achieve. One of the things I liked about working with Jon was that he was flexible in terms of what he installed, he was willing to listen to what my needs/desires were and then install the material accordingly. Some installers only want to install basic kits or want you to install pieces/kits that you might not really need based on your driving habits, mileage and environment. Jon's flexibility is something I think a potential buyer should look for. Since this event, I have had several club members ask me about installing XPEL and how much will it cost. My answer is always the same. I recommend they talk to Jon about what they are trying to achieve, what their budget is and then work towards a solution together. That might make the install $500, or it might make it $3,000 depending on what all is involved. I can say that in my years of having XPEL on multiple cars that I've never been disappointed in the material's ability to protect the paint. I have also had a number of installers throughout the years from Florida, Illinois and Kansas and I can tell you that Jon ranks among the best and we are lucky to have him here locally in KC. Jon is also good about making sure the customer is happy and that the work is done right, if there is a problem you can always bring it back and he will work with you to fix it. I'd like to thank XPEL for making the awesome Ultimate film and working with Jon to get it installed on my Model 3 in time for the Model 3 day event. If you have any questions, comments or concerns please leave them in a reply below.
I brought my black Model 3 to Jon a couple of hours prior to the event so that he could prep it for the installation. Prep work included items such as degreasing the car, washing it thoroughly and where necessary performing minor buffing and paint correction work prior to the installation of the film. Here are a few pictures of the prep work:
[caption id="attachment_556" align="alignnone" width="300"]
Once the car was cleaned up it was dried off and brought into the shop so that Jon could examine the paint and where necessary buff out any imperfections. Jon has a large plotter at his shop which is attached to a PC that contains patterns for all sorts of cars. Jon simply downloads the necessary pattern from XPEL and his plotter will cut the film to the exact dimensions necessary. By handling the patterns on the computer first, Jon can make the best use of the material available to him that comes on large rolls. Since the material can be expensive, Jon is able to keep waste to a minimum by arranging the pattern pieces on the computer first before cutting. The material that I chose for my car is the new XPEL Ultimate self-healing film. See XPEL ULTIMATE PLUS - XPEL Technologies Corporation for more details on the film and its amazing properties. At one point Jon even demonstrated on a sample piece of film that you can score it, heat it up with a hair dryer and the film will heal itself and remove the prior damage by flowing to fill itself in. The process takes a little longer in the sun, but the principle remains the same.
[caption id="attachment_558" align="alignnone" width="300"]
The first piece that Jon demonstrated installing on my Model 3 was the piece for the hood. XPEL offers a variety of patterns, for example fellow club member Ian decided to have 1/2 of his hood covered with XPEL whereas I chose to have the entire hood covered and the edges wrapped. My choice was more expensive but I mention the variations so that other owners know that they have a choice in terms of how much coverage they would like and what will fit their budgets. When Jon first applied the XPEL to the hood several members in attendance wondered out loud how it could possibly end up being invisible because bubbles and the material could easily be seen. Here are some pictures of that process:
[caption id="attachment_560" align="alignnone" width="300"]
As you can see in the photos Jon is working the film from center to edge to slowly work the fluid under the film that activates the adhesive out from underneath. This is one of the places where experience really pays off, if you don't get it right you have to pull up the material and start over again. It is also preferable to have as little fluid still left under the film and a good installer knows the tricks of getting the film to lay down quickly before the adhesive really sets up. Once the main portion of the piece has been worked down then the edges are tended to. In my case the pattern was printed slightly larger to leave extra material available for wrapping the edges around wherever possible. I find this really helps hide the film and keeps any edges from being exposed to the elements. Here are some pictures of Jon wrapping the edges and using a heat gun to help the edges stay down along with a picture of the finished hood that shines every bit as well as the painted hood, but offering great protection:
[caption id="attachment_563" align="alignnone" width="300"]
One of the other signs of a good installer is their ability to lay down complex shapes on compound curves and the Model 3 front bumper is an example of a pattern that takes a high degree of skill to install properly. This is not something you want to try at home! There are also some installers that prefer to use raw material from the roll and cut the material on the car to the exact dimensions in case the pattern varies slightly from the car or vice-versa. It takes a very skilled installer to that degree of custom work and not mess up the material or the car. I am happy to report that Jon can do either, install a complex pattern, or cut the material by hand and perform an entirely custom install. Here are some pictures of him working on the front bumper of the Model 3:
[caption id="attachment_565" align="alignnone" width="300"]
One of the things I like about XPEL is that they have coverage for nearly the entire painted surface of your car. I mentioned previously that I decided to do the entire hood, but I also decided to do some additional XPEL pieces in other areas of the car. I based my decision on having XPEL installed on prior cars as well as seeing what sort of damage is done to cars by every day driving and road debris. I ended up getting XPEL installed in the following areas: Entire hood, front bumper, both front fenders, both side mirrors, both side rocker panels, the lower portion of all doors, behind the rear wheels and the top of the bumper where the trunk opens. Here are some pictures of Jon installing some of those additional pieces for me:
[caption id="attachment_570" align="alignnone" width="300"]
My goal was basically to have every surface of the car that would commonly be impacted by road debris covered with XPEL and I believe that Jon achieved that goal with the primary kit and additional pieces that I had him add, all of which were available as patterns directly from XPEL. There was another member in attendance at the event with a white Model X that had every painted surface of the X covered in XPEL so it is possible to have complete coverage if that is what you are trying to achieve. One of the things I liked about working with Jon was that he was flexible in terms of what he installed, he was willing to listen to what my needs/desires were and then install the material accordingly. Some installers only want to install basic kits or want you to install pieces/kits that you might not really need based on your driving habits, mileage and environment. Jon's flexibility is something I think a potential buyer should look for. Since this event, I have had several club members ask me about installing XPEL and how much will it cost. My answer is always the same. I recommend they talk to Jon about what they are trying to achieve, what their budget is and then work towards a solution together. That might make the install $500, or it might make it $3,000 depending on what all is involved. I can say that in my years of having XPEL on multiple cars that I've never been disappointed in the material's ability to protect the paint. I have also had a number of installers throughout the years from Florida, Illinois and Kansas and I can tell you that Jon ranks among the best and we are lucky to have him here locally in KC. Jon is also good about making sure the customer is happy and that the work is done right, if there is a problem you can always bring it back and he will work with you to fix it. I'd like to thank XPEL for making the awesome Ultimate film and working with Jon to get it installed on my Model 3 in time for the Model 3 day event. If you have any questions, comments or concerns please leave them in a reply below.
