So my S90DL was making some clunking noises from the front under hard acceleration and while turning, I got under the car and noticed the CV boot was torn, all the grease slung out, and was certainly the issue cause of the noise.

Tesla took the car and diagnosed the same thing, but said CV axles were not covered under the powertrain warranty since it's a wear item (like brakes and tires) and would be $2,500 to fix. I thought that was BS, so I looked around online and saw this company was selling axles for these cars, and for a very reasonable price. TrakMotive Announces New CV Axles For The 2012-18 Tesla Model S | Aftermarket Intel
My other option was a used ebay axle, but I didn't really want to throw in something that might be worn out too.
So rockauto had one of the trakmotive axles for $250, I bought it and put it in. It wasn't too difficult, but I would say the passenger side front axle would be easier as there is more room on that side.
The process for the front CV axles are like this:
I didn't use the washer from the new axle, I used the old nord lock washer that was on there. I tightened up everything with a weak air impact gun and finished it up with a 1/2" breaker bar. I'm not sure what the torque values are, but I tightened up everything to at least as tight as they were to take off. These are big fasteners and you aren't going to hurt anything putting a breaker bar on them. Axle nut is supposed to be like 180ft lbs, so I just used my body weight on the breaker bar to tighten the nut (it's a bit more than a foot). It was much easier to get off, maybe 60 ft lbs, so it might be worth it to go around and check your other axle nuts.
The new axle is nice and quiet again! So hopefully problem solved for 1/10 the price. This took me about 2 hours, but I was drinking IPAs and using the tools I have at home rather than the tools I have at my shop, so it could be done faster. The removing of unnecessary parts and struggling with the old axle was the hardest part. This is about a 5/10 difficulty.
Tesla took the car and diagnosed the same thing, but said CV axles were not covered under the powertrain warranty since it's a wear item (like brakes and tires) and would be $2,500 to fix. I thought that was BS, so I looked around online and saw this company was selling axles for these cars, and for a very reasonable price. TrakMotive Announces New CV Axles For The 2012-18 Tesla Model S | Aftermarket Intel
My other option was a used ebay axle, but I didn't really want to throw in something that might be worn out too.
So rockauto had one of the trakmotive axles for $250, I bought it and put it in. It wasn't too difficult, but I would say the passenger side front axle would be easier as there is more room on that side.
The process for the front CV axles are like this:
- Put the car in jack mode, jack it up and take the wheel off. I used some big chunks of wood for jack stands because my jack stands are at my shop. You shouldn't need to be under the car here, all the work is done from the side or the frunk.
- Remove the axle nut. This would have been easy with an impact gun, as mine was very loose. The nord-lock washer was surprisingly easy to overcome with a breaker bar. If yours is tighter, pop the center cap out of the wheel, reinstall the wheel, lower the car back on the ground and use a breaker bar to remove the nut. This is a 32mm nut, but a 1-1/4" socket fit on it just fine.
- Remove the steering tie rod nut, both lower control arm nuts, and the lower sway bar end link nuts. You'll need e torx bits for the control arms, allen wrench for the sway bar end link, and 21mm and 15mm wrenches. Of if you're like me and don't have a 21mm box wrench, a regular adjustable crescent wrench. A 1/2" impact gun will break all these nuts loose and it's easy to remove them with the torx/allen and box wrench combo after that.
- When all the nuts are off, push the control arms and links down to get the studs out of the spindle. The spindle should be all loose and floppy on the upper control arm so you can pull it away. You should be able to push the CV axle out of the hub now by pulling the floppy spindle towards you and pushing the threaded end of the cv out of the hub. You don't have to remove the brake caliper or rotor or anything. Move the spindle out of the way towards the rear of the car, maybe a bungie or ratchet strap would help here.
- Remove the lower strut bolt from the lower control arm. You will need to be able to swing the strut out of the way a bit to get the end of the axle out of the hole. These are 21mm iirc.
- Remove the frunk pan. This is tricky, the carpety bit comes out first, but be sure not to break the connectors going to the light and hostage escape button. There are a couple of nuts and bolts holding the plastic frunk pan in the car. Once these are out, there are metal clips around the perimeter that can be wiggled around until they clear the plastic trim around the frunk area. Get creative moving the frunk pan around, or you could just remove all the plastic trim surrounding the frunk pan. I left mine in because some dealership asshat broke/lost most of the clips holding that stuff on and I didn't want to break any more.
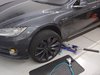
- This is the tricky bit, and you're going to have to get super creative here. The driver side axle has almost no room to get a prybar or any kind of normal tool in there to pry the axle out of the differential. On the driver side, you'll have to pull off the velcro on the noise insulation covering the drive unit and move it out of the way. The only real spot to pry is under that bracket in the picture. The passenger side looks much easier as the axle is on a jackshaft. These axles, like most axles, have a little metal spring circlip that retains the axle in the diff, and they need a little prying to get the axle to pop out. You may need to rotate the axle here to get the clip in it's happy place to pop out. This is 100% the hardest part of the job. I ended up using the end of a wrench with a crescent wrench added to the end for extra leverage to get in that spot to pop it out. When it finally did come out, a tiny amount of oil came out of the hole and made a small mess on the floor (good thing I have epoxy floors). Maybe a couple oz of fluid leaked out, enough to be absorbed by a small rag, and not enough to cause any damage to the differential, but you could always do a flush now and put the right amount in the diff. If you jack your car up more than I did you could probably get away without losing any fluid at all.
- Pull the old axle out of the hole, move the dangling strut around to get the CV end out of there. Slide the new axle into the old hole and wiggle it until it finds the matching splines and starts sliding in. The circlip is going to be a problem here too as you'll have to use the axle as a slide hammer to get the circlip to slip past the splines. The axle should go in fairly easily with gentle tapping with the axle shaft. Don't yank the axle shaft out too far as you'll pull the CV apart inside the rubber boot and have to jam it back together like I did. When the axle is fully seated, you should be able to reach in there and feel the axle able to slide in and out of the differential maybe a few mm before hitting the stops. If it's still tight feeling, the circlip probably isn't fully inserted and seated. Your prybar arrangement from step 7 should not be able to easily move the new axle back out of the differential. Keep rotating the axle and slide hammering it in until it clicks in place and can't be pulled back out (again, don't use the axle to pull on it, you'll pull the CV apart in the boot).
- Reverse the steps to put it back together. Take some time to look around the frunk to see if anything is out of place or broken. I found some neat blue painters tape on the subframe that I'm not sure why it was there. I took a whole bunch more stuff off that I ended up not needing to because I thought I could get to the axle prying spot from the bottom. That's why my skidplate shields are off in the pictures.
I didn't use the washer from the new axle, I used the old nord lock washer that was on there. I tightened up everything with a weak air impact gun and finished it up with a 1/2" breaker bar. I'm not sure what the torque values are, but I tightened up everything to at least as tight as they were to take off. These are big fasteners and you aren't going to hurt anything putting a breaker bar on them. Axle nut is supposed to be like 180ft lbs, so I just used my body weight on the breaker bar to tighten the nut (it's a bit more than a foot). It was much easier to get off, maybe 60 ft lbs, so it might be worth it to go around and check your other axle nuts.
The new axle is nice and quiet again! So hopefully problem solved for 1/10 the price. This took me about 2 hours, but I was drinking IPAs and using the tools I have at home rather than the tools I have at my shop, so it could be done faster. The removing of unnecessary parts and struggling with the old axle was the hardest part. This is about a 5/10 difficulty.