berkeley_ecar
S 90D (fully loaded) delivered 18 Mar 2017
What was your final solution for the power connection? Custom harness or splicing wires? Thanks!
There was no "final solution" to the wiring, as I was busy, and I was so pleased to have the visor extensibility feature (which was my main motivation for purchasing the visors) that I have not yet completed the electrical wiring. I do hope to complete this task, and this is the path I've followed thus far:
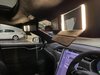
1) I tracked down the manufacturer of the power connector used by the new illuminated visors, and had a number of cable pairs made using the appropriate connector (I have extras and am willing to sell them to other DIYers for $12 a set, PM me if interested). They plug into the connectors on the visors (no cutting or modification of the visor is required), and are long enough to run to the overhead central microphone housing, with length to spare.
2) I installed one visor myself (without wiring), and then decided I did not want (at that moment) to mess with the headliner to run the electrical wiring to the microphone housing.
3) I took the visors to my local Tesla Service Center, and they installed them (no charge). The installation applied only to the mechanical installation of the visor itself-- no electrical connections were to be made, as there was no wiring harness pre-installed in the headliner for the visors (see further comments about that below). According to our agreement prior to installation, they were going to run my custom-made wire pairs from the visors through the headliner to the microphone housing, for me to deal with later. I have not yet verified that this is in fact what they did.
4) A local Tesla expert used access to Tesla Service Manuals to kindly advise me as to the location of 12V "accessory" power (power that is not always on) for my March 2017 Model S. The wiring that supports the electrochromic darkening feature of the rear view mirror runs into the mirror enclosure from the headliner near the microphone housing, and includes a red/blue striped wire that supplies +12V on the accessory rail. Any ground wire (black, or black with white stripe) can serve as ground. My expert did not seem to think the addition of connections for the LEDs of the vanity mirrors was going to pose a problem in terms of excessive current draw on the existing circuit.
5) I have no idea as to whether the wires running to the visors care about which of them attaches to 12V or ground (put differently, I don't know whether the wiring to the visors is polarized). Perhaps someone else can chime in on that issue.
6) Presumably, I will use some sort of tap to provide a connection for my visor wiring, as I would not want to cut or solder any of the factory installed accessory power wiring.
You snip off the tesla connector and just so[l]der directly to the stubs it's fairly easy just 2 wires 12v and ground. Leave yourself enough wire to reach all the way to the central speaker grill in the headliner. Works like a charm.
I believe these instructions apply only to the subset of Model S vehicles for which a wiring connector was installed at the point of connection of the visors, with a future illuminated vanity mirror in mind. This was not the case for my March 2017 version, which had no pre-installed wiring for the visors. This will be the case for many other runs of the Model S. Even for those lucky few who have a pre-installed wiring harness waiting for them under the headliner where the visors attach, it would be cleaner to use my custom-made cables, soldering those to the pre-installed wires, and then cleanly plugging the connector into the visor's matching connector.
Last edited: