Welcome to Tesla Motors Club
Discuss Tesla's Model S, Model 3, Model X, Model Y, Cybertruck, Roadster and More.
Register

Model S Pinewood Derby Car

This site may earn commission on affiliate links.
I thought this might be a fun project but I am quickly finding that I lack the necessary skills. Are there any engineers out there that might be interested in working on this? Ideally someone with a CNC machine that can do 3D objects. I was thinking it would be cool to create maybe a run of 20 or so and sell them on here for a nominal price to offset the development time/cost.

I found a very good 3D model of the Tesla here:
Tesla Model S 2012 3D model - Humster3D

This would then need to be modified to pinewood derby specs (H/W/D) and probably the wheelwells altered to fit the pinewood derby wheels/axles.

Again, much of this is beyond my present abilities, but I'm sure there are engineers on here that might think this is a fun project. I have a year until our next race...

Anybody up for a collaboration?
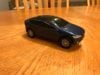
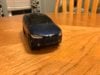
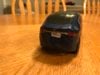
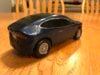
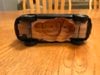
 
I might try this on my CNC. A 3D print would be fun to try as well but I don't have a 3D printer. They don't seem to offer an STL file option though and that is what you would want for CNC or 3D print.

It looks like you can request other formats. I suspect somewhere there are converters. Let me know if you think it would be worth pursuing. I certainly can front the cost of the 3D file.

Also, there are other files out there but this once seemed the best and was more reasonably priced.
 
My son and I got pretty good at Pinewood Derby. After finishing dead last in his pack when we started, we finished 5th in the Council when he was a WEBLOS.

The challenge to the Model S design is the wheels are inboard, as in within the fender. That requires a wide piece of wood. We always started with the standard block of wood in the kit.

The key to speed is the wheels and axles. And where you place the weights.
 
We did a "Model S" like vehicle for my son's pinewood derby earlier this year. He still loves the car, but I wish it had turned out better (like said above, a wider piece of wood would have been better).
We did it all with chisel and dremel work, and put a slab of weight in the bottom where the battery pack would go.
IMG_4150.jpg


IMG_4160.jpg


IMG_4161.jpg
 
My son's Model X pinewood derby car. I doubt it will be very fast - the focus was on authenticity. As has previously been stated, the regular kit's block was too small. I bought a 4x4 (Douglas fir - that's pine, right?), and cut a 7 inch length, then to the maximum width (2 3/4"). Then I printed and taped a side shot of the X to the side (resized to be 7" long). I then used a 1 3/8" Forstner but with a drill press to make the wheel wells (1/2" deep, making the inner width 1 3/4" - marked with the original pine block). Then I used a band saw to cut the profile. Then I taped a top-down shot of the X to the (still flat) bottom, and used the band saw again to cut those corners. Then I got the axle shafts with the bandsaw (in retrospect I should have done those first - both to have a flat side to make straight cuts, and also to more easily center the wheel wells (I ended up with one well off by nearly a 1/4")). From there I used hand sanding and a Dremel with a sanding thingy to smooth out the rough cut from the band saw, and cut other details. I'm especially proud of the back end with the lip under the spoiler, and the recessed license plate area; the depression on the back sides of the lift gate; and the fog lights on the front (and the front lip and mustache, but those came out pretty good from just the band saw).

I did the blue paint first with a spray can, then the rest by hand in several stages with regular model paint, referencing a few different photos, and periodically walking out to the garage :). I really like how well the black trim around the wheel wells and the rocker panels turned out. The chrome trim around the windows, and the lines showing the doors (fine point sharpie) didn't turn out so straight and fine, but my hands were trembling by that point from doing too much at once.

Finally, it was WAY overweight, so I had to gut it from the bottom with various Forstner bits on the drill press. I was terrified I would go right through it, and had to remove a lot more than I thought I would.

Overall I think it turned out pretty well, given the ad hoc nature of most of it. Now to watch it lose with my not-straight wheels!
 

Attachments

  • IMG_0411.JPG
    IMG_0411.JPG
    361.1 KB · Views: 487
  • IMG_0412.JPG
    IMG_0412.JPG
    343.6 KB · Views: 411
  • IMG_0413.JPG
    IMG_0413.JPG
    281.6 KB · Views: 566
  • IMG_0415.JPG
    IMG_0415.JPG
    316.2 KB · Views: 491
  • IMG_0414.JPG
    IMG_0414.JPG
    320.9 KB · Views: 480