Welcome to Tesla Motors Club
Discuss Tesla's Model S, Model 3, Model X, Model Y, Cybertruck, Roadster and More.
Register

Model Y Accessories for Australia

This site may earn commission on affiliate links.
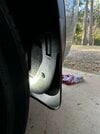
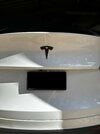
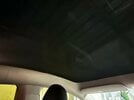
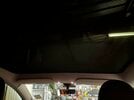
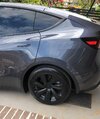
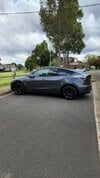
Got my car 2 weeks ago. Finally got around to installing some of the accessories.

  • Mudguards from Amazon look and installed like a breeze. Blend with the existing exterior plastic really well.
  • Black Etsy logos look great imo
  • Installed the Tesla roof shade also. Has made a big difference hit wise in Brisbane. Also looks better than I expected.
3E002DF3-93A6-4FA8-8213-B2CAEEA788AC.jpeg
 

Attachments

  • 60AF18BB-31BB-419A-9C82-EFCF4110ABF6.jpeg
    60AF18BB-31BB-419A-9C82-EFCF4110ABF6.jpeg
    337.1 KB · Views: 235
  • BA6483D5-B427-4F8D-903A-66CDBF9895DA.jpeg
    BA6483D5-B427-4F8D-903A-66CDBF9895DA.jpeg
    223.8 KB · Views: 253
I haven't had that issue IF you remove them using the same technique as for removing the Tesla hub caps.

  1. Start at one wheel spoke a pop it off with your hands (gloves makes it easier) by pulling it off against the tyre.
  2. Once it has popped off, skip one spoke and repeat step 1 with the next spoke.
  3. Keep repeating all the way around until the hub cap had come off all of the wheel spokes.
  4. The hub cap then easily comes off the wheel hub.
I ended up getting some of these on AliExpress. And yes, they come for RHS and LHS so had to make sure each side is correct.
There was no way to pull them off with the ease like the Gemini hubs. I read some other vexed person went to a tyre place and they could not get them of without probably breaking them...
I ended up using three pry tools for each spoke applying pressure and reaching behind squeezing the clips together a little. Pop it went.
Hope this helps some poor soul who tried in vain.
 
but model Y steering wheel is not Alcantara but some ugly plastic with pathetic name "vegan leather" (quite an oxymoron word...)
I meant if the steering wheel was wrapped in Alcantara would it give you also the jeebies?
You can get many lather steering covers on AliExpress ------- but you will have to do the final stitching on with the twine supplied. You also get some basic instructions and there is YT for a bit more help. Some guys get their misses to do it, not wanting to sound derogatory. It just needs a little finesse.

And yes, the stuff that is used by Tesla and few others of the vegan variety is quite horrible to touch.
 
To follow up on this my friend did order the UMC from the Tesla web shop that said 8/12amp tails and it arrived yesterday. It appears it might be a bit of a pot luck system as she did get plugs which say 10 and 15 amp but I do recall someone on FB did get ones labeled 8/12 so maybe it's a bit of a pot luck? Tesla did end up saying in writing to her after she ordered that they were limited ones. Go figure
It did come with the funny old S/X adaptor thing.
End result is that I am pretty sure it's the one which will be updatable to 10/15amp once it gets used but can't test that until her car arrives in a few weeks. So that is positive news for her that she will get that extra 20% when charging.
For anyone else wondering, I got mine from the shop this week and I got the tails which said 10/10 and 15/15 on them luckily. I’ve just managed to update to max out the speed.
 
Thanks for linking that - will be very handy for me. I hope it all works in reverse!
Keep us updated on how your pull apart goes.
Hello @alliwantisaY Further to my previous posts about mounting my phone holder in my Model Y. I mounted it with double sided tape to the back of the monitor and the holder itself now sits between the monitor and steering wheel.
To run the charging cord:
Fitting a USB-C lead through the Instrument Panel (IP)
  • To do this task, I used a straightened wire coat hanger, a roll of insulation tape, a few different plastic pry tools, Zip ties, some decent 50mm Black Gaffer tape (bunnings; while your there, get some 50mm Velcro and ~50mm double sided Tape, you will thank me later) and from memory, a T20 Torx bit. And of course, a decent 2 metre USB-C, try and pick-up a lead on eBay ETC that is braded and has a right-angle plug on at least one end. This will go into the console area.

  • Remove the timber section of the IP (Instrument Panel). This is quite easy to do, there are plenty of YouTube videos on how to do this. You know you can watch YouTube on the car’s monitor!
  • Then remove the vinyl section of the centre console. The clips hold it in very tight and are difficult to pry loose. See YouTube again if needed.
  • CAUTION the in-dash phone charger is glued to the vinyl section, DO NOT try to pry this loose. Come at it from the Console binnacle.
  • Using a straightened wire coat hanger. Place some insulation tape over the end to eliminate scratches etc.
  • Next locate a pathway for the USB-C lead. There is a slight passageway on the passenger side of the HVAC vent-tubes and the glove box.
  • Patiently poke away gingerly, to locate the pathway. I found going up from below worked better. I also tend to work out my strategy first, before pulling the cable through.
    • This is a three-part process.
    • To get the cable below the dash area.
    • To get the cable from the side of the console area through behind and between the HVAC plumbing.
    • Through to the centre console and into the forward console binnacle, to plug the lead into the existing USB-C plug.

  • Once you have located a pathway, use insulation tape to attach the USB-C lead to the coat hanger, making sure you tape the entire USB plug to the coat hanger to lessen the chance of snagging and damaging the USB plug.

  • The centre console area has a pathway for the USB lead under the sliding lead. Route the cable through, making sure the sliding console lid works accordingly. Use a decent Cloth (gaffer) tape or something semi-permanent to hold the USB cable in position so it doesn’t come loose and stop the sliding console door from operation properly.

  • Tape the USB cable to the inside of the console to prevent snagging. By using a right-angle USB plug in here, will limit the amount the lead that protrudes out into the console binnacle and can be damaged. You could also place a hard plastic cover over the plug if desired, further preventing future damage.

  • I routed the USB-C cable out from the IP behind the monitor. I you look there is a larger gap there.

  • Locate and tuck away any unused cable into an area where it’s not going to create a later issue.

  • Once happy with the routing of the cable, use Zip ties or gaffer tape or something semi-permanent to hold the cable in position, especially up on top of the dashboard. Pay particular attention to where the clips on the timber section plug into the IP.

  • Locate and make sure the spring clips are in the correct position to close everything up.

  • Refit the IP and console cover. Use some baby wipes to wipe down the area to clean any fingerprints etc off.
In the end there was no need to cut or drill anywhere. The fit and finish is perfect other that the actual Ramm Mount that I used. While the Ramm mount is professional and robust, I have been using Ramm Mounts for 20 years and they have a lifetime warranty. It doesn’t really look as elegant as the rest of the car. However, I used what I had previously purchased for other vehicles.
 
  • Like
Reactions: alliwantisaY
If anyone is interested in seeing a review on accessories I recently purchased (console tray, non slip chrome brake pads and jack pads).
I have also ordered Weather floor mats and other accessories from Tessories and Tesla so will do a review of those and share as I receive them. Hope it helps. Cheers

 
  • Like
Reactions: elddum