Welcome to Tesla Motors Club
Discuss Tesla's Model S, Model 3, Model X, Model Y, Cybertruck, Roadster and More.
Register

Model Y Mud Flap Saga

This site may earn commission on affiliate links.
Don’t those stick down closer to the ground though?
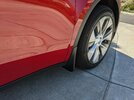
no -- they look practically identical to the RPM ones but they use a metal clip to hold on - which RPM doesn't have. Here's a pic of my basenor ones.
 

Attachments

  • PXL_20210328_200231468.jpg
    PXL_20210328_200231468.jpg
    525.5 KB · Views: 2,077
My experience:
One rear bolt removed fine using the excellent WD40 method from the video.
The other rear fastener broke free on the first turn, so no opportunity to dowse in WD40.
Examining afterwards it was held with the tiniest bead and had lots of locktite, so inevitable.
Wasted 1 hour trying all possible methods to grip the 'nut' by removing part of the wheel-well liner, but really it's a circular fastener so impossible to grip.
In the end hacksawed through the bolt - surprisingly easy (soft metal), used a flexible blade to avoid scratching the bumper to much.
Replaced with the plastic push-through rivet from the mud flap kit, seems perfectly solid.
TLDR: If you shear the fastener, just hacksaw the bolt, don't both trying to grip the fastener.
 
I bought the Basenor mud flaps on Amazon. Like many, I had to deal with the difficulty of one of the bolts being difficult to remove. The passenger side was no problem; the driver's side was hard and I ignorantly torqued it until the internal spot weld holding the nut snapped, and then the bolt was stuck, spinning freely. Thought I'd help others who fell into this trap.

One thing I couldn't figure out was how to get the mud flap on with the nut/bolt. Since installing the mud flap requires the fender liner to be popped back in place, I have no access to hold the nut from spinning while screwing in the bolt. In RPM's video, they solved this by using a plastic grommet. The grommets that come with the flap are the same size as the Tesla ones in the fender liners are are not a good length to replace the bolt in a secure way. Would welcome suggestions or a solution for this!

IMG_4075.png


I recommend some vice grips like these with narrower tips to get at the nut.

vice grips.png


After you follow the instructions to remove the two plastic grommets and the thumbscrew in the fender liner, you can pop the liner off the fender with a flathead screwdriver and look at the problem area.

IMG_4084.png


Once you get a good grip on the nut and some WD40 or liquid wrench, you can get the bolt free of the nut. And here's the nut itself.

nut.png
 
I ordered the BASNOR flaps from Amazon. Took me maybe 20 minutes total for all 4, including watching the 2 minutes install video.
Not sure what people mean by the need to remove a bolt. There is a nut to unthread on the underside. Came off just fine with the proper ratchet size, no issues. Went back on just fine too.
Are they the prettiest flaps? No, not really. But they do what they are supposed to.
 
Hey guys. Do you think its necessary to install both the mud flaps along with the PPF that Tesla? I wasn't sure if the mud flaps provided enough coverage to negate the PPF
I definitely noticed that dirt and water was getting up on the rear doors even with the Basenor flaps installed in the front -- I ended up installing ppf for the rear doors that I bought on Abstract Ocean. I think both is probably a good idea.
 
I ordered the BASNOR flaps from Amazon. Took me maybe 20 minutes total for all 4, including watching the 2 minutes install video.
Not sure what people mean by the need to remove a bolt. There is a nut to unthread on the underside. Came off just fine with the proper ratchet size, no issues. Went back on just fine too.
Are they the prettiest flaps? No, not really. But they do what they are supposed to.
Same, I got those too and work perfectly. easy install
 
  • Like
Reactions: Mourron
Installed the Basenor flaps tonight. Install went well...appreciate the extra metal clip. Feels very secure and its not "floppy" on the top. Like most, I would have appreciated a filled/flat plastic instead of the hollow front that would collect extra dirt. But time will tell if that is actually an issue or not.

I was going to do this method ->

A simpler way to install Model Y mud flaps

Which seems more foolproof. Though, last night I did the wd-40 method to loosen the two screws, where I loosened/tightened about 3 times on each side till I got to a point (on the driver side) where I dared not go any farther since it seemed to be getting too tight. The flaps didn't arrive till today....so when I went back to loosen them, they seemed looser than last night so I "dared" and completely removed them.

I think the 24 hour wd-40 "soak" helped a lot.
 
The passenger side was no problem; the driver's side was hard and I ignorantly torqued it until the internal spot weld holding the nut snapped, and then the bolt was stuck, spinning freely. Thought I'd help others who fell into this trap.

Help! This happened to my bolt, it's stuck and spinning - how do I resolve this?
 
I don't see how the rear mudflaps add any protection nor is it needed. I elected to only install the front flaps and Tesla PPF to rear doors. From what I've read, the two choices for a broken weld on rear bolts are a) remove wheel well liner and grip nut with vise-grip and unscrew nut or b) grip external nut with vice-grip and saw off bolt...don't know if the remaining fragment is a problem or not.